Introduction
Welcome to the documentation of the Jolie programming language.
What is Jolie?
Jolie is a service-oriented programming language: it is designed to reason effectively about the key questions of (micro)service development, including the following.
- What are the APIs exposed by services?
- How can these APIs be accessed?
- How are APIs implemented in terms of concurrency, communication, and computation?
How does it look?
This is a simple service for greeting clients.
// Some data types
type GreetRequest { name:string }
type GreetResponse { greeting:string }

// Define the API that we are going to publish
interface GreeterAPI {
    RequestResponse: greet( GreetRequest )( GreetResponse )
}

service Greeter {
    execution: concurrent // Handle clients concurrently

    // An input port publishes APIs to clients
    inputPort GreeterInput {
        location: "socket://localhost:8080" // Use TCP/IP
        protocol: http { format = "json" }    // Use HTTP
        interfaces: GreeterAPI     // Publish GreeterAPI
    }

    // Implementation (the behaviour)
    main {
        /*
        This statement receives a request for greet,
        runs the code in { ... }, and sends response
        back to the client.
        */
        greet( request )( response ) {
            response.greeting = "Hello, " + request.name
        }
    }
}
If you have installed Jolie (get it here), you can save the code above in a file called greeter.ol and then launch it from the terminal with the command:
jolie greeter.ol
The service is now waiting for client requests. Run
curl http://localhost:8080/greet?name=Jolie
and you will see the output
{"greeting":"Hello, Jolie"}
Service-orientation
More in general, Jolie brings a structured linguistic approach to the programming of services, including constructs for access endpoints, APIs with synchronous and asynchronous operations, communications, behavioural workflows, and multiparty sessions. Additionally, Jolie embraces that service and microservice systems are often heterogeneous and interoperability should be a first-class citizen: all data in Jolie is structured as trees that can be semi-automatically (most of the time fully automatically) converted from/to different data formats (JSON, XML, etc.) and communicated over a variety of protocols (HTTP, binary protocols, etc.). Jolie is an attempt at making the first language for microservices, in the sense that it provides primitives to deal directly with the programming of common concerns regarding microservices without relying on frameworks or external libraries. Our aim is to provide a tool that aid developers in producing and managing microservice systems more effectively.
Where do I go from here?
Check out the menu on the left.
If you want to get started, go to section Getting Started.
Section Tutorials covers practical tutorials on particular scenarios, collected by our contributors.
Section Language, Tools, and Standard Library explains how to use the language (both basic and advanced constructs) and its accompanying tools and libraries.
Get in touch
If you have comments or requests on this documentation or Jolie in general, you can see how to reach us at this link: https://www.jolie-lang.org/community.html. We look forward to hearing from you.
Enjoy Jolie!
The Jolie Team
![]()
Getting started
This an introductory tutorial for getting confidence with the Jolie language. You will learn to:
- define an interface for a service;
- program and run a service;
- set the execution modality.
As a reference example, here we are creating a service which implements a simple basic calculator. In particular, the service will provide four basic operations for each of the basic arithmetic ones: sum, subtraction, multiplication and division.
Define an interface for a service
Jolie enables the developer to follow a contract first programming approach. This means that, before starting with the development, it is necessary to define the API of the service. In Jolie, this can be done by defining the interface. An interface contains a list of functionalities, called operations, which can be implemented by a service. In the following we report a first draft of an interface for a calculator:
interface CalculatorInterface {
    RequestResponse:
        sum,
        sub,
        mul,
        div
}
This code can be read as defines an interface called CalculatorInterface which contains four operations of type RequestResponse called sum, sub, mul and div respectively. It is worth noting that there are two possible types for the operations: RequestResponse and OneWay. The former represents a synchronous exchange which involves a request message and a response message, whereas the latter represents an asynchronous exchange where there is only a request message without any response.
Save this code into a specific file called CalculatorInterfaceModule.ol, we will import it later from the service module.
Define message types
So far, we have just defined an interface as a list of operations without specifying anything about the signatures of the operations. In Jolie it is possible to define message types in order to specify the structure of the messages. In the following we enhance the previous definition of the interface, by adding message types.
type SumRequest: void {
    term[1,*]: int
}

type SubRequest: void {
    minuend: int
    subtraend: int
}

type MulRequest: void {
    factor*: double
}

type DivRequest: void {
    dividend: double
    divisor: double
}

interface CalculatorInterface {
    RequestResponse:
        sum( SumRequest )( int ),
        sub( SubRequest )( int ),
        mul( MulRequest )( double ),
        div( DivRequest )( double )
}
Some interesting things to note:
- in Jolie there are basic data types as integers, string, double, etc. In the example we exploit
int(integers) for all the operations with the exception of operations multiplication and division where we use typedouble. You can check the other basic types here; - the keyword
typeallows for the definition of structured data types; - an operation message type is just a data type associated with it into the definition of the operation. As an example the request message of operation
sumisSumRequestwhereas the reply is just aint; - a data type structure in Jolie represents a tree of nodes. As an example, type
DivRequestcontains two subnodes nameddividendanddivisorrespectively. Both of them aredouble; - a node in a data structure can be a vector. As an example node
termof typeSumRequestis a vector ofint.[1,*]stands for: minimum occurrences 1 and maximum occurrences infinite. We readterm[1,*]:intas an unbounded vector of int with at least one element;
Program and run a service
Once we have defined the interface to implement, we are ready to define the service. Let's call the service CalculatorService. Edit a new module as follows:
from .CalculatorInterfaceModule import CalculatorInterface

service CalculatorService {

}
This code permits to import the definition of the CalculatorInterface from module CalculatorInterfaceModule stored into file CalculatorInterfaceModule.ol and defines a service called CalculatorService. The dot prefix tells Jolie that it should find the module in the same directory.
Defining the inputPort
Unfortunately, the code above will raise an error if executed, because the service definition does not contain any listening port nor any behaviour too. Let's start by defining a listening endpoint for this service:
rom .CalculatorInterfaceModule import CalculatorInterface

service CalculatorService {

    inputPort CalculatorPort {
        location: "socket://localhost:8000"
        protocol: http { format = "json" }
        interfaces: CalculatorInterface
    }
}
Listening endpoints in Jolie are called inputPort. In this example we defined one inputPort named CalculatorPort. An inputPort always requires three parameters in order to be properly set:
- location: it specifies where the service is listening for messages. In the example
socket://localhost:8000wheresocketdefines the medium used for the communication; - protocol: it specifies the protocol do use for interacting with the service. In this example is
http. In particular, protocol http is parameterized setting propertyformattojsonwhich means that the message body of the http message is a JSON; - interfaces: it specifies the interfaces available at the port. In this case the interface
CalculatorInterfaceis defined. Summarizing we can read the inputPort definition of this example as follows: _start to listen on a socket of localhost at port 8000. Use protocol http for interpreting received messages and preparing responses too. Enable all the operations defined into CalculatorInterface`.
Defining the behaviour
Now, the service is ready to receive messages on the operation specified in interface CalculatorInterface but we did not tell it what to do once a message is received. It is time to finalize the service by specifying the behaviour:
from .CalculatorInterfaceModule import CalculatorInterface

service CalculatorService {

    inputPort CalculatorPort {
        location: "socket://localhost:8000"
        protocol: http { format = "json" }
        interfaces: CalculatorInterface
    }

    main {

        [ sum( request )( response ) {
            for( t in request.term ) {
                response = response + t
            }
        }]

        [ sub( request )( response ) {
            response = request.minuend - request.subtraend
        }]

        [ mul( request )( response ) {
            response = 1
            for ( f in request.factor ) {
                response = response * f
            }
        }]

        [ div( request )( response ) {
            response = request.dividend / request.divisor
        }]
    }
}
Some interesting things to be noticed:
- the behaviour is set within scope
main; - the list of operations are specified using input choices. This is why you see square brackets around the implementation of each operation. Briefly, when more than one operation is put within an input choice, it means they are all available but only that which receives a message is executed;
- each operation specifies a variable which contains the request message, in the example we named all of them as
request. they specify the variable which will contain the response, in the example we named all of them asresponse; - the code specified within curly brackets in an operation, defines the code to be executed after the reception of a request and the final sending of the response;
- once the body code of a request-response is finished, the content of the variable specified as a response will be actually sent as response message. This means that its data structure must correspond to what is defined into the interface;
- we read
for( t in request.term )as: for each element of vectorrequest.termdo the code within curly brackets. Use tokentfor referring to the current element of the vector.
Running the service
Save the previous code into a module called CalculatorService.ol within the same folder where you previously saved the interface module CalculatorInterfaceModule.ol. Run the service using the following command:
jolie CalculatorService.ol
The service will start immediately waiting for a request.
Sending a request to the service
For the sake of this example, we can use curl as a program for sending a message to the service. Other http clients can be used instead. Running the following clients you can check how the different operations reply:
- sum:
curl 'http://localhost:8000/sum?term=5&term=6&term=20'
{"$":31}
- sub:
curl 'http://localhost:8000/sub?minuend=10&subtraend=5'
{"$":5}
- mul:
curl 'http://localhost:8000/mul?factor=5&factor=2&factor=3'
{"$":30}
- div:
curl 'http://localhost:8000/div?dividend=10.8&divisor=2'
{"$":5.4}
Setting the execution modality
We are quite sure that, if you strictly followed this tutorial, you were able to run only one client and then restart the service because it went down. This is not an error or a malfunction, but it is due to the fact that we did not specify any execution modality for the service CalculatorService. The execution modality specifies three different way to run a service: concurrent, sequential or single. If nothing is specified, modality single is set. This modality means that the service executes its behaviour once, then stops. This is why our service just executed one operation and then stopped.
In order to enable the service to continuously serve requests we need to specify the execution modality concurrent.
So, let's admire our first service in Jolie!
from .CalculatorInterfaceModule import CalculatorInterface

service CalculatorService {

    execution: concurrent

    inputPort CalculatorPort {
        location: "socket://localhost:8000"
        protocol: http { format = "json" }
        interfaces: CalculatorInterface
    }

    main {

        [ sum( request )( response ) {
            for( t in request.term ) {
                response = response + t
            }
        }]

        [ sub( request )( response ) {
            response = request.minuend - request.subtraend
        }]

        [ mul( request )( response ) {
            for ( f in request.factor ) {
                response = response * f
            }
        }]

        [ div( request )( response ) {
            response = request.dividend / request.divisor
        }]
    }

}
The complete example
The complete example of this tutorial can be found at this link
Exiting a service
Jolie provides the exit instruction to exit the current program by terminating the running Java virtual machine. In the example above, we could extend our service interface and behaviour with the shutdown operation, which closes the service using the exit instruction — notice that we use the full syntax of input choices here, which is [ inputOperation ]{ post-operation code }.
    main {

        [ sum( request )( response ) {
            for( t in request.term ) {
                response = response + t
            }
        }]

        // ...

        [ shutdown()() ]{
            exit
        }
    }

}
Using dependencies
One of the key features of Jolie, is declaring the dependencies of a service by means of statement outputPort.
An outputPort defines a target endpoint connected with a service and it allows to exchange messages with it.
In this tutorial we are going to show how to use dependencies. We will develop a new service which offers some advanced arithmetic operations,
that uses the four basic arithmetical operations supplied by the CalculatorService described in the tutorial Getting Started.
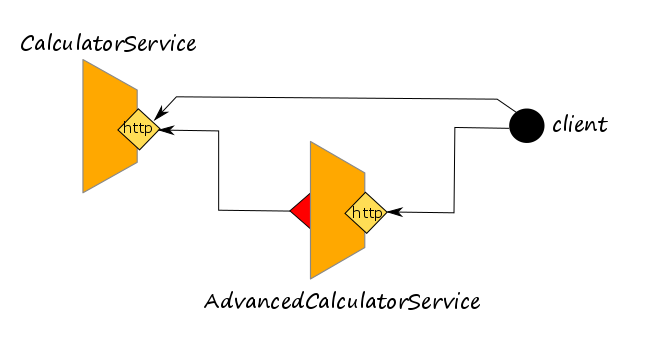
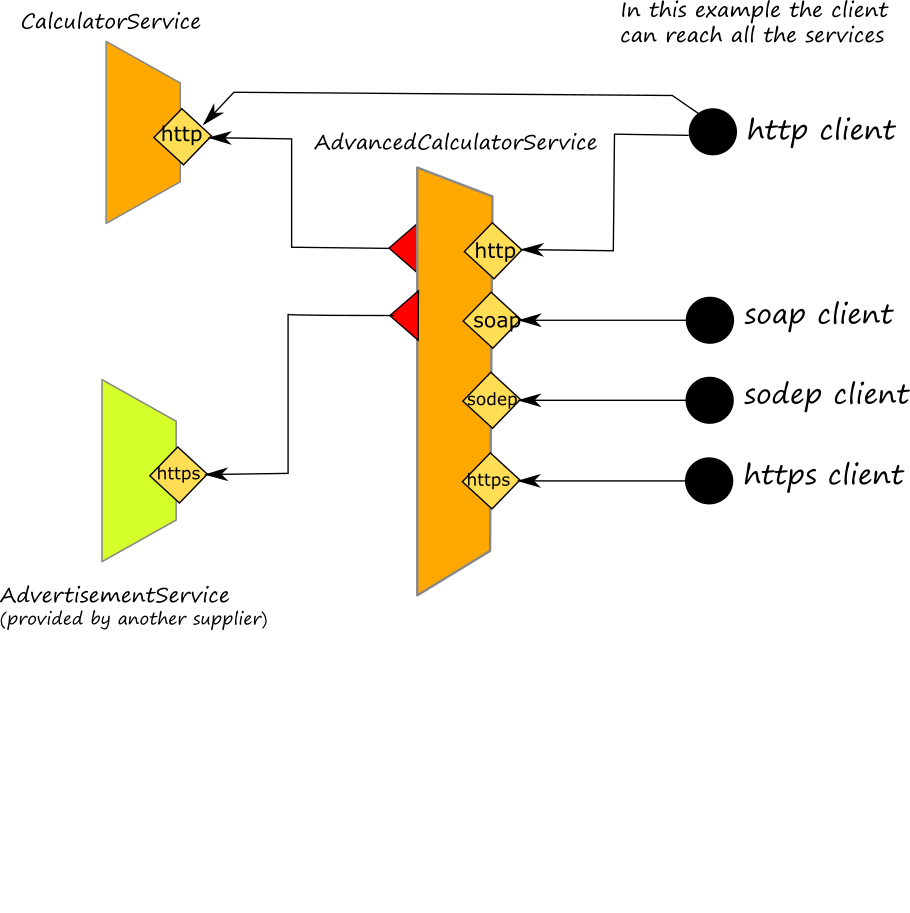
Before illustrating the code, let us depict what we are going to build in the following picture:

The AdvancedCalculatorService will be a new service available for a client together with the CalculatorService. The AdvancedCalculatorService will exploit the operations offered by the CalculatorService in order to supply its own operations.
the interface of the AdvancedCalculatorService
In the following we report the interface of the AdvancedCalculatorService:
type FactorialRequest: void {
    term: int
}
type FactorialResponse: void {
    factorial: long
}

type AverageRequest: void {
    term*: int
}
type AverageResponse: void {
    average: double
}

type PercentageRequest: void {
    term: double
    percentage: double
}
type PercentageResponse: double

interface AdvancedCalculatorInterface {
    RequestResponse:
        factorial( FactorialRequest )( FactorialResponse ),
        average( AverageRequest )( AverageResponse ),
        percentage( PercentageRequest )( PercentageResponse )
}
The service offers three operations: factorial, average and percentage whose meaning is quite intuitive.
Implementation of the AdvancedCalculatorService
In the following we report the actual definition of the AdvancedCalculatorService:
from .AdvancedCalculatorServiceInterfaceModule import AdvancedCalculatorInterface
from .CalculatorInterfaceModule import CalculatorInterface

service AdvancedCalculatorService {

    execution: concurrent

    outputPort Calculator {
        location: "socket://localhost:8000"
        protocol: http { format = "json" }
        interfaces: CalculatorInterface
    }

    inputPort AdvancedCalculatorPort {
        location: "socket://localhost:8001"
        protocol: http { format = "json" }
        interfaces: AdvancedCalculatorInterface
    }

    main {
        [ factorial( request )( response ) {
            for( i = request.term, i > 0, i-- ) {
                req_mul.factor[ #req_mul.factor ] = i
            }
            mul@Calculator( req_mul )( response.factorial )
        }]

        [ average( request )( response ) {
            sum@Calculator( request )( sum_res )
            div@Calculator( { dividend = double( sum_res ), divisor = double( #request.term ) })( response.average )
        }]

        [ percentage( request )( response ) {
            div@Calculator( { dividend = request.term, divisor = 100.0 })( div_res )
            mul@Calculator( { factor[0] = div_res, factor[1] = request.percentage })( response )
        }]
    }
}
It is worth noting that in the first lines we import both the interfaces of the AdvancedCalculatorService and the CalculatorService. We will use the former one for defining the inputPort of the AdvancedCalculatorService, whereas we will use the latter one for defining the outputPort towards the CalculatorService. Both the declarations can be found before the definition of scope main.
Note that the location of an outputPort defines the target location of the service to be invoked; the protocol must correspond to that defined into the corresponding inputPort; and, finally, the interface is used to declare all the available operations that can be used with that dependency. It is not mandatory that the interface defined into an outputPort must be the same of that defined in the corresponding inputPort, but it is important that all the operations in that of the outputPort are defined into the target inputPort too.
The behaviour
The behaviour contains the code of the three operations where each of them exploits at least one operation of the CalculatorService. Operation factorial uses mul@Calculator, operation average uses sum@Calculator and div@Calculator, finally operation percentage uses div@Calculator and mul@Calculator.
The primitive we use for invoking a RequestResponse (in this case a RequestResponse of the CalculatorService) is called SolicitResponse. It is a synchronous primitive which sends a message and waits for its response before continuing. Its syntax is quite simple: it requires the name of the operation to be invoked, followed by @ and the name of the outputPort operation which defines the dependency (in this case the name of the outputPort is Calculator). Let us discuss here, what happens in operation average: the first thing is to make the sum of all the received terms. Luckily, the type of the request message of operation average is equal to that of operation sum at the CalculatorService, thus we can just send the same message (sum@Calculator( request )( sum_res )). Then, we just divide the summation by the number of received terms. We use the operation div for achieving such a result.
Tips: character #, when used before a variable path, plays the role of operator size and it returns the number of the elements of the related vector. In the example, we read the statement #request.term as the number of elements of vector term within the node request.
Running the example
In order to run the example, we need to launch both CalculatorService and AdvancedCalculatorService. Thus, we need to open two shells and run the following commands, one for each shell:
jolie CalculatorService.oljolie AdvancedCalculatorService.ol
In a third shell, try to run the following clients:
curl 'http://localhost:8001/factorial?term=5'curl 'http://localhost:8001/average?term=1&term=2&term=3'curl 'http://localhost:8001/percentage?term=50&percentage=10'
The complete example
The complete example can be found at this link
Using more than one dependency
In this tutorial we specialize the system of services presented in tutorial Using Dependencies.
In particular, here we suppose to add an advertise message to each call of the AdvancedCalculatorService. The message is retrieved by invoking an external service not implemented in Jolie but exposed using REST.
In the architecture, the AdvancedCalculatorService has one dependency more, from which it can get the advertise messages.
In order to simulate the advertise message provider, here we exploit a funny service which returns Chuck Norris jokes.
The new interface of the AdvancedCalculatorService
In the following, we report the new interface of the AdvancedCalculatorService that we modified in order to deal with the advertise messages.
type FactorialRequest: void {
    term: int
}
type FactorialResponse: void {
    factorial: long
    advertisement: string
}

type AverageRequest: void {
    term*: int
}
type AverageResponse: void {
    average: double
    advertisement: string
}

type PercentageRequest: void {
    term: double
    percentage: double
}
type PercentageResponse: double {
    advertisement: string
}

interface AdvancedCalculatorInterface {
    RequestResponse:
        factorial( FactorialRequest )( FactorialResponse ),
        average( AverageRequest )( AverageResponse ),
        percentage( PercentageRequest )( PercentageResponse )
}
It is worth noting that all the response messages, now contain a new field called advertisement that is a string. Thus we expect to receive a new advertise message for each operation call.
The behaviour of the AdvancedCalculatorService
In the following we report the definition of the AdvancedCalculatorService.
from .AdvancedCalculatorServiceInterfaceModule import AdvancedCalculatorInterface
from .CalculatorInterfaceModule import CalculatorInterface

interface ChuckNorrisIface {
    RequestResponse: random( undefined )( undefined )
}

service AdvancedCalculatorService {

    execution: concurrent

    outputPort Calculator {
        location: "socket://localhost:8000"
        protocol: http { format = "json" }
        interfaces: CalculatorInterface
    }

    outputPort Chuck {
        location: "socket://api.chucknorris.io:443/"
        protocol: https {
            .osc.random.method = "get";
            .osc.random.alias = "jokes/random"
        }
        interfaces: ChuckNorrisIface
    }

    inputPort AdvancedCalculatorPort {
        location: "socket://localhost:8001"
        protocol: http { format = "json" }
        interfaces: AdvancedCalculatorInterface
    }

    main {
        [ factorial( request )( response ) {
            for( i = request.term, i > 0, i-- ) {
                req_mul.factor[ #req_mul.factor ] = i
            }
            mul@Calculator( req_mul )( response.factorial )
            random@Chuck()( chuck_res )
            response.advertisement = chuck_res.value
        }]

        [ average( request )( response ) {
            {
                sum@Calculator( request )( sum_res )
                div@Calculator( { dividend = double( sum_res ), divisor = double( #request.term ) })( response.average )
            }
            |
            {
                random@Chuck()( chuck_res )
                response.advertisement = chuck_res.value
            }
        }]

        [ percentage( request )( response ) {
            {
                div@Calculator( { dividend = request.term, divisor = 100.0 })( div_res )
                mul@Calculator( { factor[0] = div_res, factor[1] = request.percentage })( response_mul )
                response = response_mul
            }
            |
            {
                random@Chuck()( chuck_res )
                response.advertisement = chuck_res.value
            }
        }]
    }
Note that:
- there are two outputPorts definitions. The former one points to the
CalculatorServiceas we described in the tutorial Getting Started, whereas the latter one points to the servicechucknorris.iowe use for simulating the advertisement service; - the outputPort
Chuckuses protocolhttps. The location issocket://api.chucknorris.io:443/where the port is the https standard one:443; - the outputPort
Chuckdeclares an interacted with only one operation:random. No types are defined. - the HTTPS protocol has two parameters:
osc.random.methodandosc.random.alias. The former one specifies to use HTTP method GET when operationrandomis invoked; the latter one specifies how to build the url when operationrandomis invoked. In particular, when operationrandomis invoked, the final URL is obtained as the concatenation of the location with the specified alias(api.chucknorris.io:443/jokes/random). alias has been introduced in protocolshttpandhttpsfor mapping service operations with the actual target urls; - in the behaviour of operation
factorialthe operationrandom@Chuckis executed aftermul@Calculator, this means that the request message torandom@Chuckis sent only after receiving the response frommul@Calculator; - in the behaviors of operations
averageandpercentage,random@Chuckis executed in parallel with those directed to serviceCalculator. Parallelism is expressed using operator|. A parallel composition is finished when all the parallel branches are finished. In operationfactorialparallelism can be used too, sequential composition has been used just for illustrating a different way for composing statements; - in the behaviour of operation
average, the response message can be concurrently prepared in the two parallel branches because the assignments involve two different subnodes of variableresponse:response.averageandresponse.advertisement. The parallel assignments on two separate subnodes of the same variable does not trigger any conflict; - in the behaviour of operation
percentage, variableresponseis not directly assigned in the response message ofmul@Calculator( as it happen writingmul@Calculator( { factor[0] = div_res, factor[1] = request.percentage })( response )). It is because a solicit-response always erases the variable used for storing the received reply. So, if the response tomul@Calculatorwas received after the execution ofresponse.advertisement = chuck_res.valuein the parallel branch, the content of nodeadvertisementwould be erased. Using placeholderresponse_muland then making the assignmentresponse = response_mulallows us to just valorize the root value of variableresponsepreserving the contents of the subnodes.
Running the example
In order to run the example, we need to launch both CalculatorService and AdvancedCalculatorService. Thus, we need to open two shells and run the following commands, one for each shell:
jolie CalculatorService.oljolie AdvancedCalculatorService.ol
In a third shell, try to run the following clients:
curl 'http://localhost:8001/factorial?term=5'curl 'http://localhost:8001/average?term=1&term=2&term=3'curl 'http://localhost:8001/percentage?term=50&percentage=10'
The complete example
The complete example can be found at this link
Using more input ports and protocols
In this tutorial we will show how to add more input ports in a service. In such a way, it is possible to enable the service to receive messages with different formats and protocols by exploiting the same behaviour.
In particular, we modify the service AdvancedCalculatorService of the tutorial Using more than one dependency as depicted in the following diagram:
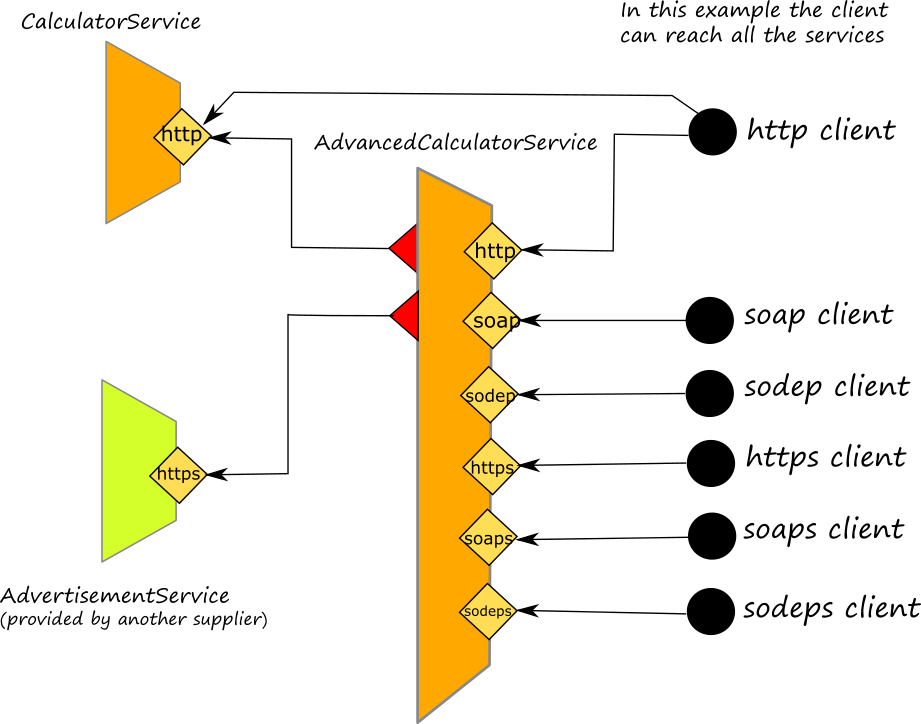
Besides the existing port for protocol http, Input ports will be incrementally added for the following protocols:
All the examples may be consulted at this link
Adding an input port with protocol SOAP
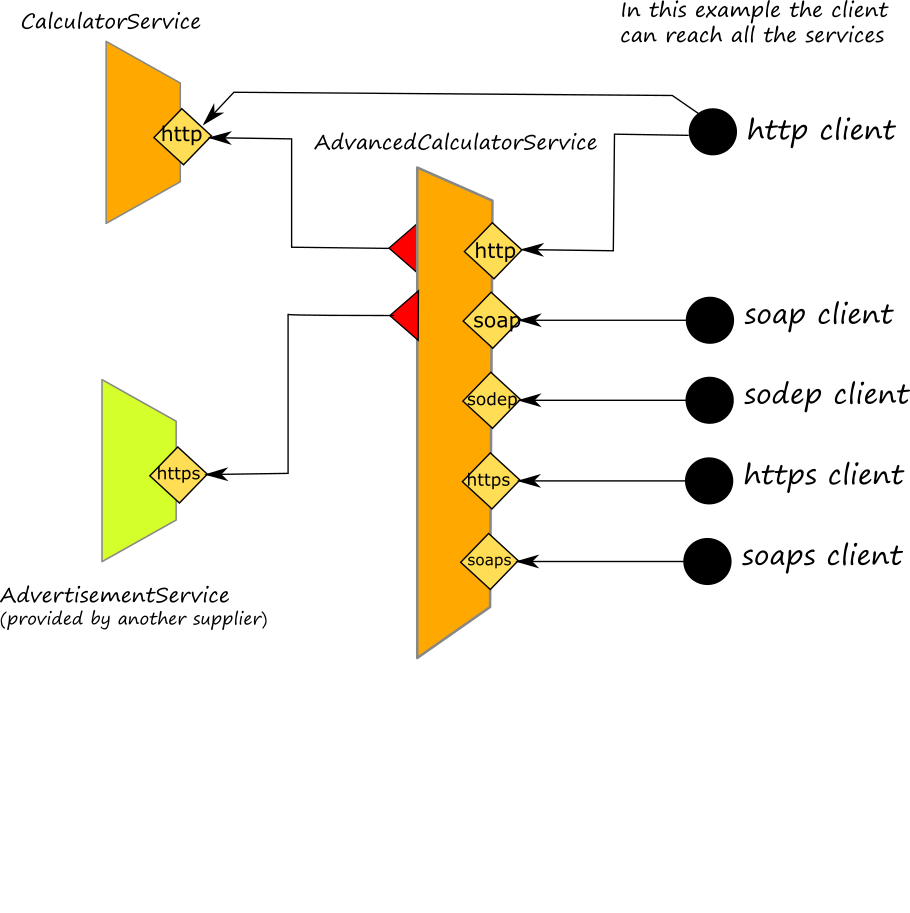
Protocol http/soap is used for exchanging structured information among Web Services. As depicted in the following picture, in Jolie it is possible to add input ports specifically for addressing SOAP messages.
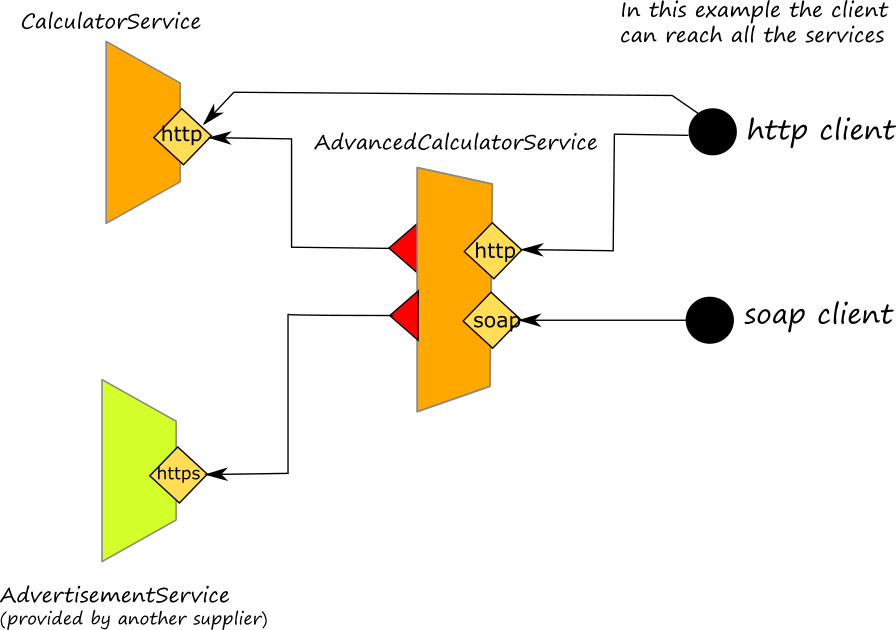
The behaviour of the service is always the same, but a new soap port is added and a soap client can now invoke the service. In the following we describe the steps to follow in order to add a soap port correctly configured.
Adding the port
The first step is adding the inputPort to the code. In our example is:
inputPort AdvancedCalculatorPortSOAP {
    location: "socket://localhost:8002"
    protocol: soap
    interfaces: AdvancedCalculatorInterface
}
From now on, the service will be able to receive messages in soap format on port 8002. But there is not any wsdl document attached to it. Note: jolie does not perform a type check validation at the level of SOAP message for received messages, but messages will be automatically converted into jolie values and then type checked against the jolie interface. As far as the reply messages are concerned, jolie will exploit the wsdl definition for correctly ordering xml sequences, jolie uses not ordered trees, thus subnodes are always unordered and when they are converted into a xml soap format, there is not any guarantee about the order of subnodes. A specific order can be forced using a xml schema within the corresponding wsdl definition. For this reason it is important to attach the wsdl definition to the soap port. In the following section we explaining how to do it.
Generating the wsdl definition
Once the soap port is defined, we need to attach the corresponding wsdl definition to be used together with that port. In the case., the wsdl definition represents the existing jolie interface (in the example it is AdvancedCalculatorInterface) using a WSDL XML notation. Converting manually a jolie interface into a wsdl definition is quite difficult, so we introduced an automatic tool for doing it: jolie2wsdl. It is installed together with the jolie interpreter. Its usage is quite simple, it is a command line tool which accepts some parameters. In our example, the command to run is:
jolie2wsdl --namespace test.jolie.org --portName AdvancedCalculatorPortSOAP --portAddr http://localhost:8002 --outputFile AdvancedCalculator.wsdl AdvancedCalculatorService.ol
where:
- namespace: it specifies the namespace of the wsdl document
- portName: it specifies the name of the soap port from which extracting the wsdl documentation
- portAddr: it is the port address that will appear inside the wsdl definition
- outputFile: it is the output file where the wsdl definition will be stored.
The final result should be similar to the definition at this link
Completing the configuration of the port
Now we are ready to complete the configuration of the soap port as it follows:
inputPort AdvancedCalculatorPortSOAP {
    location: "socket://localhost:8002"
    protocol: soap {
        wsdl = "AdvancedCalculator.wsdl",
        wsdl.port = "AdvancedCalculatorPortSOAPServicePort"
    }
    interfaces: AdvancedCalculatorInterface
}
This new inputPort has been defined for using protocol soap, and it is listening on port 8002. It is worth noting that two parameters are required: wsdl and wsdl.port. The former one specifies the wsdl file to be used by the service for creating correct soap messages, whereas the latter specifies the wsdl port to be attached to the current port.
The complete example
The complete example follows and it may be consulted at this [link] (https://github.com/jolie/examples/tree/master/v1.10.x/tutorials/more_inputports_and_protocols/soap)
service AdvancedCalculatorService {

    execution: concurrent

    outputPort Chuck {
        location: "socket://api.chucknorris.io:443/"
        protocol: https {
            .osc.random.method = "get";
            .osc.random.alias = "jokes/random"
        }
        interfaces: ChuckNorrisIface
    }

    outputPort Calculator {
        location: "socket://localhost:8000"
        protocol: http { format = "json" }
        interfaces: CalculatorInterface
    }

    inputPort AdvancedCalculatorPort {
        location: "socket://localhost:8001"
        protocol: http { format = "json" }
        interfaces: AdvancedCalculatorInterface
    }

    inputPort AdvancedCalculatorPortSOAP {
        location: "socket://localhost:8002"
        protocol: soap {
            wsdl = "AdvancedCalculator.wsdl",
            wsdl.port = "AdvancedCalculatorPortSOAPServicePort"
        }
        interfaces: AdvancedCalculatorInterface
    }

    main {
        [ factorial( request )( response ) {
            for( i = request.term, i > 0, i-- ) {
                req_mul.factor[ #req_mul.factor ] = i
            }
            // The service with the new port can now be run in the same way we did without the soap port:
        [ average( request )( response ) {
            {
                sum@Calculator( request )( sum_res )
                div@Calculator( { dividend = double( sum_res ), divisor = double( #request.term ) })( response.average )
            }
            |
            {
                random@Chuck()( chuck_res )
                response.advertisement = chuck_res.value
            }
        }]

        [ percentage( request )( response ) {
            {
                div@Calculator( { dividend = request.term, divisor = 100.0 })( div_res )
                mul@Calculator( { factor[0] = div_res, factor[1] = request.percentage })( response_mul )
                response.result = response_mul
            }
            |
            {
                random@Chuck()( chuck_res )
                response.advertisement = chuck_res.value
            }
        }]
    }
}
Running the service and invoking it
The complete example can be found here. Since we are extending the example Using more than one dependency, here we need to run two services in two separate shells:
jolie AdvancedCalculatorService.ol
jolie CalcularService.ol
Now the service AdvanceCalculatorService is listening on two ports: 8001 and 8002. Where the former accepts 'http/json' messages and the latter soap messages. Now let us use an external tool for creating a correct soap request. A tool you could use is SoapUI. It is sufficient to import the wsdl file and then fill the request with the value you prefer. In the following picture we prepared a request for the operation factorial.

Adding an input port with protocol SODEP
Protocol sodep is a binary protocol released together with Jolie engine. It is an efficient protocol we suggest to use every time you need to integrate a jolie service with another jolie service.
In the following picture we show how to add an inputPort which provides a sodep protocol in addition to those with http/json and http/soap already discussed.
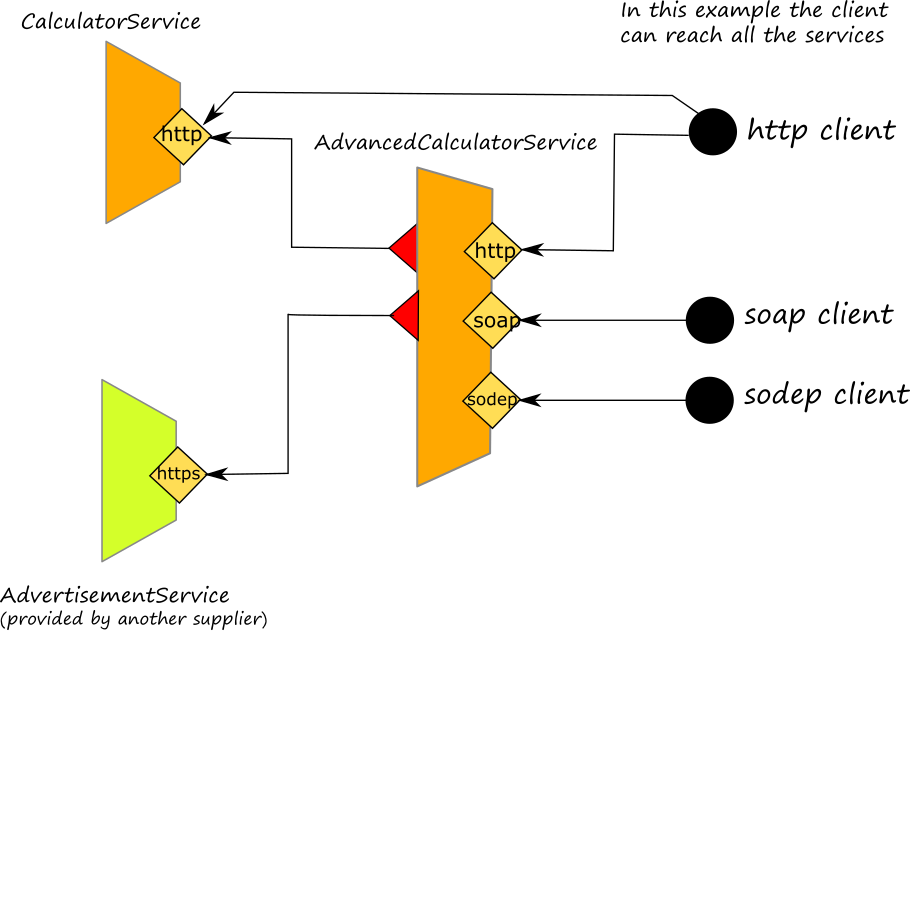
As it happened for the addition of soap protocol input port, also in the case of a sodep protocol input port the behaviour of the service is always the same, and you don't need to modify it.
Adding the port
The first step is adding the inputPort to the code. In our example is:
inputPort AdvancedCalculatorPortSOAP {
    location: "socket://localhost:8003"
    protocol: sodep
    interfaces: AdvancedCalculatorInterface
}
No other actions are required.
The complete example
The complete example follows and it may be consulted at this [link] (https://github.com/jolie/examples/tree/master/v1.10.x/tutorials/more_inputports_and_protocols/sodep)
from .AdvancedCalculatorServiceInterfaceModule import AdvancedCalculatorInterface
from .CalculatorInterfaceModule import CalculatorInterface

interface ChuckNorrisIface {
    RequestResponse: random( undefined )( undefined )
}

service AdvancedCalculatorService {

    execution: concurrent

    outputPort Chuck {
        location: "socket://api.chucknorris.io:443/"
        protocol: https {
            .osc.random.method = "get";
            .osc.random.alias = "jokes/random"
        }
        interfaces: ChuckNorrisIface
    }

    outputPort Calculator {
        location: "socket://localhost:8000"
        protocol: http { format = "json" }
        interfaces: CalculatorInterface
    }

    inputPort AdvancedCalculatorPort {
        location: "socket://localhost:8001"
        protocol: http { format = "json" }
        interfaces: AdvancedCalculatorInterface
    }

    inputPort AdvancedCalculatorPortSOAP {
        location: "socket://localhost:8002"
        protocol: soap {
            wsdl = "AdvancedCalculator.wsdl",
            wsdl.port = "AdvancedCalculatorPortSOAPServicePort"
        }
        interfaces: AdvancedCalculatorInterface
    }

    inputPort AdvancedCalculatorPortSODEP {
        location: "socket://localhost:8003"
        protocol: sodep
        interfaces: AdvancedCalculatorInterface
    }

    main {
        [ factorial( request )( response ) {
            for( i = request.term, i > 0, i-- ) {
                req_mul.factor[ #req_mul.factor ] = i
            }
            mul@Calculator( req_mul )( response.factorial )
            random@Chuck()( chuck_res )
            response.advertisement = chuck_res.value
        }]

        [ average( request )( response ) {
            {
                sum@Calculator( request )( sum_res )
                div@Calculator( { dividend = double( sum_res ), divisor = double( #request.term ) })( response.average )
            }
            |
            {
                random@Chuck()( chuck_res )
                response.advertisement = chuck_res.value
            }
        }]

        [ percentage( request )( response ) {
            {
                div@Calculator( { dividend = request.term, divisor = 100.0 })( div_res )
                mul@Calculator( { factor[0] = div_res, factor[1] = request.percentage })( response_mul )
                response.result = response_mul
            }
            |
            {
                random@Chuck()( chuck_res )
                response.advertisement = chuck_res.value
            }
        }]
    }
}
Running the service and invoking it
Since we are extending the example Using more than one dependency, here we need to run two services in two separate shells:
jolie AdvancedCalculatorService.ol
jolie CalcularService.ol
In this case the client is another jolie script that must be run in a separate shell:
from AdvancedCalculatorServiceInterfaceModule import AdvancedCalculatorInterface
from console import *
from string_utils import StringUtils

service SodepClient {
    outputPort AdvancedCalculatorService {
        location: "socket://localhost:8003"
        protocol: sodep
        interfaces: AdvancedCalculatorInterface
    }

    inputPort ConsoleInputPort {
        location: "local"
        interfaces: ConsoleInputInterface
    }

    embed Console as Console
    embed StringUtils as StringUtils

    init {
        registerForInput@Console()()
    }

    main {
        println@Console("Select the operation to call:")()
        println@Console("1- factorial")()
        println@Console("2- percentage")()
        println@Console("3- average")()
        print@Console("? ")()

        in( answer )
        if ( (answer != "1") && (answer != "2") && (answer != "3") ) {
            println@Console("Please, select 1, 2 or 3")()
            throw( Error )
        }

        if ( answer == "1" ) {
            println@Console( "Enter an integer")()
            in( term )
            factorial@AdvancedCalculatorService( { term = int( term ) } )( factorial_response )
            println@Console( "Result: " + factorial_response.factorial )()
            println@Console( factorial_response.advertisement )()
        }
        if ( answer == "2" ) {
            println@Console( "Enter a double")()
            in ( term )
            println@Console( "Enter a percentage to be calculated")()
            in ( percentage )
            percentage@AdvancedCalculatorService( { term = double( term ), percentage = double( percentage ) } )( percentage_response )
            println@Console( "Result: " + percentage_response.result )()
            println@Console( percentage_response.advertisement )()
        }
        if ( answer == "3" ) {
            println@Console("Enter a list of integers separated by commas")()
            in( terms )
            split@StringUtils( terms { regex = ","} )( splitted_terms )
            for( t in splitted_terms.result ) {
                req_average.term[ #req_average.term ] = int( t )
            }
            average@AdvancedCalculatorService( req_average )( average_response )
            println@Console( "Result: " + average_response.average )()
            println@Console( average_response.advertisement )()
        }
    }
}
Note that in this client the corresponding sodep outputPort is defined. In the behaviour, a simple choice is offered to the user on the console for selecting the operation to invoke. Depending on the choice, the user is asked to insert the specific parameters required by the operation, then the message is sent to the AdvancedCalculatorService. In the following we report an example of an execution:
jolie sodep_client.ol


Select the operation to call:
1- factorial
2- percentage
3- average
? 1
Enter an integer
3
Result: 6
Chuck NOrris is an incredible sitar player.
Adding an input port with protocol HTTPS
Protocol https is a very wide used secure protocol which exploits http over ssl. It is a standard protocol we suggest to use every time you need to secure your APIs following a standard approach.
In the following picture we show how to add an inputPort which provides a https protocol in addition to those with http/json, http/soap and sodep, already discussed in the previous sections.
As it happened for the addition of the other protocol input ports, also in the case of a https protocol input port, the behaviour of the service is always the same, and you don't need to modify it.
Adding the port
The first step is adding the inputPort to the code. In our example is:
inputPort AdvancedCalculatorPortHTTPS {
    location: "socket://localhost:8004"
    protocol: https {
        format = "json",
        ssl.keyStore = "keystore.jks",
        ssl.keyStorePassword = "jolie!"
    }
    interfaces: AdvancedCalculatorInterface
}
Note that protocol https requires a keystore as a reference in order to provide a security certificate to clients.
In this example, we previously generated a key store using the tool keytool. Then, we specified the key store file as a parameter of the protocol ssl.keyStore, together with the password to access it ssl.keyStorePassword.
The complete example
The complete example follows and it may be consulted at this [link] (https://github.com/jolie/examples/tree/master/v1.10.x/tutorials/more_inputports_and_protocols/https)
from .AdvancedCalculatorServiceInterfaceModule import AdvancedCalculatorInterface
from .CalculatorInterfaceModule import CalculatorInterface

interface ChuckNorrisIface {
    RequestResponse: random( undefined )( undefined )
}

service AdvancedCalculatorService {

    execution: concurrent

    outputPort Chuck {
        location: "socket://api.chucknorris.io:443/"
        protocol: https {
            .osc.random.method = "get";
            .osc.random.alias = "jokes/random"
        }
        interfaces: ChuckNorrisIface
    }

    outputPort Calculator {
        location: "socket://localhost:8000"
        protocol: http { format = "json" }
        interfaces: CalculatorInterface
    }

    inputPort AdvancedCalculatorPort {
        location: "socket://localhost:8001"
        protocol: http { format = "json" }
        interfaces: AdvancedCalculatorInterface
    }

    inputPort AdvancedCalculatorPortSOAP {
        location: "socket://localhost:8002"
        protocol: soap {
            wsdl = "AdvancedCalculator.wsdl",
            wsdl.port = "AdvancedCalculatorPortSOAPServicePort"
        }
        interfaces: AdvancedCalculatorInterface
    }

    inputPort AdvancedCalculatorPortSODEP {
        location: "socket://localhost:8003"
        protocol: sodep
        interfaces: AdvancedCalculatorInterface
    }

    inputPort AdvancedCalculatorPortHTTPS {
        location: "socket://localhost:8004"
        protocol: https {
            format = "json",
            ssl.keyStore = "keystore.jks",
            ssl.keyStorePassword = "jolie!"
        }
        interfaces: AdvancedCalculatorInterface
    }

    main {
        [ factorial( request )( response ) {
            for( i = request.term, i > 0, i-- ) {
                req_mul.factor[ #req_mul.factor ] = i
            }
            mul@Calculator( req_mul )( response.factorial )
            random@Chuck()( chuck_res )
            response.advertisement = chuck_res.value
        }]

        [ average( request )( response ) {
            {
                sum@Calculator( request )( sum_res )
                div@Calculator( { dividend = double( sum_res ), divisor = double( #request.term ) })( response.average )
            }
            |
            {
                random@Chuck()( chuck_res )
                response.advertisement = chuck_res.value
            }
        }]

        [ percentage( request )( response ) {
            {
                div@Calculator( { dividend = request.term, divisor = 100.0 })( div_res )
                mul@Calculator( { factor[0] = div_res, factor[1] = request.percentage })( response_mul )
                response.result = response_mul
            }
            |
            {
                random@Chuck()( chuck_res )
                response.advertisement = chuck_res.value
            }
        }]
    }
}
As it si possible to note, here we just added the port AdvancedCalculatorPortHTTPS, thus enabling the service to receive on port 8004 using protocol https.
Running the service and invoking it
Since we are extending the example Using more than one dependency, here we need to run two services in two separate shells:
jolie AdvancedCalculatorService.ol
jolie CalcularService.ol
We can use curl for sending a request to the service.
curl https://localhost:8004/factorial?term=3
WARNING: If you are using a self signed certificate for the example service, use parameter --insecurefor avoiding the validation check of the certificate, otherwise curl will not send any request.
Adding an input port with protocol SOAPS
Protocol soaps uses protocol soap over https and it can be useful when developing a Web Service over a secure communication. https is a standard protocol, an example of its usage has been already commented in the previous section. Here we add an extra input port which allows to expose a soap port, like we did in section soap, over https.
In the following picture we show how to add an inputPort which provides a soaps protocol in addition to those with http/json, http/soap, sodep and https already discussed in the previous sections.
As it happened for the addition of the other protocol input ports, also in the case of a soaps protocol input port, the behaviour of the service is always the same, and you don't need to modify it.
Adding the port
The first step is adding the inputPort to the code. In our example is:
inputPort AdvancedCalculatorPortSOAPS {
    location: "socket://localhost:8005"
    protocol: soaps {
        wsdl = "AdvancedCalculatorSOAPS.wsdl",
        wsdl.port = "AdvancedCalculatorPortSOAPServicePort",
        ssl.keyStore = "keystore.jks",
        ssl.keyStorePassword = "jolie!"
    }
    interfaces: AdvancedCalculatorInterface
}
Note that protocol soaps requires parameters for identifying the wsdl document to use (wsdl) and the related port (wsdl.port) as we did for protocol soap. Here we generated a new wsdl document, in order to provide the correct location for the soaps port. As we did for the soap protocol example, we exploit tool jolie2wsdl,
jolie2wsdl --namespace example.jolie.org --portName AdvancedCalculatorPortSOAPS --portAddr https://localhost:8005 --outputFile AdvanceCalculatorSOAPS.wsdl AdvancedCalculatorService.ol
In this case we saved the wsdl document within file AdvancedCalculatorSOAPS.wsdl that is the file name specified in parameter wsdl.
Moreover, similarly as we did for protocol https, protocol soaps requires a keystore as a reference in order to provide a security certificate to clients. In this example, we previously generated a key store using the tool keytool. Then, we specified the key store file as a parameter of the protocol ssl.keyStore, together with the password to access it ssl.keyStorePassword.
The complete example
The complete example follows and it may be consulted at this [link] (https://github.com/jolie/examples/tree/master/v1.10.x/tutorials/more_inputports_and_protocols/soaps)
from .AdvancedCalculatorServiceInterfaceModule import AdvancedCalculatorInterface
from .CalculatorInterfaceModule import CalculatorInterface

interface ChuckNorrisIface {
    RequestResponse: random( undefined )( undefined )
}

service AdvancedCalculatorService {

    execution: concurrent

    outputPort Chuck {
        location: "socket://api.chucknorris.io:443/"
        protocol: https {
            .osc.random.method = "get";
            .osc.random.alias = "jokes/random"
        }
        interfaces: ChuckNorrisIface
    }

    outputPort Calculator {
        location: "socket://localhost:8000"
        protocol: http { format = "json" }
        interfaces: CalculatorInterface
    }

    inputPort AdvancedCalculatorPort {
        location: "socket://localhost:8001"
        protocol: http { format = "json" }
        interfaces: AdvancedCalculatorInterface
    }

    inputPort AdvancedCalculatorPortSOAP {
        location: "socket://localhost:8002"
        protocol: soap {
            wsdl = "AdvancedCalculator.wsdl",
            wsdl.port = "AdvancedCalculatorPortSOAPServicePort"
        }
        interfaces: AdvancedCalculatorInterface
    }

    inputPort AdvancedCalculatorPortSODEP {
        location: "socket://localhost:8003"
        protocol: sodep
        interfaces: AdvancedCalculatorInterface
    }

    inputPort AdvancedCalculatorPortHTTPS {
        location: "socket://localhost:8004"
        protocol: https {
            format = "json",
            ssl.keyStore = "keystore.jks",
            ssl.keyStorePassword = "jolie!"
        }
        interfaces: AdvancedCalculatorInterface
    }

    inputPort AdvancedCalculatorPortSOAPS {
        location: "socket://localhost:8005"
        protocol: soaps {
            wsdl = "AdvancedCalculator.wsdl",
            wsdl.port = "AdvancedCalculatorPortSOAPServicePort",
            ssl.keyStore = "keystore.jks",
            ssl.keyStorePassword = "jolie!"
        }
        interfaces: AdvancedCalculatorInterface
    }

    main {
        [ factorial( request )( response ) {
            for( i = request.term, i > 0, i-- ) {
                req_mul.factor[ #req_mul.factor ] = i
            }
            mul@Calculator( req_mul )( response.factorial )
            random@Chuck()( chuck_res )
            response.advertisement = chuck_res.value
        }]

        [ average( request )( response ) {
            {
                sum@Calculator( request )( sum_res )
                div@Calculator( { dividend = double( sum_res ), divisor = double( #request.term ) })( response.average )
            }
            |
            {
                random@Chuck()( chuck_res )
                response.advertisement = chuck_res.value
            }
        }]

        [ percentage( request )( response ) {
            {
                div@Calculator( { dividend = request.term, divisor = 100.0 })( div_res )
                mul@Calculator( { factor[0] = div_res, factor[1] = request.percentage })( response_mul )
                response.result = response_mul
            }
            |
            {
                random@Chuck()( chuck_res )
                response.advertisement = chuck_res.value
            }
        }]
    }
}
As it si possible to note, here we just added the port AdvancedCalculatorPortSOAPS, thus enabling the service to receive on port 8005 using protocol soaps.
Running the service and invoking it
Since we are extending the example Using more than one dependency, here we need to run two services in two separate shells:
jolie AdvancedCalculatorService.ol
jolie CalcularService.ol
As we did for protocol soap example, we can use SoapUI as a tool for creating a client. It is sufficient to import the wsdl file and then fill the request with the value you prefer. In the following picture we prepared a request for the operation factorial.

Adding an input port with protocol SODEPS
Protocol sodeps uses binary protocol sodep already described in this example, over ssl. It can be useful when securing communication over sodep protocol.
In the following picture we show how to add an inputPort which provides a sodeps protocol in addition to those with http/json, http/soap, sodep, https and sodeps already discussed.
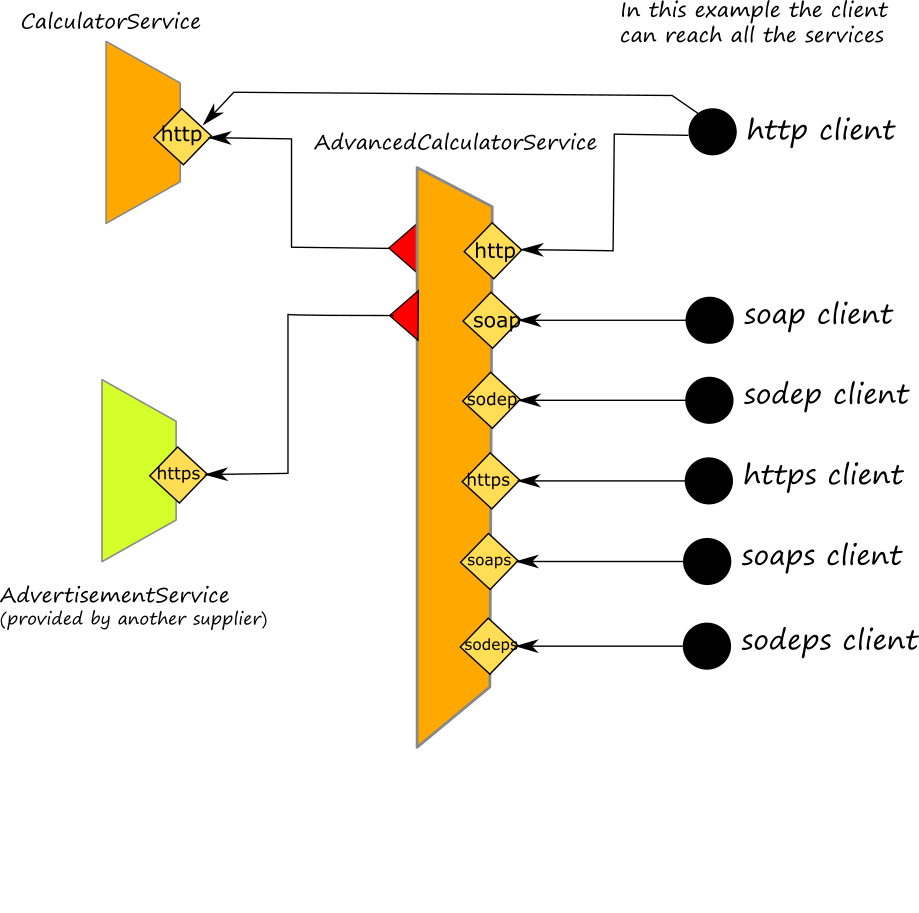
As it happened for the addition of sodep protocol input port, also in the case of a sodep protocol input port the behaviour of the service is always the same, and you don't need to modify it.
Adding the port
The first step is adding the inputPort to the code. In our example is:
inputPort AdvancedCalculatorPortSODEPS {
    location: "socket://localhost:8006"
    protocol: sodeps {
        ssl.keyStore = "keystore.jks",
        ssl.keyStorePassword = "jolie!"
    }
    interfaces: AdvancedCalculatorInterface
}
It is worth noting that, as we did for protocol https also in this case we need to specify the keystore and the related password. You can use tool keytool for generating it.
The complete example
The complete example follows and it may be consulted at this [link] (https://github.com/jolie/examples/tree/master/v1.10.x/tutorials/more_inputports_and_protocols/sodeps)
from .AdvancedCalculatorServiceInterfaceModule import AdvancedCalculatorInterface
from .CalculatorInterfaceModule import CalculatorInterface

interface ChuckNorrisIface {
    RequestResponse: random( undefined )( undefined )
}

service AdvancedCalculatorService {

    execution: concurrent

    outputPort Chuck {
        location: "socket://api.chucknorris.io:443/"
        protocol: https {
            .osc.random.method = "get";
            .osc.random.alias = "jokes/random"
        }
        interfaces: ChuckNorrisIface
    }

    outputPort Calculator {
        location: "socket://localhost:8000"
        protocol: http { format = "json" }
        interfaces: CalculatorInterface
    }

    inputPort AdvancedCalculatorPort {
        location: "socket://localhost:8001"
        protocol: http { format = "json" }
        interfaces: AdvancedCalculatorInterface
    }

    inputPort AdvancedCalculatorPortSOAP {
        location: "socket://localhost:8002"
        protocol: soap {
            wsdl = "AdvancedCalculator.wsdl",
            wsdl.port = "AdvancedCalculatorPortSOAPServicePort"
        }
        interfaces: AdvancedCalculatorInterface
    }

    inputPort AdvancedCalculatorPortSODEP {
        location: "socket://localhost:8003"
        protocol: sodep
        interfaces: AdvancedCalculatorInterface
    }

    inputPort AdvancedCalculatorPortHTTPS {
        location: "socket://localhost:8004"
        protocol: https {
            format = "json",
            ssl.keyStore = "keystore.jks",
            ssl.keyStorePassword = "jolie!"
        }
        interfaces: AdvancedCalculatorInterface
    }

    inputPort AdvancedCalculatorPortSOAPS {
        location: "socket://localhost:8005"
        protocol: soaps {
            wsdl = "AdvancedCalculatorSOAPS.wsdl",
            wsdl.port = "AdvancedCalculatorPortSOAPServicePort",
            ssl.keyStore = "keystore.jks",
            ssl.keyStorePassword = "jolie!"
        }
        interfaces: AdvancedCalculatorInterface
    }

    inputPort AdvancedCalculatorPortSODEPS {
        location: "socket://localhost:8006"
        protocol: sodeps {
            ssl.keyStore = "keystore.jks",
            ssl.keyStorePassword = "jolie!"
        }
        interfaces: AdvancedCalculatorInterface
    }

    main {
        [ factorial( request )( response ) {
            for( i = request.term, i > 0, i-- ) {
                req_mul.factor[ #req_mul.factor ] = i
            }
            mul@Calculator( req_mul )( response.factorial )
            random@Chuck()( chuck_res )
            response.advertisement = chuck_res.value
        }]

        [ average( request )( response ) {
            {
                sum@Calculator( request )( sum_res )
                div@Calculator( { dividend = double( sum_res ), divisor = double( #request.term ) })( response.average )
            }
            |
            {
                random@Chuck()( chuck_res )
                response.advertisement = chuck_res.value
            }
        }]

        [ percentage( request )( response ) {
            {
                div@Calculator( { dividend = request.term, divisor = 100.0 })( div_res )
                mul@Calculator( { factor[0] = div_res, factor[1] = request.percentage })( response_mul )
                response.result = response_mul
            }
            |
            {
                random@Chuck()( chuck_res )
                response.advertisement = chuck_res.value
            }
        }]
    }
}
Running the service and invoking it
Since we are extending the example Using more than one dependency, here we need to run two services in two separate shells:
jolie AdvancedCalculatorService.ol
jolie CalcularService.ol
In this case the client is another jolie script that must be run in a separate shell. As we did for the example where we use protocol sodep, here we modified the output port which points to the sodeps port of the service, in order to be compliant with protocol sodeps.
from AdvancedCalculatorServiceInterfaceModule import AdvancedCalculatorInterface
from console import *
from string_utils import StringUtils

service SodepsClient {
    outputPort AdvancedCalculatorService {
        location: "socket://localhost:8006"
        protocol: sodeps {
            ssl.trustStore = "truststore.jks",
            ssl.trustStorePassword = "jolie!"
        }
        interfaces: AdvancedCalculatorInterface
    }

    inputPort ConsoleInputPort {
        location: "local"
        interfaces: ConsoleInputInterface
    }

    embed Console as Console
    embed StringUtils as StringUtils

    init {
        registerForInput@Console()()
    }

    main {
        println@Console("Select the operation to call:")()
        println@Console("1- factorial")()
        println@Console("2- percentage")()
        println@Console("3- average")()
        print@Console("? ")()

        in( answer )
        if ( (answer != "1") && (answer != "2") && (answer != "3") ) {
            println@Console("Please, select 1, 2 or 3")()
            throw( Error )
        }

        if ( answer == "1" ) {
            println@Console( "Enter an integer")()
            in( term )
            factorial@AdvancedCalculatorService( { term = int( term ) } )( factorial_response )
            println@Console( "Result: " + factorial_response.factorial )()
            println@Console( factorial_response.advertisement )()
        }
        if ( answer == "2" ) {
            println@Console( "Enter a double")()
            in ( term )
            println@Console( "Enter a percentage to be calculated")()
            in ( percentage )
            percentage@AdvancedCalculatorService( { term = double( term ), percentage = double( percentage ) } )( percentage_response )
            println@Console( "Result: " + percentage_response.result )()
            println@Console( percentage_response.advertisement )()
        }
        if ( answer == "3" ) {
            println@Console("Enter a list of integers separated by commas")()
            in( terms )
            split@StringUtils( terms { regex = ","} )( splitted_terms )
            for( t in splitted_terms.result ) {
                req_average.term[ #req_average.term ] = int( t )
            }
            average@AdvancedCalculatorService( req_average )( average_response )
            println@Console( "Result: " + average_response.average )()
            println@Console( average_response.advertisement )()
        }
    }
}
Note that the outputPort requires two more parameters: ssl.trustStore and ssl.trustStorePassword which allows to the define the trust store where checking the validity of the server certificate. To this end, it is important to extract the certificate from the keystore of the service and add it to the trust store of the client. In the following we report how to run the client and how it appears its console:
jolie sodep_client.ol


Select the operation to call:
1- factorial
2- percentage
3- average
? 1
Enter an integer
3
Result: 6
Chuck NOrris is an incredible sitar player.
Using files
Using files in jolie is very simple. There standard library file provides a set of useful operations for managing files. In this tutorial we show:
- how to read from a file;
- how to write to a file;
- how to send the content of a file from a service to another.
Reading a file
In this simple example, whose code can be checked at this link, we show how to read the content of a file and print out it on the console. In the following we present a jolie script which reads from file test.txt and prints its content on the console using println@console.
from file import File
from console import Console

service Example {

    embed Console as console
    embed File as file

    main {

        readFile@file( { filename = "test.txt"} )( response )
        println@console( response )()
    }

}
Note that it is important to import jolie from file import Fileand embed jolie embed File as file the into the service from the standard library then it is sufficient to use operation readFile@file for reading from the file. The operation readFile@file requires the filename. The content is then stored into variable response and it can be easily printed out using println@console.
Writing a file
As for the reading of a file, writing a file uses the standard library file and in particular we exploit the operation writeFile@file. In the following we show a script which creates a file called test.txt and writes the string this is a test message. The full code of the example may be consulted at this link
from file import File

service Example{
    embed File as file

    main {
        writeFile@file( {
            filename = "test.txt"
            content = "this is a test message"
        } )()
    }
}
Note that the operation writeFile@file requires at least two parameters: the filename and the content of the file.
Communicating the content of a file
Now, let's step forward creating a simple system where a server receives the content from a source file read by the client, and appends it to a receiving file. The full example can be checked at this link. The example uses the following file structure
.
+-- ServerInterface.ol
+-- server.ol
+-- client.ol
The interface of the server follows can be found in ServerInterface.ol:
interface ServerInterface {
    RequestResponse:
        setFileContent( string )( void )
}
Note that it is very simple and it just defines a single operation which is able to receive a string.The code of the server is :
from .ServerInterface import ServerInterface
from file import File

constants {
    FILENAME = "received.txt"
}


service ExampleServer {

    embed File as file

    inputPort server {
        Location: "socket://localhost:9000"
        Protocol: sodep
        Interfaces: ServerInterface
    }


    execution:concurrent

    main {
        setFileContent( request )( response ) {
            writeFile@file( {
                filename = FILENAME
                content = request
                append = 1
            } )()
        }
    }
}
The server is waiting to receive a message on operation setFileContent, once received it appends the message into the file received.txt. Note that the appending capability is enabled setting the parameter append of the operation writeFile@file to 1.
On the other hand, the client reads a content from a file and sends it to the server:
from .ServerInterface import ServerInterface
from file import File

service ExampleClient{

    embed File as file

    outputPort server {
        Location: "socket://localhost:9000"
        Protocol: sodep
        Interfaces: ServerInterface
    }

    main {
        readFile@file( {filename = "source.txt"} )( content )
        setFileContent@server( content )()
    }

}
Communicating raw contents
Let's now concluding this tutorial showing how to manage also binary files. So far indeed, we dealt only with text files where their content is always managed as a string. In general, we could require to manage any kind of files. In the following we show hot to read, communicate and write the binary content of a file. We propose the same scenario of the section above where there is a client which reads from a file and sends its content to a server, but we show how to deal with binary files. The full code of the example may be consulted at this link. Like in previous example the following file structure is used.
.
+-- ServerInterface.ol
+-- server.ol
+-- client.ol
The interface of the server changes as it follows:
type SetFileRequest: void {
    .content: raw
}

interface ServerInterface {
    RequestResponse:
        setFile( SetFileRequest )( void )
}
Note that the request type of operation setFile has a subnode called .content whose native type is set to raw. raw is the native type used in jolie messages for sending binaries. Let us now see how the client works:
from .ServerInterface import ServerInterface
from file import File


constants {
    FILENAME = "received.pdf"
}


service ExampleServer {

embed File as file

inputPort server {
    Location: "socket://localhost:9000"
    Protocol: sodep
    Interfaces: ServerInterface
}


execution: concurrent
main {
    setFile( request )( response ) {

        writeFile@file(  {
            .filename = FILENAME;
            .content = request.content;
            .format = "binary"
        })()
    }
}


}
Note that the approach is the same of that we used for string contents with the difference that we specify also the parameter format="binary" for the operation readFile@file. Such a parameter enables jolie to interpreting the content of the file as a stream fo bytes which are represented as the native type raw. It is worth noting that the content of the reading is directly stored into the variable rq.content, this is why we just send variable rq with operation setFile.
On the server side the code is:
from .ServerInterface import ServerInterface
from file import File


service ExampleClient{

    embed File as file

    outputPort server {
        Location: "socket://localhost:9000"
        Protocol: sodep
        Interfaces: ServerInterface
    }

    main {
        readFile@file( {
            filename = "source.pdf"
            format = "binary"
        } )( rq.content )

        setFile@server( rq )()
    }
}
Also in this case we enable the usage of binaries setting the parameter format="binary" for operation writeFile. Note that in this example the file read is a PDF file.
JSON files
As for XML, Jolie natively supports automatic conversions also between Jolie and JSON data structures.
This is leveraged by the File library service to give simple ways to read from and write to JSON files.
Reading from a JSON file
Say that you have a JSON file called note.json with the following content.
{
    "note": {
        "sender": "John",
        "receiver": "Jane",
        "content": "I made pasta"
    }
}
You can read from this file and obtain a Jolie data structure as follows.
from file import File

service Example {
    embed File as File

    main
    {
        readFile@File( {
        filename = "note.json"
        format = "json"
        } )( data )
        // data is now { node << { sender = "John" receiver = "Jane" content = "I made pasta" } }
    }
}
Variable data now contains the data from the JSON structure, which you can access as usual using the standard Jolie syntax. For example, to print the to node of the note, you can include "console.iol" at the beginning of the program and write:
println@Console( data.note.to )() // "Jane"
Writing to a JSON file
Suppose that you wanted to store the following data structure as a JSON file.
{
    note << {
        sender = "John"
        receiver = "Jane"
        content = "I made pasta"
    }
}
You can do so by invoking writeFile@File and passing that data structure as the content to be written.
from file import File

service Example {
    embed File as File

    main
    {
        writeFile@File( {
            filename = "note.json"
            format = "json"
            content << {
                note << {
                    sender = "John"
                    receiver = "Jane"
                    content = "I made pasta"
                }
            }
        } )()
    }
}
The file note.json will now contain the JSON data that we showed at the beginning of the tutorial.
Another example
Let us consider to have a starting json file, named file.json like the following one:
{
    "module": [
        {
            "moduleId": "ONE",
            "moduleName": "ONE",
            "moduleOverview": "ONE"
        },
        {
            "moduleId": "TWO",
            "moduleName": "TWO",
            "moduleOverview": "TWO"
        }
    ]
}
The need is to add one more module item to the file. In the following example a jolie script just reads the file and add a new item module, then it writes the result on the same file.
from file import File

service ManagingJsonFiles {
    embed File as File

    main {
        readFile@File( { filename = "file.json", format = "json" } )( starting_json )
        starting_json.module[ #starting_json.module ] << {
            moduleId = "NEW"
            moduleName = "NEW"
            moduleOverview = "NEW"
        }
        writeFile@File({ filename = "file.json", format = "json", content << starting_json } )()
    }
}
It is worth noting that readFile and writeFile are two operations offered by standard library File. The standard library has been imported at the first line from file import File, then it is embedded at line four embed File as File.
The final json file appears like the following one.
{
    "module": [
        {
            "moduleOverview": "ONE",
            "moduleName": "ONE",
            "moduleId": "ONE"
        },
        {
            "moduleOverview": "TWO",
            "moduleName": "TWO",
            "moduleId": "TWO"
        },
        {
            "moduleOverview": "NEW",
            "moduleName": "NEW",
            "moduleId": "NEW"
        }
    ]
}
The complete example may be consulted at this link.
XML files
Jolie natively supports automatic conversions between Jolie and XML data structures.
The File library service leverages this to offer simple ways of reading from and writing to XML files.
Reading from an XML file
Suppose that you had an XML file called note.xml with the following content.
<note><from>John</from><to>Jane</to><content>I made pasta</content></note>
You can read from this file and obtain a Jolie data structure as follows.
from file import File

service Example {

    embed File as file

    main  {
        readFile@file( {
            filename = "note.xml"
            format = "xml"
        } )( data )
        // data is now { node << { from = "John" to = "Jane" content = "I made pasta" } }
    }
}
Variable data now contains the data from the XML structure, which you can access as usual using the standard Jolie syntax. For example, to print the to node of the note, you can import the standard library console at the beginning of the program and write and use the operation println@console(data.node.to)()
from file import File
from console import Console

service Example {

embed File as file
embed Console as console

    main {
        readFile@file( {
            filename = "note.xml"
            format = "xml"
        } )( data )
        // data is now { node << { from = "John" to = "Jane" content = "I made pasta" } }
        println@console(data.node.to)()
    }
}
Writing to an XML file
Suppose that you wanted to store the following data structure as an XML file.
{
    note << {
        from = "John"
        to = "Jane"
        content = "I made pasta"
    }
}
You can do so by invoking writeFile@file and passing that data structure as the content to be written.
from file import File

service Example {

    embed File as file
    main
    {
        writeFile@file( {
            filename = "note.xml"
            format = "xml"
            content << {
                note << {
                    from = "John"
                    to = "Jane"
                    content = "I made pasta"
                }
            }
        })()
    }
}
The file note.xml will now contain the XML data that we showed at the beginning of the tutorial.
Twitter API
Twitter offers an API that can be used to access the platform programmatically. In this tutorial, we are going to see how to access these APIs natively from Jolie.
TL;DR
Get a bearer token to access the Twitter API from Twitter at the page https://developer.twitter.com/en/docs/basics/authentication/oauth-2-0/bearer-tokens. Replace <YOUR BEARER TOKEN> in the code below with your own bearer token.
outputPort Twitter {
    location: "socket://api.twitter.com:443/"
    protocol: https {
        addHeader.header << "Authorization" { value = "Bearer " + "<YOUR BEARER TOKEN>" }
        osc << {
            user_timeline << { alias = "1.1/statuses/user_timeline.json" method = "get" }
            show << { alias = "1.1/statuses/show.json" method = "get"
        }
        }
    }
    RequestResponse: user_timeline, show
}
You can now access the operations user_timeline and show of the Twitter API through the Twitter output port given above.
Here is a full Jolie snippet that prints the latest 10 tweets by the Jolie Twitter account. Just copy-paste the code into a file, put your own bearer token, and launch it.
// The output port from above
outputPort Twitter {
    location: "socket://api.twitter.com:443/"
    protocol: https {
        addHeader.header << "Authorization" { value = "Bearer " + "<YOUR BEARER TOKEN>" }
        osc << {
            user_timeline << { alias = "1.1/statuses/user_timeline.json" method = "get" }
            show << { alias = "1.1/statuses/show.json" method = "get" }
        }
    }
    RequestResponse: user_timeline, show
}

main
{
    user_timeline@Twitter( {
        screen_name = "jolielang"
        count = 10
        tweet_mode = "extended" // get full tweets
    } )( tweetList )
    for( tweet in tweetList._ ) { // JSON arrays are stored in _
        println@Console( tweet.full_text )()
    }
}
If you want to access more operations than user_timeline and show, just add them to the output port configuration. You can find the full Twitter API reference at https://developer.twitter.com/en/docs/api-reference-index.
Learn the details
Here is a more step-by-step explanation.
Get a bearer token
The Twitter API requires authentication for most operations. We will use an OAuth 2.0 Bearer Token. Before proceeding, you should go and get your own token from Twitter.
Got your token? Let's continue!
Set up an output port
The key to accessing the Twitter API is to configure an output port using the https protocol, such that it can access the operations that you need.
You can see a complete list of the operations offered by the Twitter API at https://developer.twitter.com/en/docs/api-reference-index. What you are looking for is the resource URL and the HTTP method (GET, POST, etc.) of the operation(s) that you are interested in.
For example, say that you want to use operation statuses/user_timeline. Its documentation at https://developer.twitter.com/en/docs/tweets/timelines/api-reference/get-statuses-user_timeline declares that its resource URL is https://api.twitter.com/1.1/statuses/user_timeline.json and its method is GET.
This translates to the following output port configuration in Jolie. You have to replace <YOUR BEARER TOKEN> with the bearer token that you have obtained previously.
outputPort Twitter {
    location: "socket://api.twitter.com:443/"
    protocol: https {
        addHeader.header << "Authorization" { value = "Bearer " + "<YOUR BEARER TOKEN>" }
        osc << { // "operation-specific configuration"
            user_timeline << { // Configuration for operation user_timeline
                alias = "1.1/statuses/user_timeline.json" // the resource path
                method = "get" // the HTTP method to use
            }
        }
    }
    RequestResponse: user_timeline
}
Use the output port
We can now use our output port to access the Twitter API. Continuing with our example, we use operation user_timeline to print all the latest 10 tweets by the Jolie Twitter account.
include "console.iol"

outputPort Twitter {
    /* put the output port code from above here */
}

main
{
    user_timeline@Twitter( {
        screen_name = "jolielang"
        count = 10
        tweet_mode = "extended" // get full tweets
    } )( tweetList )
        for( tweet in tweetList._ ) { // JSON arrays are stored in _
        println@Console( tweet.full_text )()
    }
}
Adding more operations
You can add more operations simply by adding the corresponding entries to the protocol configurations and the interface of the port. For example, the following code extends our previous output port to offer also the home_timeline operation (see https://developer.twitter.com/en/docs/tweets/timelines/api-reference/get-statuses-home_timeline).
outputPort Twitter {
    location: "socket://api.twitter.com:443/"
    protocol: https {
        addHeader.header << "Authorization" { value = "Bearer " + "<YOUR BEARER TOKEN>" }
        osc << {
            user_timeline << { alias = "1.1/statuses/user_timeline.json" method = "get" }
            home_timeline << { alias = "1.1/statuses/home_timeline.json" method = "get" }
        }
    }
    RequestResponse: user_timeline, home_timeline
}
Passing the bearer token secret
If you do not want to hardcode the bearer token, you can make your program read it from an environment variable (a popular approach if you want to Dockerize your program, see how to use Docker, a file, a command-line argument, etc.
For example, to read the bearer token from an environment variable and use it to configure the Twitter output port, you can use the following code.
include "runtime.iol" // Include the Runtime service

outputPort Twitter {
    location: "socket://api.twitter.com:443/"
    protocol: https {
        // No hardcoded authorization header
        osc << {
            user_timeline << { alias = "1.1/statuses/user_timeline.json" method = "get" }
            /* More operation configurations ... */
        }
    }
    RequestResponse: user_timeline /* More operations... */
}

init
{
    // Read the bearer token from the environment variable BEARER_TOKEN
    getenv@Runtime( "BEARER_TOKEN" )( bearerToken )
    Twitter.protocol.addHeader.header << "Authorization" { value = "Bearer " + bearerToken }
}
Supporting new protocols in Jolie
Introduction
This is a step by step guide on how to implement a protocol in the programming language Jolie.
One of the distinguishing features of Jolie is that protocols used for communication can be easily changed in a program without requiring the refactoring of the code. As an example of that, see the code below, where code written in the main block invokes the operation twice, using either the http and sodep protocols, just by changing one line in the deployment.
We start the tutorial by cloning the Jolie repository and compile the interpreter. Then, we will create a new protocol by cloning and modifying an existing one. Finally, we will identify which parts must be specifically changed to start implementing our own protocol.
Cloning and compiling the Jolie interpreter
Before starting to develop a new protocol for the Jolie language, we need to have installed Git, Maven, and the Java Development Kit.
We can clone the Jolie repository from Github and compile it with the following commands.
git clone https://github.com/jolie/jolie
cd jolie
mvn install
Once compiled, we suggest to install the Jolie command in the system, to ease testing our implementation. To do so, we can either link the Jolie executable to the systems bin files or install Jolie as described on the homepage. A quick way of to link the Jolie executable to the systems bin files is to run the dev-setup.sh file found in the Jolie scripts folder.
cd jolie/scripts
sh dev-setup.sh
To make sure we installed the jolie command correctly, we can run the command below, which prints the version of interpreter.
jolie --version
Project Structure
The new protocol we are going to implement is essentially a new sub-project in the Jolie repository.
To prepare the structure of the project, we will not start from scratch but rather copy and modify a protocol already present. To do that, first access the folder where the Jolie repository was cloned. Then, let us open the folder named extensions. Here, we find the folder named sodep and we make a copy, naming the new folder e.g., mysodep. The choice to use sodep in our tutorial comes from the fact that its implementation is relatively small and just consists of three files, described below.
pom.xml
The file pom.xml is the file used by maven to compile the project. Any protocol written in Jolie uses the following parent block, groupId, version, and packaging:
<parent>
    <groupId>org.jolie-lang</groupId>
    <artifactId>distribution</artifactId>
    <relativePath>../../pom.xml</relativePath>
    <version>1.0.0</version>
</parent>
<groupId>org.jolie-lang</groupId>
<artifactId>mysodep</artifactId>
<version>${jolie.version}</version>
<packaging>jar</packaging>
Note that only the artifactId changes from protocol to protocol. Here, we replaced the original sodep with mysodep.
    <name>mysodep</name>
    <description>mySodep protocol for Jolie</description>
In the build block, the manifestEntries block contains information on the name of the protocol factory.
<manifestEntries>
    <X-JOLIE-ProtocolExtension>
    mysodep:jolie.net.MySodepProtocolFactory
    </X-JOLIE-ProtocolExtension>
</manifestEntries>
Here, change the sodep part to the name of your protocol (mysodep), and change SodepProtocolFactory to the name of the new protocol factory (mySodepProtocolFactory). The artifactItem and outputDirectory should not be changed.
The last part of the pom.xml file is the implementation of dependencies. All protocols will have Jolie as a dependency, as written below.
<dependencies>
    <dependency>
        <groupId>${project.groupId}</groupId>
        <artifactId>jolie</artifactId>
        <version>${jolie.version}</version>
    </dependency>
</dependencies>
Protocol Factory implementation
We proceed to rename the file SodepProtocolFactory.java into MySodepProtocolFactory.java (used by Jolie to create an instance of the protocol). As expected, the name of the protocol factory is the same as the one present in the related pom.xml file.
In the protocol factory file, change every occurrence of SodepProtocol to mySodepProtocol and SodepProtocolFactory to mySodepProtocolFactory.
Protocol implementation
The last file that we need to change is SodepProtocol.java, which contains the actual implementation of the protocol, i.e, where data structures are encoded and decoded for communication.
Similarly to what we did before, we need to rename the file from SodepProtocol.java into MySodepProtocol.java and replace any occurrence of sodep to mysodep in the file. Specifically, there are at least 3 items that need to be changed.
-
The class name
public class mySodepProtocol extends ConcurrentCommProtocol -
The name method
    public String name()
    {
        return "mysodep";
    }
- The SodepProtocol method
    public MySodepProtocol( VariablePath configurationPath )
    {
        super( configurationPath );
    }
First compilation and execution
We can now check that the new protocol (although implementing the same behaviour as sodep) can be compiled and used in a Jolie program.
To do so, navigate to the directory of mysodep, where the pom.xml file is. From here, run
mvn install
to compile the extension. This will create an executable named mysodep.jar in the target folder and copy it into the folder jolie/dist/extensions.
NOTE! To recompile the entire Jolie project, integrate your extension into the main Jolie pom.xml file, found in the repository root. This is done by adding the following line to the 'module' section of the pom.xml file.
<module>extensions/mysodep</module>
Now that the implementation of mysodep is ready and compiled, we can use it in Jolie programs. As an example, we use the new protocol mysodep in the programs below (a client and a server).
include "console.iol"
interface TwiceInterface {
    RequestResponse: twice( int )( int )
}
outputPort TwiceService {
    Location: "socket://localhost:8000"
    Protocol: mysodep
    RequestResponse: twice
}
main
{
    twice@TwiceService( 5 )( response )
    println@Console( response )()
}

interface TwiceInterface {
    RequestResponse: twice( int )( int )
}
inputPort TwiceService {
    Location: "socket://localhost:8000"
    Protocol: mysodep
    RequestResponse: twice
}
main
{
    twice( number )( result ) {
        result = number * 2
    }
}
Writing your own protocol
In this section, we will use the new protocol, mysodep, to take a closer look at how a protocol is implemented in Jolie.
Protocol Factory implementation
Any protocol factory needs to have two methods implemented to create output ports and input ports, respectively.
public CommProtocol createOutputProtocol( VariablePath configurationPath, URI location )
    throws IOException
{
    return new mySodepProtocol( configurationPath );
}

public CommProtocol createInputProtocol( VariablePath configurationPath, URI location )
    throws IOException
{
    return new mySodepProtocol( configurationPath );
}
Protocol implementation
In general, the protocol needs to implement four methods: name, recv, send, and threadSafe.
The method name labels the protocol and it is used by the Jolie interpreter to identify it.
public String name()
{
    return "mysodep";
}
The method recv, handles incoming messages to be decoded into Jolie CommMessages (CommMessage is the internal representation of messages in Jolie).
public CommMessage recv( InputStream istream, OutputStream ostream )
    throws IOException
{
    // ...
}
The method send handles outgoing messages by encoding a CommMessage into bits.
public void send( OutputStream ostream, CommMessage message, InputStream istream )
    throws IOException
{
    // ...
}
The method isThreadSafe is used by the Jolie interpreter to optimise the execution of protocols. In the case of sodep, the method does not need to be implemented, since the protocol extends the SequentialProtocol class.
public final boolean isThreadSafe()
{
    // ...
}
Adding Dependencies to the project
If our protocol implementation used some dependencies, they can be added in the pom.xml dependency block. For instance, if our protocol needs the http library in the Jolie project, like the existing protocol soap, then we can add the following lines the dependencies block in the pom.xml file.
<dependency>
    <groupId>${project.groupId}</groupId>
    <artifactId>http</artifactId>
    <version>${jolie.version}</version>
</dependency>
That is, <groupId\>project name</groupId\>, <artifactId\>dependency name</artifactId\>, <version\>version of dependency</version>.
Finally, to make the dependencies available at runtime, we add the annotation @AndJarDeps("path/to/dependency.jar\") into the protocol factory class declaration. As an example, the SoapProtocolFactory class shows the following dependencies.
@AndJarDeps({
    "jaxws/javax.annotation-api.jar",
    "jaxws/javax.xml.soap-api.jar",
    "jaxws/jaxb-api.jar",
    "jaxws/jaxb-core.jar",
    // ...
    "jaxws/streambuffer.jar",
    "jaxws/woodstox-core-asl.jar"
})
Basics
This chapter is devoted to present the basic features of the Jolie programming language. You will learn to manipulate data and messages and you will know how to define a communication connection among different microservices written in Jolie. You will discover that in Jolie you can implement easily both synchronous and asynchronous communication and, finally, you will know how to deal with correlation sets and sessions.
Data Types
In Jolie, the messages exchanged through operations are data trees (see section Handling Simple Data).
A data type defines:
- the structure of a data tree;
- the type of the content of its node;
- the allowed number of occurrences of each node.
Basic Data Types
The basic data types are the simplest kind of data type in Jolie. Their syntax is:
T ::= { void, bool, int, long, double, string, raw, any }
An example of usage of such kind of data types in interface definition is:
interface MyInterface {
    RequestResponse: myOperation( int )( string )
}
Refined Basic Data Types
Basic data types can be refined in order to restrict the valid values. Depending on the basic data type there are different refinements available. In the following table there is the list of all the available refinements. It is possible to use only 1 refinement for each basic type declaration.
| Basic Type | Available Refinements |
|---|---|
| string | length, regex, enum |
| int | ranges |
| long | ranges |
| double | ranges |
When a value that does not respect the refinement type is forced to be used a TypeMismatch will be raised by the interpreter.
String format
The string is enclosed (as in other languages) by two double quote. Inside the string you can
- use a single quote;
- insert a special character with the usual escape method (\
, example \n") - using a double quote, escaping it ("")
You can split the string over multiple lines
jsonValue = "{
    \"int\": 123,
    \"bool\": true,
    \"long\": 124,
    \"double\": 123.4,
    \"string\": \"string\",
    \"void\": {},
    \"array\": [123, true,\"ciccio\",124,{}],
    \"obj\" : {
        \"int\": 1243,
        \"bool\": true,
        \"long\": 1234,
        \"double\": 1234.4,
        \"string\": \"string\",
        \"void\": {}
    }
}";
Refinement: length
This refinement allows for specifying the minimum and the maximum length of a string. The minimum and the maximum length must be specify as a couple of values between square brackets. Example:
type MyType {
    my_refined_string_field: string( length( [2,5] ) )
}
In this example the field my_refined_string_field is a string which must have at least two characters and not more than five characters. Values like "home", "dog", "eye", etc are admitted, whereas values like "I", "keyboard","screen", etc are not admitted.
Refinement: regex
This refinement allows for specifying the regular expression a string must respect.
In the following example we set an email field to respect some structural characters like "@" and ".".
type MyType {
    email: string( regex(".*@.*\\..*") )
}
Note that Jolie uses the dk.brics.automaton library for managing regular expressions, thus you may consult this link as a reference for composing the regular expressions: Composing regular expressions in Jolie string basic type refinement
Refinement: enum
This refinement allows for specifying a set of available values for the string.
In the following example, only the values "paul","homer","mark" are admitted for the field name:
type MyType {
    name: string( enum(["paul","homer","mark"]))
}
Refinement: ranges
This refinement allows for specifying a list of valid intervals for an integer, a double or a long.
In the following example, we show a type with three fields with different basic types. Each of them uses a refinement ranges for restricting the possible values.
type MyType {
    f1: int( ranges( [1,4], [10,20], [100,200], [300, *]) )
    f2: long( ranges( [3L,4L], [10L,20L], [100L,200L], [300L, *]) )
    f3: double( ranges( [4.0,5.0], [10.0,20.0], [100.0,200.0], [300.0, *]) )
}
The token * is used for specifying an unbounded maximum limit.
In this example the field f1 can be an integer which respects one of the following conditions, where v is the actual value:
- 1 <= v <= 4
- 10 <= v <= 20
- 100 <= v <= 200
- 300 <= v
Note that, depending on the basic type, the minimum and the maximum values of each interval must be expressed with the related notation: using L for denoting long valued and using . for specifying the usage of decimals in the case of double.
Custom Data Types
Jolie supports the definition of custom data types, which are a composition of the basic ones. The simplest custom type is just an alias of a basic type type CustomType: T.
Nested data types
Complex custom types can be obtained by defining nested subnodes of the root, the operator to define nesting of nodes is the . symbol. The syntax to define nested data types is:
type CustomType: T {
    aSubNode: T {
        aSubSubNode: T {
            ...
        }
    }
    ...
    anotherSubNode: T { ... }
}
Let us see some example of nested data types.
type Coordinates: void {
    lat: double
    lng: double
}
The custom type Coordinates is a possible representation of a nested data type to handle coordinates. The root cannot contain any value, while the two nested subnodes are both double.
type ShoppingList: void {
    fruits: int {
        bananas: int
        apples: int
    }
    notes: string
}
The custom type ShoppingList represents a list of items to be bought. In the example the subnode fruits contains the sum of all the fruits that should be bought, while its subnodes corresponds to which kind of fruits to buy and their quantity.
A definition of type can be used within another type definition thus to express more complex types. In the example below, fruits are expressed within a custom type and then used in type ShoppingList:
type Fruits: void {
    bananas: int
    apples: int
}

type ShoppingList: void {
    fruits: Fruits
    notes: string
}
NOTE: in case the root native type is void, the definition of the native type can be omitted. As an example the two types above can be written also as it follows:
type Fruits {
    bananas: int
    apples: int
}

type ShoppingList {
    fruits: Fruits
    notes: string
}
In the following we will exploit this syntactic shortcut for expressing types.
Subnodes with cardinality
Since each node of a tree in Jolie is a vector, in a type declaration each node requires a cardinality to be specified. The cardinality expresses the minimum and the maximum occurrences for that node ([min, max]). Cardinality is always expressed in the form:
[min, max]- an interval frommintomax(both integers), wheremaxcan be equal to*for defining an unlimited number of occurrences ([min, *]).
Some special shortcuts can be used for expressing cardinality easily instead of the ordinary syntax with square brackets:
*- meaning any number of occurrences, a shortcut for[0, *].?- meaning none or one occurrence, a shortcut for[0, 1].- when no cardinality is defined, it is defaulted to the value
[1,1], meaning that one and only one occurrence of that subnode can be contained in the node.
Formally, given R as a range, which specifies the allowed number of occurrences of the subnode in a value, the complete syntax for nested data types with cardinality follows:
type CustomType: T {
    aSubNode[R]: T {
        aSubSubNode[R]: T {
            ...
        }
    }
    ...
    anotherSubNode[R]: T { ... }
}
Lets consider the examples below to illustrate the 3 different cardinality options in Jolie.
type CustomType: T {
    aSubNode[1,5]: T
}
Example. In this case cardinalities are defined by occurrences where minimal occurrence of aSubNode of type T is one and maximum occurrences of the same node are five.
type CustomType: T {
    aSubNode[0,1]: T
    anotherSubNode?: T
}
The example above shows that ? is a shortcut for [0,1] and hence the cardinality of aSubNode and anotherSubNode are the same.
type CustomType: T {
    aSubNode[0,*]: T
    anotherSubNode*: T
}
The above example shows that * is a shortcut for [0,*] and hence the cardinality of aSubNode and anotherSubNode are the same.
Undefined set of subnodes
Jolie provides the term any { ? } to capture the type of a tree with any type for the root and an undefined set of subnodes. Jolie also provides a shortcut to any { ? } which is the type undefined. Hence the two writings below are equal
type CustomType: any { ? }
type CustomType: undefined
Let us see a comprehensive example of a custom type with cardinality.
type mySubType {
    value: double
    comment: string
}

type myType: string {

    x[ 1, * ]: mySubType

    y[ 1, 3 ] {
        value*: double
        comment: string
    }

    z?: void { ? }
}
As we can read, nodes x and y are similarly typed, both are typed as void and have two subnodes: value, typed as double, and comment, typed as string.
Let us focus on the cardinality. To be valid, the node myType must declare:
- at least one node
xof typemySubType; - a range between one and three of
y.
Referring to the previous example, x requires the definition of both nodes value and comment, while y requires only the definition of the node comment, since none or an infinite number of nodes myType.y.value can be defined. The subnode z can be present or not, and can contain any kind of subnode ({ ? }).
Defining type nodes with reserved characters
Sometimes you may need to define node names that contain special characters, such as @. In these cases, you need to put your node name between double quotes, as in the following example.
type TestType {
    "@node": string
}
You can access these nodes with special characters by using dynamic look-up, for example x.("@node"). This is explained more in detail in data structures.
Attention: This feature is available from Jolie 1.6.2.
Data types choice (sum types)
Given Ti in {T1, ..., Tn} nested nodes data types can have any type belonging to T (data types in T are mutually exclusive). Let us show one possible example of such property.
type CustomType: void | bool | int | long | double | string | raw | any
The same stands between nested data types.
type CustomType: any | any { .subNode: T } | any { .subNode[2,3]: T }
Checking types at runtime: instanceof
See section Handling Simple Data/Runtime type checking of a variable for getting details about primitive instanceof.
Interfaces
Jolie defines two types of operations:
- one-way operations, which receive a message;
- request-response operations, which reply or receive a message and send back a response.
Thus an interface is a collection of operation types, a list of One-Way and Request-Response operation declarations.
The basic declaration of an interface lists all the names of its operations, grouped by type:
interface identifier {
    OneWay:
        ow_name1( t1 ),
        ow_name2( t2 ),
        //...,
        ow_nameN( tN )
    RequestResponse:
        rr_name1( tk1 )( tk2 ),
        rr_name2( tk3 )( tk4 ),
        //...
        rr_nameN( tkN )( tkN+1 )
}
The syntax presented above includes the types of the messages of each operation. One-way operations require only one message type, whilst request-responses define both request (left argument) and response (right argument) types.
As an example, let us declare the interface SumInterface:
interface SumInterface {
    RequestResponse:
        sum( SumRequest )( int )
}
SumInterface defines a request-response operation sum. SumInterface is the same used in the declaration of SumInput and SumServ, shown at the end of ports subsection.
The type declarations of both request and response messages are explained further in the data types subsection below.
Declarations of Faults: the statement throws
The operations of type RequestResponse can reply with a fault instead of the response message. In such a case, we need to specify into the interface declaration that a request-response operation can raise a fault. In order to do that it is sufficient to list the faults after the usage of the statement throws as it is shown here in the complete syntax:
interface IfaceName {
    RequestResponse:
        Op1( ReqType1 )( ResType1 ) throws ErrX( MsgTypeX ) ... ErrY( MsgTypeY )
        //...
        OpN( ReqTypeN )( ResTypeN ) throws ErrW( MsgTypeW ) ... ErrZ( MsgTypeZ )
}
where ErrX, ErrY, ErrW, ..., ErrZ are the fault names and MsgTypeX, ..., MsgTypeZ are the types of the messages. Examples of its usage can be found in Section Fault Handling.
Ports
In Jolie there are two kinds of ports:
- input ports: which expose input operations to other services;
- output ports: which define how to invoke the operations of other services.
Within each port, both input and output, it is possible to define three elements:
- location;
- protocol;
- interfaces.
The Location defines where the service is listening for a message (in the case of input ports) or where the message has to be sent (in the case of output ports). The Protocol defines how Jolie will send or receive a message. It could defines both the transportation protocol (e.g. http) and the message format (e.g. json). Finally, Interfaces specify the list of the available operations and the related message types information. In particular, in case of an input port, an interfaces specifies the operation exhibited by the current service, whereas in the case of an output port it defines the operations which can be invoked by that service.
Usually we graphically represent outputPorts with red triangles and inputPort with yellow squares. As an example, in the diagram below we represent a client connected to a server by means of an outputPort defined in the client and an inputPort defined in the server.

The syntax of input and output ports
The syntax for input and output ports is, respectively:
inputPort id {
    location: URI
    protocol: p
    interfaces: iface_1,
                ...,
                iface_n
}
outputPort id {
    location: URI
    protocol: p
    interfaces: iface_1,
                ...,
                iface_n
}
where URI is a URI (Uniform Resource Identifier), defining the location of the port; id, p and iface_i are the identifiers representing, respectively, the name of the port, the data protocol to use, and the interfaces accessible through the port.
Locations
A location expresses the communication medium and the address a service uses for exposing its interface (input port) or invoking another service (output port).
A location must indicate the communication medium the port has to use and its related parameters in this form: medium[:parameters] where medium is a medium identifier and the optional parameters is a medium-specific string. Usually the medium parameters define the address where the service is actually located.
Jolie currently supports four media:
local(Jolie in-memory communication);socket(TCP/IP sockets).btl2cap(Bluetooth L2CAP);rmi(Java RMI);localsocket(Unix local sockets);
An example of a valid location is: "socket://www.mysite.com:80/", where socket:// is the location medium and the following part represents the address.
For a thorough description of the locations supported by Jolie and their parameters see Locations section.
Protocols
A protocol defines how data to be sent or received should be, respectively, encoded or decoded, following an isomorphism.
Protocols are referred by name. Examples of valid (supported) protocol names are:
httphttpssoapsodep(a binary protocol specifically developed for Jolie)xmlrpcjsonrpc
For a thorough description of the protocols supported by Jolie and their parameters see Protocols section.
Let us consider the following input port declaration:
inputPort SumInput {
    Location: "socket://localhost:8000/"
    Protocol: soap
    Interfaces: SumInterface
}
SumInput is an inputPort, and it exposes the operations defined in SumInterface interface. Such operations can be invoked at the TCP/IP socket localhost, on port 8000, and by encoding messages with the soap protocol.
Finally, let us define the SumServ outputPort, which is used to invoke the services exposed by SumInput:
outputPort SumServ {
    location: "socket://localhost:8000/"
    protocol: soap
    interfaces: SumInterface
}
Multiple ports
More than one input and one output ports can be defined into a service thus, enabling a service to receive messages from different location and different protocols.
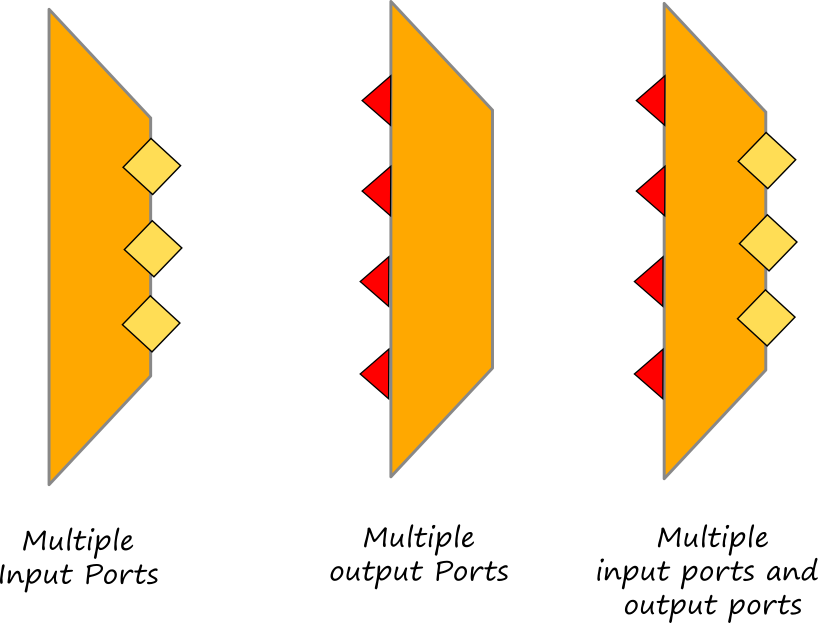
As an example, in the following piece of service, two input ports and three outputPorts are declared:
...

outputPort OutputPort1 {
    location: "socket://localhost:9000/"
    protocol: sodep
    interfaces: Interface1
}

outputPort OutputPort2 {
    location: "socket://localhost:9001/"
    protocol: sodep
    interfaces: Interface2
}

outputPort OutputPort3 {
    location: "socket://localhost:9002/"
    protocol: sodep
    interfaces: Interface3
}

inputPort InputPort1 {
    location: "socket://localhost:8000/"
    protocol: soap
    interfaces: MyInterface
}

inputPort InputPort2 {
    location: "socket://localhost:8001/"
    protocol: sodep
    interfaces: MyInterface
}

...
Services
A service is the key element of a jolie program, it is the minimal artifact that can be designed and developed with Jolie. In Jolie everything is a service, a composition of services is a service. An application written in Jolie is always a composition of services. There is no possibility to develop something different.
A service is always described by a service definition where the code is specified. Service definitions can be organized in Modules.
The service is a component that includes blocks that define its deployment and its behaviour. More precisely, a service node contains a collection of Jolie components, like named procedures and communication ports, and may specify a typed value used to parameterise its execution — this value can be passed either from the execution command used to launch the Jolie interpreter as well as by an importer that wants to use the service internally (e.g., see embedding below)). The syntax of service definition is the following:
[public | private] service ServiceName ( parameterName : parameterType) {
    // service related component..
    main {
        // ...
    }
}
The following example reports a service which provides a simple operation for multiplying a parameter with a numeric constant 8.
interface MyServiceInterface {
    RequestResponse: multiply ( int )( int )
}

service MyService() {

    execution: concurrent

    inputPort IP {
        location: "socket://localhost:8000"
        protocol: sodep
        interfaces: MyServiceInterface
    }

    main {
        multiply ( number )( result ) {
            result = number * 8
        }
    }
}
This service exposes one inputPort where it offers the operation multiply. Note that the interface has been defined outside the scope service but it is referenced within it input port IP. Interface declarations indeed are independently defined w.r.t. services, and they can only be referenced when used. The statement execution:concurrent specifies the execution modality to be used when running the service.
Parameterized services
To better understand how services and their parameters interact, let us modify the previous example by giving the possibility to specify the constant used for the multiplication, the location of the service and its protocol. In the following we report the Jolie module that specifies a type (for the parameter), an interface of a service and a service using it:
type MyServiceParam {
    factor: int
    location: string
}

interface MyServiceInterface {
    RequestResponse: multiply ( int )( int )
}

service MyService( p: MyServiceParam ) {

    execution: concurrent

    inputPort IP {
        location: p.location
        protocol: sodep
        interfaces: MyServiceInterface
    }

    main {
        multiply ( number )( result ) {
            result = number * p.factor
        }
    }
}
The service MyService requires a value of type MyServiceParam for its execution. Specifically, the values in the parameter include the location and protocol of the inputPort and the multiplicative factor used in the multiply operation.
Passing parameters from command line
It is possible to pass parameters to a service from command line, just storing the parameter values into a json file and padding it using argument --params. Let us considering the following json file, named params.json, to be passed to the service defined in the previous section:
{
    "location":"socket://localhost:8000",
    "factor": 2
}
The command line for running the service passing the parameters in params.json is:
jolie --params params.json my-service.ol
where we suppose that my-service.ol is the file where MyService has been stored.
Embedding a service
Services can be embedded within other services in order to run a cell (or Multi service). The primitive which allows for embedding a service is primitive embed. In the following example service ConfigurationService is embedded within service MainService:
service ConfigurationService {
    inputPort IP {
        location: "local"
        requestResponse: getDBConn( void )(string)
    }

    main {
        getDBConn ( req )( result ) {
            result = "SUPER_SECRET_CONN"
        }
    }
}

service MainService {

    embed ConfigurationService( ) as Conf

    main {
        getDBConn@Conf( )( res )
    }
}
More details about embedding can be found at section Embedding
Private services
In order to limit the service from being accessed by public, like types and interfaces, Jolie provides the ability to specify scope of access via public and private keywords. The service is defined as public by default when omitted. The access limitation for service helps us write secure and maintainable Jolie code. Below shows the code snippet for a Jolie module that can be execute only through command line interface. These two services, namely ConfigurationService and MainService, cannot be imported and used externally.
private service ConfigurationService {
    inputPort IP {
        location: "local"
        requestResponse: getDBConn( void )(string)
    }

    main {
        getDBConn ( req )( result ) {
            result = "SUPER_SECRET_CONN"
        }
    }
}

private service MainService {

    embed ConfigurationService( ) as Conf

    main {
        getDBConn@Conf( )( res )
    }
}
Service execution target
While having a single service is mandatory to directly run a given Jolie module, we can instruct the Jolie interpreter to target a custom-named service — and by extension, use the same instruction to select the target of execution of one of the services within a given module.
To select a custom-named Jolie module for execution, we use the interpreter parameter -s or the equivalent --service followed by the name of the target service, e.g., jolie --service myService.
Specifically, if the targeted module has only one service definition, the --service parameter is discarded and the service is executed.
Contrarily, when a module includes multiple service definitions, the Jolie interpreter requires the definition of the --service parameter, reporting an execution error both if the parameter or the correspondent service definition in the module is missing.
In the example below, we show a module where two services are defined. Service MyService require parameters to be executed, whereas service MainService does not require them, but it embeds service MyService by passing parameters in statement embed.
from console import Console

type MyServiceParam {
    factor: int
    protocol: string
}

interface MyServiceInterface {
    RequestResponse: multiply( int )( int )
}

service MyService ( p: MyServiceParam ) {
    inputPort IP {
        location: "local"
        protocol: p.protocol
        interfaces: MyServiceInterface
    }

    main {
        multiply ( number )( result ) {
            result = number * p.factor
        }
    }
}

service MainService {
    embed Console as Console
    embed MyService( { .protocol = "sodep", .factor = 2 } ) as Service

    main {
        multiply@Service( 3 )( res ) // res = 6
        println@Console( res )()
    }
}
In order to run it, the following command line must be used:
jolie --service MainService script.ol
Module System and Import Statement
The Jolie module system is a mechanism that allows developers to share and reuse Jolie code from different files.
A Jolie module can be accessed and used through the import statement.
Definitions
The terminology for the module system differs among programming languages, thus it is useful to have a concrete definition before we delve into one for Jolie.
The Jolie module system is built upon three different components, namely: packages, modules, and symbols:
-
a symbol is a named definition declared in a file. Symbols are either
typedefinitions,interfacedefinitions, orservicedefinitions. As in other languages, the access to Jolie symbols can be restricted with the usual access modifiers prefixing of the symbol definition. Symbols without an access modifier are consideredpublicby default, whileprivateones are inaccessible from the importer; -
a module corresponds to a Jolie file and it contains a set of symbols. To make a Jolie module directly executable (e.g., runnable with the command
jolie myFile.ol), we need to have specified just oneservicewhich itself contains the blockmain { ... }. This single service (andmainprocedure) is the execution target/entry-point of the Jolie interpreter. Drawing a parallel, programmers define amainmethod in a Java class when that unit is the entry-point of execution: hence, the method is implemented in applications that define a specific execution flow, while libraries frequently omit amainmethod as they are modules imported and used by other projects. When there are more and one service per module, the interpreter prohibits direct the execution of modules and requires the definition of the--serviceparameter (explained below); -
a package is a directory that contains one or more Jolie modules. The
importmechanism uses the package name — i.e., the directory name — to traverse and locate the target module in the file system.
Import Statement
The syntax of the import statement is
from moduleSpecifier import importTarget_1 [as alias_1], ..., importTarget_n [as alias_n]
The importing module is defined by the moduleSpecifier. Users can use a dot . as path separator between packages and modules. Each identifier before the last one defines the packages where the importing module resides, while the last identifier represents either the importing package or the importing module name. If the last identifier is a package, Jolie module parser will attempt to look up for a module named main in particular package, or else it is a module.
Hence, the import fragment from A.B.C.d would read "look into folder A, then B, then C, check if d is a folder; if so, open module (the file) main in d, otherwise, open module (the file) d and import the following symbols (omitted)". When prefixed with a . module lookups are resolved from the location of the importing file, rather than the working directory from which the Jolie interpreter have been launched. E.g.,
from A import AInterface
// import AInterface definition from module A or A.main if A is a package.

from .B import BType as BLocalType
// import BType definition as BLocalType from module B (or B.main if B is a package) in the same package.
The second part of the import statement, importTarget, is a list of symbol names defined in the target module, with an optional qualified name to bind to the local execution environment denoted by using 'as' keyword. E.g.,
from package.module import symbolA // Absolute import
from .module import symbolB as localB // Relative import
Jolie also supports the importing of all the (public) symbols defined in a given module, with the wildcard keyword *, e.g., from myPackage.myModule import * — wildcard-imported symbols cannot be aliased, as they are imported in bulk.
Debugging the import system
The import statement executes in three stages:
- modules lookup;
- modules parsing;
- symbol binding.
For each import statement, the Jolie interpreter resolves the import as specified in the module path, performing a lookup to the importing source.
The source code of the imported target is then parsed and the symbol definitions are bound to the local execution environment.
Any errors that occur during the execution of an import statement, such as modules/symbols not found or illegal accesses of symbols terminate the execution of the interpreter.
Module Lookup strategies
During the module lookup, the Jolie interpreter uses the module path to identify and attempt to locate the imported module, resolving it following either an absolute or a relative (when the path is prefixed by a .) location strategy.
Absolute paths
For absolute paths, the interpreter performs the lookup within the directory of execution of the Jolie interpreter and the system-level directories where the modules of the Jolie standard library reside.
Let us illustrate the followed procedure to define the priorities of module lookup with a concrete example.
To do that, we first define some labels to represent the relevant parts of the module path used in the lookup:
- let
PATHrepresent the whole module path, e.g.,p1.p2.mod; - let
HEADrepresent the prefix of the path, e.g,,p1inp1.p2.mod; - let
TAILrepresent the suffix of the path, e.g.,p2.modinp1.p2.mod.
The first thing the absolute-path lookup does is looking for the module within the execution directory of the Jolie interpreter.
Hence, let WorkingDir represent the absolute path of the execution directory, we first lookup modules within WorkingDir in the following order:
- we look for the module following the nesting structure of the
PATHunder theWorkingDir; - if the above attempt fails, we look for a packaged version of Jolie services — which are files with the extension
.jap— contained within thelibsubdirectory of theWorkingDir. Specifically, we look for a.japfile namedHEAD.japwhich, if found, is inspected following the nesting structure of theTAIL; - if the above attempt fails, we apply the procedures 1. and 2. to the system-level directories (e.g., from the
packagesdirectory of the $JOLIE_HOME folder)
Relative paths
Relative paths (denoted by the . prefix) are resolved starting from the location of the importer.
Besides the first ., which signifies the usage of a location-relative resolution strategy, any following . indicates the traditional upward traversal of directories.
Let us label ImporterDir the directory of the importer module, then:
- a relative path import of the shape
.modwould look for the modulemodinsideImporterDir; - a relative path import of the shape
..modwould look for the modulemodin the parent directory ofImporterDir; - a relative path import of the shape
...modwould look for the modulemodin the parent of the parent directory ofImporterDir, and so on.
Reiterating the concept with the example path used in the previous section:
- the relative path
.p1.p2.modwould be resolved by looking for the modulemodwithin the nested directoriesImporterDir,p1, andp2; - a relative path import of the shape
..p1.p2.modwould be resolved by looking for the modulemodfrom the parent ofImporterDir, followed with the nested foldersp1andp2.
Package Manager for Jolie
The jolie package manager jpm is the tool for managing packages in Jolie. jpm can be installed using npm with following command
npm install -g @jolie/jpm
Note that jpm requires NodeJS version 18 or newer to operate.
Jolie packages uses the benefit of node ecosystem to provide the developer-friendly experience on building the packages. jpm manages a jolie specific field in the package.json. Which specify Jolie packages that the project is depended on.
Create Jolie project with npm create
Jolie provides an easy way to create a jolie project via npm create command. In an empty directory, execute the following command and follow the instruction. The command will create a bootstrap Jolie project based on type user choosing and automatically activate jpm on the fly.
npm create jolie
Activate jpm on a Jolie project
In order to activate jpm on an existing Jolie project, it requires package.json file to be present on the root directory of the project. Which can be done via executing npm init command. Following with jpm init command
npm init --y # Creates npm project

jpm init # Adds jolie's specific field to package.json
jpm Usage
jpm capable of fetching packages from both npm and maven. The latter is useful for the project that only required importing java classes to the classpath e.g. database driver. A dependency can be install using the following command
Adding dependency
jpm install [TARGET[@version]] [-r mvn|npm]

ARGUMENTS
    TARGET  Target package to add to dependency

FLAGS
    -r, --repo=(mvn|npm) the lookup repository (mvn for maven)

EXAMPLES
    $ jpm install
    scan entries from package.json and download all dependencies

    $ jpm install @jolie/websocket
    add @jolie/websocket into the project

    $ jpm install org.xerial:sqlite-jdbc
    add sqlite's jdbc driver to the project
jpm will download and extract the dependency to the proper directory in the project.
Removing dependency
USAGE
    $ jpm remove [TARGET]

ARGUMENTS
    TARGET  Target package

DESCRIPTION
    Remove Jolie related dependency to the project

    Currently, it removes the corresponding entry on package.json file and perform install command


EXAMPLES
    $ jpm remove jolie-jsoup
        Remove jolie-jsoup from the dependencies
Under the hood of jpm's package.json
jpm operate only on jolie field in package.json. The field itself contains the information of the dependency and which repository to fetch the data from. The rest of the content inside package.json is left to be managed by npm, so we can fully use the potential of npm on development to publishing the package to npm repository. The jolie field should not be modified manually.
For more information, inquiry, or suggestion, please use jpm's github or join the discord.
Communication Primitives
Communication primitives are strictly related to the operations declared in the interfaces and the ports defined into the service. Communication primitives can be divided in two categories:
- input primitives
- output primitives
Input primitives are triggered by a message reception, whereas the output primitives enable a message sending.
Input primitives
Input primitives can be divided in two types which also correspond to those used into the interface declaration:
- one-way: a message can be received from an external caller. It must correspond to a OneWay operation declared into an interface.
- request-response: a message can be received from an external caller, and a synchronous reply can be sent back. It must correspond to a RequestResponse operation declared into an interface.
In order to program a one-way operation inside the behaviour of a service, it is sufficient to declare the name of the OneWay operation published into an inputPort of the service followed by the name of the variable between brackets where the received message will be stored.
operation_name( request )
On the other hand, a request-response operation requires the name of a RequestResponse operation defined into an interface followed by two variables: the former is in charge to store the receiving message whereas the latter is in charge to store the replying message. Both the variables must be defined within brackets. Since a request-response primitive is a synchronous primitive, between the request and the response message some code can be executed. The caller will wait for the termination of that code before receiving for the reply.
operation_name( request )( response ){
    // code block
}
As an example let us consider the following service which has two operations defined. The former is a one-way operation and the latter a request-response one.
from console import Console

interface MyInterface {
OneWay:
    myOW( string )
RequestResponse:
    myRR( string )( string )
}

service MyService {
    execution: concurrent

    embed Console as Console

    inputPort myPort {
        location: "socket://localhost:8000"
        protocol: sodep
        interfaces: MyInterface
    }

    main {
        [ myOW( request ) ]{ println@Console("OW:" + request )() }

        [ myRR( request )( response ) {
            println@Console("RR:" + request )();
            response = "received " + request
        }]
    }
}
Output primitives
Output primitives allow for sending messages to some input operations defined on another service. Also the output primitives can be divided into two categories:
- notification: a message can be sent to a receiving one-way operation.
- solicit-response: a message can be sent to a receiving request-response operation. The solicit-response is blocked until the reply message is received.
The syntax of notification and solicit-response resembles those of one-way and request-response with the exception that the operation name is followed by the token @ and the name of the outputPort to be used for sending the message. Here in the following, we report the syntax of the notification where OutputPort_Name is the name of the outputPort to be used and request is the variable where the sending message is stored.
operation_name@OutputPort_Name( request )
Analogously, in order to program a solicit-response it is necessary to indicate the port used to send the message. Differently from the one-way primitive, in the solicit-response one the first variable contains the message to be sent and the second one contains the variable where the reply message will be stored. No code block is associated with a solicit-response primitive because it simply sends a message and waits until it receives a response from the requested service.
operation_name@OutputPort_Name( request )( response )
In the following we report a possible client of the service above which is able to call the operations myOW and myRR in sequence:
from console import Console

execution: concurrent

interface MyInterface {
OneWay:
    myOW( string )
RequestResponse:
    myRR( string )( string )
}

service MyService {
    embed Console as Console

    execution: single

    outputPort myOutputPort {
        location: "socket://localhost:8000"
        protocol: sodep
        interfaces: MyInterface
    }

    main {
        myOW@myOutputPort( "hello world, I am the notification" );
        myRR@myOutputPort( "hello world, I am the solicit-response" )( response );
        println@Console( response )()
    }
}
Solicit-Response timeout
It is possible to set the response timeout of a solicit-response by specifying the engine argument responseTimeout when running Jolie. Details can be found at page Basics/Engine Argument.
Example
Here we discuss a simple example where both OneWay/Notification and RequestResponse/SolicitResponse primitives are used. The complete code can be checked and downloaded at this link.
The example's architecture is reported below.

A newspaper service collects news sent by authors, users can get all the registered news into the newspaper. The interface of the newspaper service defines two operations:
- sendNews which is a OneWay operation used by authors for sending news to the newspaper service
- getNews which is a RequestResponse operation used by users for getting the list of the registered news
type News: void {
    .category: string
    .title: string
    .text: string
    .author: string
}

type GetNewsResponse: void {
    .news*: News
}

type SendNewsRequest: News

interface NewsPaperInterface {
    RequestResponse:
        getNews( void )( GetNewsResponse )
    OneWay:
        sendNews( SendNewsRequest )
}
The implementation of the two operations is very simple; we exploit a global variable for storing all the incoming news. When the getNews is invoked, we just return the list of the stored news. Details about the global variables can be found in section Processes.
from NewsPaperInterface import NewsPaperInterface


service NewsPaper {
    execution: concurrent

    inputPort NewsPaperPort {
        location:"auto:ini:/Locations/NewsPaperPort:file:locations.ini"
        protocol: sodep
        interfaces: NewsPaperInterface
    }

    main {
        [ getNews( request )( response ) {
            response.news -> global.news
        }]

        [ sendNews( request ) ] { global.news[ #global.news ] << request }
    }
}
The author and the user can invoke the NewsPaper by exploiting two jolie scripts, author.ol and user.ol respectively. The two scripts can be run in a separate shell with respect to the newspaper one. In the following we report the code of the twi scripts:
//author.ol
from NewsPaperInterface import NewsPaperInterface
from console import Console
from console import ConsoleInputInterface

service AuthorClient {

    embed Console as Console

    inputPort ConsoleInput {
        location: "local"
        Interfaces: ConsoleInputInterface
    }

    outputPort NewsPaper {
        location: "socket://localhost:9000"
        protocol: sodep
        interfaces: NewsPaperInterface
    }

    main {
        /* in order to get parameters from the console we need to register the service to the console one
        by using the operatio registerForInput. After this, we are enabled to receive messages from the console
        on input operation in (defined in console.iol)*/
        registerForInput@Console()();
        print@Console("Insert category:")(); in( request.category );
        print@Console("Insert title:")(); in( request.title );
        print@Console("Insert news text:")(); in( request.text );
        print@Console("Insert your name:")(); in( request.author );
        sendNews@NewsPaper( request );
        println@Console("The news has been sent to the newspaper")()
    }
}
//user.ol
from NewsPaperInterface import NewsPaperInterface
from console import Console


service UserClient {

    embed Console as Console
    outputPort NewsPaper {
        location: "socket://localhost:9000"
        protocol: sodep
        interfaces: NewsPaperInterface
    }

    main {
        getNews@NewsPaper()( response );
        for( i = 0, i < #response.news, i++ ) {
            println@Console( "CATEGORY: " + response.news[ i ].category )();
            println@Console( "TITLE: " + response.news[ i ].title )();
            println@Console( "TEXT: " + response.news[ i ].text )();
            println@Console( "AUTHOR: " + response.news[ i ].author )();
            println@Console("------------------------------------------")()
        }
    }
}
Type Mismatching
In Jolie, whenever a message is sent or received through a port, its type is checked against what specified in the port's interface. An invoker sending a message with a wrong type receives a TypeMismatch fault.
The TypeMismatch fault can be easily handled by exploiting the fault handling, as you can do with common faults:
scope ( myScope )
{
    install(
        TypeMismatch => println@Console( myScope.TypeMismatch )()
    );
    // code
}
Type mismatching in one-way operations
A TypeMismatch check is performed both when a message is sent and received in one-way operations. In the former case the sender checks if the type of the output message matches with the one declared operation's interface. In case of mismatch, the TypeMismatch fault is raised and the message is not sent. In the latter case, the receiver checks the type of the incoming message and, if its type does not match, the message is not received and a TypeMismatch warning is printed at console.
In case a TypeMismatch is raised by the receiver, no fault is sent back to the invoker as a response. Thus, in case a mismatching-typed message is correctly sent by the invoker, it is discarded by the receiver, keeping its behaviour unaffected, while the invoker is not notified with a fault message.
Type mismatching in request-response operations
TypeMismatch fault in request-response operations leads to four different scenarios, summed in the table below:
| Fault raised in REQUEST messages | Fault raised in RESPONSE messages | |
|---|---|---|
| SENDER side | The message is not sent;a TypeMismatch exception is raised. | a TypeMismatch exception is raised. |
| RECEIVER side | The message is discarded;a warning message is sent to console;a TypeMismatch fault message is sent to the sender | a TypeMismatch exception is raised.a TypeMismatch fault is sent to the sender. |
Handling Simple Data
Basic data types
Jolie is a dynamically typed language: variables do not need to be declared, and they do not need to be assigned a type in advance by the programmer. The value of a variable is type checked at runtime, whenever messages are sent or received to/from other services.
Jolie supports seven basic data types:
bool: booleans;int: integers;long: long integers (withLorlsuffix);double: double-precision float (decimal literals);string: strings;raw: byte arrays;void: the empty type.
Values of type raw cannot be created directly by the programmer, but are supported natively for data-passing purposes.
Furthermore, Jolie supports the any basic type, which means a value that can be of any basic type.
In the following example, differently typed values are passed into the same variable:
a = 5
a = "Hello"
Jolie supports some basic arithmetic operators:
- add (
+) - subtract (
-) - multiply (
*) - divide (
/) - modulo (
%)
Their behaviour is the same as in other classical programming languages. The language also supports pre-/post-increment (++) and pre-/post-decrement (--) operators.
An example of the aforementioned operators follows:
a = 1
b = 4

n = a + b/2 // n = 3
n++ // n = 4
n = ++a + (b++)/2 // n = 4
Additional meanings: + is the string concatenation and matches the OR on bools (||), * matches the AND on bools (&&) and undefined - var matches the negation on bools (!).
Casting and checking variable types
Variables can be cast to other types by using the corresponding casting functions: bool(), int(), long(), double(), and string(). Some examples follow:
s = "10";
n = 5 + int( s ); // n = 15

d = "1.3";
n = double( d ); // n = 1.3
n = int ( n ) // n = 1
Runtime type checking of a variable: instanceof
A variable type can be checked at runtime by means of the instanceof operator, whose syntax is:
expression instanceof (native_type | custom_type)
instanceof operator can be used to check variable typing with both native types and custom ones (see type subsection in Data Types section). Example:
s = "10";
n = s instanceof string; // n = true
n = s instanceof int; // n = false
n = ( s = 10 ) instanceof int; // n = true
Working with strings
Strings can be inserted enclosing them between double quotes. Character escaping works like in C and Java, using the \ escape character:
s = "This is a string\n"
Strings can be concatenated by using the plus operator:
s = "This is " + "a string\n"
String formatting is preserved, so strings can contain tabs and new lines:
s = "
JOLIE preserves formatting.
    This line will be indented.
                    This line too.
"
Undefined variables
All variables start as undefined; that is, they are not part of the state of the program. A variable becomes defined when a value is assigned to it.
To check whether a variable is defined, you can use the primitive predicate is_defined:
a = 1
c1 = is_defined( a ) // c1 is true
c2 = is_defined( b ) // c2 is false
Sometimes it is useful to undefine a variable, i.e., to remove its value and make it undefined again. Undefining a variable is done by using the undef statement, as shown in the example below.
a = 1
undef( a )
if ( is_defined( a ) ) {
    println@Console( "a is defined" )()
} else {
    println@Console( "a is undefined" )()
}
The operators behave like this:
undefined + var = varundefined - var = -var(negation of numbers and booleans)undefined * var = varundefined / var = 0undefined % var = var
Dynamic arrays
Arrays in Jolie are dynamic and can be accessed by using the [] operator, like in many other languages.
Example:
a[ 0 ] = 0;
a[ 1 ] = 5;
a[ 2 ] = "Hello";
a[ 3 ] = 2.5
A key point for understanding and programming services in Jolie is that every variable is actually a dynamic array.
Jolie handles dynamic array creation and packing. This makes dealing with complex data easier, although Jolie hides this mechanism when the programmer does not need it. Whenever an array index is not specified, the implicit index for that variable is set by default to 0 (zero), like shown in the example below.
a = 1 // Jolie interprets this as a[0] = 1
println@Console( a[ 0 ] )() // Will print 1
Array size operator #
Since its dynamic-array orientation, one handy feature provided by Jolie is the array size operator #, which can be used as shown in the examples below.
a[ 0 ] = 0;
a[ 1 ] = 1;
a[ 2 ] = 2;
a[ 3 ] = 3;
println@Console( #a )() // Will print 4
Nested arrays
In jolie, the type system does not permit directly nested arrays as known in other programming languages. This limitation may be compensated by the introduction of children nodes (explained in Data Structures).
Example: The two-dimensional array a may not be defined nor accessed by a[i][j], but a[i].b[j] is possible.
Notice
Certain input formats as JSON allow directly nested arrays though, e.g. [[1,2],[3,4]] . For this reason Jolie's JSON parser automatically inserts a _ -named children node for each array. If the JSON data was saved in the variable matrix , a single value may be obtained by matrix._[i]._[j] .
The underscore trick works in both directions: by expressing nested arrays in this way, all _ -named members again disappear on conversion (back) into JSON.
Composing Statements
Defining a Jolie application behaviour
The behaviour of a Jolie application is defined by conditions, loops, and statement execution rules.
Whilst conditions and loops implement the standard conditional and iteration constructs, execution rules defines the priority among code blocks.
Behavioural operators
Jolie offers three kinds of operators to compose statements in sequence, parallel, or as a set of input choices.
Sequence
The sequence operator ; denotes that the left operand of the statement is executed before the one on the right. The sequence operator syntax is:
statementA ; statementB
A valid use of the sequence operator is as it follows:
main
{
    print@Console( "Hello, " )();
    println@Console( "world!" )()
}
In practice, the ; is used only when composing sequences in a single line of code, since newlines are interpreted as ;. The code from before can be rewritten as:
main
{
    // This is interpreted as a sequence
    print@Console( "Hello, " )()
    println@Console( "world!" )()
}
Attention. Keep in mind that, in Jolie, ; is NOT the "end of statement" marker. For the sake of clarity, let us consider an INVALID use of the sequence operator:
main
{
    print@Console( "Hello, " )();
    println@Console( "world!" )(); // Invalid usage of ;
}
Parallel
The parallel operator | states that both left and right operands are executed concurrently. The syntax of the parallel operator is:
statementA | statementB
It is a good practice to explicitly group statements when mixing sequence and parallel operators. Statements can be grouped by enclosing them within an unlabelled scope represented by a pair curly brackets {}, like in the following example:
{ statementA ; statementB ; ... ; statementF }
|
{ statementG ; statementH }
The parallel operator has always priority on the sequence one, thus the following code snippets are equivalent:
A ; B | C ; D
{A ; B} | {C ; D}
Parallel execution is especially useful when dealing with multiple services, in order to minimize waiting times by managing multiple communications at once.
An example with parallel
In this example we consider the scenario where there are three services:
- trafficService: it provides information about traffic for a given city
- forecastService: it provides information about forecasts for a given city (in the specific case it just provides the current temperature)
- infoService: it concurrently retrieves information from both the forecast and the traffic service:
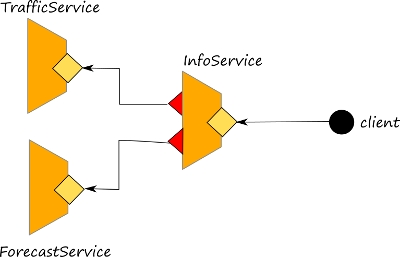
The behaviour of the InfoService is reported below. It is worth noting that the parallel operator combines the two calls to the other services, and the responses are stored into subnodes response.temperature and response.traffic, respectively.
main {
    getInfo(request)(response) {
        getTemperature@Forecast( request )( response.temperature )
        |
        getData@Traffic( request )( response.traffic )
    };
    println@Console("Request served!")()
}
Click here to get the comprehensive code of the example above.
Concurrent access to shared variables can be restricted through synchronized blocks.
Statements
Input choice
The input choice implements input-guarded choice. Namely, it supports the receiving of a message for any of the statements in the choice. When a message for an input statement IS_i can be received, then all the other branches are deactivated and IS_i is executed. Afterwards, the related branch behaviour branch_code_1 is executed. A static check enforces all the input choices to have different operations, so to avoid ambiguity.
The syntax of an input choice is:
[ IS_1 ] { branch_code_1 }
[ IS_i ] { branch_code_i }
[ IS_n ] { branch_code_n }
Let us consider the example below in which only buy or sell operation can execute, while the other is discarded.
[ buy( stock )( response ) {
    buy@Exchange( stock )( response )
} ] { println@Console( "Buy order forwarded" )() }

[ sell( stock )( response ) {
    sell@Exchange( stock )( response )
}] { println@Console( "Sell order forwarded" )() }
Note that input choice are usually used as the first statement of the service behaviour in order to specify all the available operations for that service. In this case all the operations are available to be called from external clients; in this case, when the service receives a message for an operation of the input choice, a session which executes the related branch will be run.
An example with input choice
In the link below we modified the example presented in the previous section (Parallel) where in service forecastService we specify two operations instead of one (getTemperature and getWind) composed within an input choice. The architecture is the same:
Click here to get the example code.
The forecast has been modified as follows:
main {
    /* here we implement an input choice among the operations: getTemperature and getWind */
    [ getTemperature( request )( response ) {
        if ( request.city == "Rome" ) {
            response = 32.4
        } else if ( request.city == "Cesena" ) {
            response = 30.1
        } else {
            response = 29.0
        }
    } ] { nullProcess }

    [ getWind( request )( response ) {
        if ( request.city == "Rome" ) {
            response = 1.40
        } else if ( request.city == "Cesena" ) {
            response = 2.01
        } else {
            response = 1.30
        }
    }] { nullProcess }
}
Conditions and conditional statement
Conditions are used in control flow statements in order to check a boolean expression. Conditions can use the following relational operators:
==: is equal to;!=: is not equal to;<: is lower than;<=: is lower than or equal to;>: is higher than;>=: is higher than or equal to;!: negation.
Conditions can be used as expressions and their evaluation always returns a boolean value (true or false). That value is the argument of conditional operators.
Some valid conditions are:
x == "Hi"
!x
25 == 10
The statement if ... else is used to write deterministic choices:
if ( condition ) {
    ...
} [else {
    ...
}]
Note that the else block is optional (denoted by its enclosure in square brackets).
Like in many other languages, the if ... else statement can be nested and combined:
if ( !is_int( a ) ) {
    println@Console( "a is not an integer" )()
} else if ( a > 50 ) {
    println@Console( "a is major than 50" )()
} else if ( a == 50 ) {
    println@Console( "a is equal to 50" )()
} else {
    println@Console( "a is minor than 50" )()
}
for and while
The while statement executes a code block as long as its condition is true.
while( condition ) {
    ...
}
Like the while statement, for executes a code block as long as its condition is true, but it explicitly defines its initialization code and the post-cycle code block, which is executed after each iteration.
for( init-code-block, condition, post-cycle-code-block ) {
    ...
}
Example:
include "console.iol"

main {
    for( i = 0, i < 10, i++ ) {
        println@Console( i )()
    }
}
Iterating over arrays
Attention. Arrays and the # operator are explained in detail in the Data Structures section.
Another form of for loops is the following, which iterates over all elements of an array a.
for( element in a ) {
    println@Console( element )()
}
This is equivalent to the following code, but it is much less error-prone, so it is recommended to use the code above instead of the one below.
for( i = 0, i < #a, i++ ){
    println@Console( a[i] )
}
Procedures
The main procedure may be preceded or succeeded by the definition of auxiliary procedures that can be invoked from any other code block, and can access any data associated with the specific instance they belong to. Unlike in other major languages, procedures in Jolie do not have a local variable scope.
In Jolie procedures are defined by the define keyword, which associates a unique name to a block of code. Its syntax follows:
define procedureName
{
    ...
    code
    ...
}
For example, the code below is valid:
define sumProcedure
{
    sum = x + y
}

main
{
    x = 1;
    y = 2;
    sumProcedure
}
Data Structures
Jolie data structures
Jolie data structures are tree-like similarly to XML data trees or JSON data trees.
Creating a data structure
Let us create a root node, named animals which contains two children nodes: pet and wild. Each of them is an array with two elements, respectively equipped with another sub-element (its name).
main
{
    animals.pet[0].name = "cat";
    animals.pet[1].name = "dog";
    animals.wild[0].name = "tiger";
    animals.wild[1].name = "lion"
}
Equivalent representations of the structure of animals in XML and JSON are, respectively:
<animals>
    <pet>
        <name>cat</name>
    </pet>
    <pet>
        <name>dog</name>
    </pet>
    <wild>
        <name>tiger</name>
    </wild>
    <wild>
        <name>lion</name>
    </wild>
</animals>
animals : {
    "pet" : [
        { "name" : "cat" },

        { "name" : "dog" }
    ],
    "wild" : [
        { "name":"tiger" },

        { "name":"lion" }
    ]
}
Attention. It is worth noting that each node of a tree is potentially an array of elements. If no index is defined, the first elements is always considered. Otherwise, the element index is always defined between square brackets [].
Navigating data structures
Data structures are navigated using the . operator, which is the same used for creating nested structures. The structures created by nesting variables are called variable paths. Some examples of valid variable paths follows:
myVar; // our variable AND the first element of the array
myVar[0]; // the first element of the array. Equivalent to myVar
myVar[i]; // the i-th element of the array
myVar.b[3]; // the fourth element of the array b nested in myVar
myVar.b.c.d // the d element nested in c nested in b nested in myVar
. operator requires a single value operand on its left. Thus if no index is specified, it is defaulted to 0. In our example the variable path at Line 5 is automatically translated to:
myVar[0].b[0].c[0].d
Dynamic look-up
Nested variables can be identified by means of a string expression evaluated at runtime.
Dynamic look-up can be obtained by placing a string between round parentheses. Let us consider the animals structure mentioned above and write the following instruction:
println@Console( animals.( "pet" )[ 0 ].name )()
The string "pet" is evaluated as an element's name, nested inside animals structure, while the rest of the variable path points to the variable name corresponding to pet's first element. Thus the output will be cat.
Also a concatenation of strings can be used as an argument of a dynamic look-up statement, like in the following example, which returns the same result as the previous one.
a = "pe";
println@Console( animals.( a + "t" )[ 0 ].name )()
foreach - traversing items
Data structures can be navigated by exploiting the foreach statement, whose syntax is:
foreach ( nameVar : root ) {
    //code block
}
foreach operator looks for any child-node name inside root and puts it inside nameVar, executing the internal code block at each iteration.
Combining foreach and dynamic look-up is very useful for navigating and handling nested structures:
include "console.iol"

main {
    animals.pet[0].name = "cat";
    animals.pet[1].name = "dog";
    animals.wild[0].name = "tiger";
    animals.wild[1].name = "lion";

    foreach ( kind : animals ){
        for ( i = 0, i < #animals.( kind ), i++ ) {
                println@Console( "animals." + kind + "[" + i + "].name=" + animals.( kind )[ i ].name )()
        }
    }
}
In the example above kind ranges over all child-nodes of animals (pet and wild), while the for statement ranges over the elements of the current animals.kind node, printing both it's path in the structure and its content:
animals.pet[0].name=cat
animals.pet[1].name=dog
animals.wild[0].name=tiger
animals.wild[1].name=lion
with - a shortcut to repetitive variable paths
with operator provides a shortcut for repetitive variable paths.
In the following example the same structure used in previous examples (animals) is created, avoiding the need to write redundant code:
with ( animals ){
    .pet[ 0 ].name = "cat";
    .pet[ 1 ].name = "dog";
    .wild[ 0 ].name = "tiger";
    .wild[ 1 ].name = "lion"
}
Attention. The paths starting with . within the scope of the with operator are just shortcuts. Hence, when writing paths with dynamically evaluated values, e.g., array lengths, the path declared as argument of the with operator is evaluated for each subpath in the body of the with .
For instance, the code below
with ( myArray[ #myArray ] ) {
    .first     = "1";
    .second = "2";
    .third    = "3"
}
will unfold as the one below
myArray[ #myArray ].first  = "1";
myArray[ #myArray ].second = "2";
myArray[ #myArray ].third  = "3"
At each line `#myArray` returns the size of `myArray`, which increases at each assignment, yielding the structure:
myArray[ 0 ].first[ 0 ] = "1"
myArray[ 1 ].second[ 0 ] = "2"
myArray[ 2 ].third[ 0 ] = "3"
undef - erasing tree structures
A structure can be completely erased - undefined - using the statement undef:
undef( animals )
Note that: undef ( ) does not remove the structure it is aliasing, only undefine the alias used.
For example, consider:
include "console.iol"

main {
    a.b.c.d.e = 12;
    a.b.c = 14;
    p -> a.b.c;
    println@Console(p)();
    undef(p);
    println@Console(a.b.c)();
    println@Console(a.b.c.d.e)()
}
Running the code shows that, after the operation undef on p, the original data path is unchanged.
<< - copying an entire tree structure
The deep copy operator << copies an entire tree structure into another.
zoo.sector_a << animals; undef( animals )
In the example above the structure animals is completely copied in structure sector_a, which is a nested element of the structure zoo. Therefore, even if animals is undefined at Line 2, the structure zoo contains its copy inside section_a.
For the sake of clarity a representation of the zoo structure is provided as it follows:
<zoo>
    <sector_a>
        <pet>
            <name>cat</name>
        </pet>
        <pet>
            <name>dog</name>
        </pet>
        <wild>
            <name>tiger</name>
        </wild>
        <wild>
            <name>lion</name>
        </wild>
    </sector_a>
</zoo>
Attention. At runtime d<< s explores the source (tree s) node-wise and for all initialised sub-nodes in s, e.g., s.path.to.subnode, it assigns the value of s.path.to.subnode to the corresponding sub-node rooted in d. According to the example d.path.to.subnode = s.path.to.subnode. This means that if d already had initialised sub-nodes, d<< s will overwrite all the correspondent sub-nodes of s rooted in d, leaving all the others initialised node of d unaffected.
d.greeting = "hello";
d.first = "to the";
d.first.second = "world";
d.first.third = "!";

s.first.first = "to a";
s.first.second = "brave";
s.first.third = "new";
s.first.fourth = "world";

d << s
The code above will change the structure of d from this:
d
|_ greeting = "hello"
|_ first = "to the"
    |_ first.second = "world"
    |_ first.third = "!"
to this
d
|_ greeting = "hello"
|_ first
|_ first = "to a"
|_ second = "brave"
|_ third = "new"
|_ fourth = "world"
Note that node d.first has been overwritten entirely by the subtree s.first which is defined as an empty node with four sub-nodes.
Using literals
You can create a custom data value from its literal specification.
Consider the following structure
d - 12
|_ greeting = "hello"
|_ first = "to the"
|_ first.second = "world"
|_ first.third = "!"
You can define d with the follow line:
d << 12 {.greeting ="hello", .first = "to the", .first.second = "world", .first.third="!" }
Note that: Remember to use << to copy the entire tree structure.
It's very common to make the mistake
d = 12 {.greeting ="hello", .first = "to the", .first.second = "world", .first.third="!" }
In this case only the root value (12) would be assigned to d
Using the literals in calling the service's operation
You can use the literals calling an operation's service.
So if we have the operation op at Service that allow a custom data type structure as d, defined above, we can call the operation in the follow mode
op@Service(12 {.greeting ="hello", .first = "to the", .first.second = "world", .first.third="!" })()
-> - structures aliases
A structure element can be an alias, i.e. it can point to another variable path.
Aliases are created with the -> operator, like in the following example:
myPets -> animals.pet;
println@Console( myPets[ 1 ].name )(); // will print dog
myPets[ 0 ].name = "bird"; // will replace animals.pet[ 0 ].name value with "bird"
println@Console( animals.pet[ 0 ].name )() // will print "bird"
Aliases are evaluated every time they are used.
Thus we can exploit aliases to make our code more readable even when handling deeply nested structure like the one in the example below:
include "console.iol"
main {
with ( a.b.c ){
.d[ 0 ] = "zero";
.d[ 1 ] = "one";
.d[ 2 ] = "two";
.d[ 3 ] = "three"
};
currentElement -> a.b.c.d;
for ( i = 0, i < #currentElement, i++ ) {
println@Console( currentElement[ i ] )()
}
}
The alias currentElement is used to refer to the i-th element of d nested inside a.b.c. At each iteration the alias is evaluated, using the current value of i variable as index. Therefore, the example's output is:
zero
one
two
three
BEWARE OF ->: a -> b
where b is a custom data type,is a lazy reference not a pointer to the node. The expression on the right of -> will be evaluated evaluated every time you are going to use the reference a. So we could say a is a lazy reference.
Consider the following use:
define push_env {
__name = "env-" + __deepStack
;
prev_env -> __environment.(__name)
;
__deepStack++
;
__name = "env-" + __deepStack
;
__environment.(__name) = __name
;
env -> __environment.(__name)
}
the idea is to have __environment as a root where every child variable represent an environment of execution.
if we evaluate prev_env and env at the end of the routine we will find that they have the same value.
prev_env is evaluated as __environment.(__name)
same expression of env .
If you are going to use static path (not dynamic) this type of problem will not arise, but if you are using dynamic look-up be careful of the type of implementation.
Constants
It is possible to define constants by means of the construct constants. The declarations of the constants are divided by commas. The syntax is:
constants {
const1 = val1,
const2 = val2,
...
contsn = valn
}
As an example let us consider the following code:
constants {
Server_location = "socket://localhost:8080",
ALARM_TIMEOUT = 2000,
standard_gravity = 9.8
}
Constants might also be assigned on the command line. Just call a program using jolie -C server_location=\"socket://localhost:4003\" program.ol to override Server_location. We can even remove its declaration from the constants list in case of a mandatory command line assignment.
Attention. Under Windows = is a parameter delimiter. To correctly use the command line option -C make sure to enclose the assignment of the constant between single or double quotes like jolie -C "server_location=\"socket://localhost:4003\"" program.ol .
Processes and Sessions
In Jolie a process is a running instance of a behaviour whereas a session is a process in charge to serve one or more requests. The two concepts are quite similar, thus the two terms could be used for referring the same entity. The only difference is that a process is a term which refers to an executable entity inside a Jolie engine, whereas a session is an entity which represents an open conversation among two or more services. Briefly, the process can be considered as the executable artifact which animates a session. A session always starts when triggered from an external message, whereas a process always starts when a session is triggered or when a Jolie script is run.
Processes
A process can be considered as the executable artifact which animates a session. In this section, we will discuss those statements that rule the execution of processes within the engine. In particular, we will show how to address concurrent execution of processes and synchronization.
Execution modality
The execution modality permits to specify the way a process must be executed within the engine. An process can be executed in three modalities:
- single
- sequential
- concurrent
The syntax of the execution modality is:
execution: single | concurrent | sequential
single is the default execution modality (so the execution construct can be omitted), which runs the program behaviour once. sequential, instead, causes the program behaviour to be made available again after the current instance has terminated. This is useful, for instance, for modelling services that need to guarantee exclusive access to a resource. Finally, concurrent causes a program behaviour to be instantiated and executed whenever its first input statement can receive a message.
In the `sequential` and `concurrent` cases, the behavioural definition inside the main procedure must be an input statement, thus the executed process always animates a session. Single modality is usually exploited for running scripts because they require to be triggered by command instead of a message reception.
A crucial aspect of processes is that each of them has its own private state, determining variable scoping. This lifts programmers from worrying about race conditions in most cases.
For instance, let us recall the server program given at the end of Communication Ports section. The execution modality of the NewsPaper is concurrent thus it can support multiple requests from both the script author.ol and user.ol.
from NewsPaperInterface import NewsPaperInterface
service NewsPaper {
execution: concurrent
inputPort NewsPaperPort {
location:"auto:ini:/Locations/NewsPaperPort:file:locations.ini"
protocol: sodep
interfaces: NewsPaperInterface
}
main {
[ getNews( request )( response ) {
response.news -> global.news
}]
[ sendNews( request ) ] { global.news[ #global.news ] << request }
}
}
main{} and init{}
main and init define the behaviour scope and the initializating one respectively. All the operations of the service must be implemented within the scope main, whereas the scope init is devoted to execute special procedures for initialising a service before it makes its behaviours available. All the code specified within the init{} scope is executed only once, when the service is started. The scope init is not affected by the execution modality. On the contrary, the code defined in the scope main is executed following the execution modality of the service.
As an example let us consider the newspaper service reported above enriched with a simple init scope where a message is printed out on the console:
from NewsPaperInterface import NewsPaperInterface
from console import Console
service NewsPaper {
execution: concurrent
embed Console as Console
inputPort NewsPaperPort {
location:"auto:ini:/Locations/NewsPaperPort:file:locations.ini"
protocol: sodep
interfaces: NewsPaperInterface
}
init {
println@Console("The service is running...")()
}
main {
[ getNews( request )( response ) {
response.news -> global.news
}]
[ sendNews( request ) ] { global.news[ #global.news ] << request }
}
}
When run the service will print out the following message in the console:
The service is running...
Global variables
Jolie also provides global variables to support sharing of data among different processes. These can be accessed using the global prefix:
global.myGlobalVariable = 3 // Global variable
myLocalVariable = 1 // Local to this behaviour instance
In the example reporters at this link it is shown the difference between a global variable and a local variable. The server is defined as it follows:
from ServiceInterface import ServiceInterface
from console import Console
service MyService {
embed Console as Console
execution: concurrent
inputPort Test {
location: "socket://localhost:9000"
protocol: sodep
interfaces: ServiceInterface
}
main {
test( request)( response ) {
global.count++
count++
println@Console("global.count:" + global.count )()
println@Console("count:" + count )()
println@Console()()
}
}
}
In the body of the request-response test the global variable global.count and the local variable count are incremented by one for each received message, then their value are printed out on the console. If we call such service ten times the output is:
global.count:1
count:1
global.count:2
count:1
global.count:3
count:1
global.count:4
count:1
global.count:5
count:1
global.count:6
count:1
global.count:7
count:1
global.count:8
count:1
global.count:9
count:1
global.count:10
count:1
It is worth noting that the global variable keeps its value independently from the executiing instance, thus it can be incremented each time a new session is executed. On the other hand the local variable is fresh each time.
Synchronisation
Concurrent access to global variables can be restricted through synchronized blocks, similarly to Java:
synchronized( id ){
//code
}
The synchronisation block allows only one process at a time to enter any synchronized block sharing the same id.
As an example, let us consider the service reported at this link
The register service has a concurrent execution and exposes the register request-response operation. register increments a global variable, which counts the number of registered users, and sends back a response to the client. A sleep call to time service, simulates the server side computation time.
RegisterInterface.ol/
type response {
message: string
}
interface RegisterInterface {
RequestResponse: register( void )( response )
}
register.ol/
from RegisterInterface import RegisterInterface
from time import Time
service Register {
execution: concurrent
embed Time as Time
inputPort Register {
location: "socket://localhost:2000"
protocol: sodep
interfaces: RegisterInterface
}
init
{
global.registered_users=0;
response.message = "Successful registration.\nYou are the user number "
}
main
{
register()( response ){
/* the synchronized section allows to access syncToken scope in mutual exclusion */
synchronized( syncToken ) {
response.message = response.message + ++global.registered_users;
sleep@Time( 2000 )()
}
}
}
}
The client executes five parallel calls to the service in order to register five different users.
main
{
{
register@Register()( response1 );
println@Console( response1.message )()
}
|
{
register@Register()( response2 );
println@Console( response2.message )()
}
|
{
register@Register()( response3 );
println@Console( response3.message )()
}
|
{
register@Register()( response4 );
println@Console( response4.message )()
}
|
{
register@Register()( response5 );
println@Console( response5.message )()
}
}
If executed, it is possible to observe that the parallel calls of the client are serialized by the service thanks to the primitive synchronized which implements a mutual access of the scope syncToken.
Sessions
In Jolie a session represents a communication session among the service that holds the session, and other participants. In the majority of cases, a session is enabled when a message is received on a request-response operation, and it is terminated when the response message is sent. In general, more interactions among different participants can be designed establishing a stateful session among them. In Jolie, a stateful session is always represented by a set of data which identifies it within the engine, that is called correlation set. A session is always animated by a specific running process in the engine. More sessions can be carried on by the same process at the same time.
Stateful sessions
Usually a service provides loosely coupled operations, which means that there is no correlation among the different invocations of different operations. Each invocation can be considered as independent from the others. Nevertheless, it could happen that we need to design sessions which can receive messages more than once from external invokers. In these cases, we need to correctly route the incoming messages to the right session.
Let us clarify with an example. Assume a scenario where there is a service which allows two users for playing Tris game (tic tac toe). The Tris game service will keep each game into a specific session. A user can participate to different games, thus it needs to send its move to the right session for correctly playing the game. In this case, we need to route each user message to the right session it is involved in. This is solved by sending for each message an extra information, usually a session identifier. We call these kind of information correlation sets.
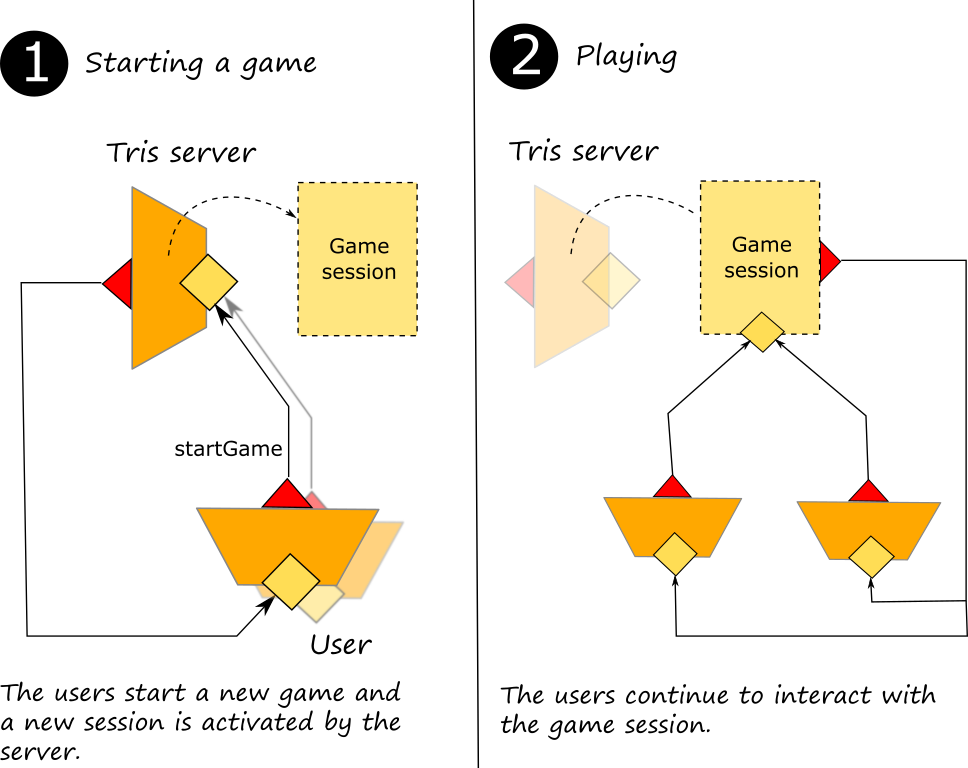
If you are curious on seeing how a tris game can be implemented in Jolie, you can find the code at this link
Correlation sets
Jolie supports incoming message routing to behaviour instances by means of correlation sets. Correlation sets are a generalisation of session identifiers: instead of referring to a single variable for identifying behaviour instances, a correlation set allows the programmer to refer to the combination of multiple variables, called correlation variables. In common web application frameworks this issue is covered by sid session identifier, a unique key usually stored as a browser cookie.
Correlation set programming deals both with the deployment and behavioural parts. In particular, the former must declare the correlation sets, instructing the interpreter on how to relate incoming messages to internal behaviour instances. The latter instead has to assign the concrete values to the correlation variables.
In the deployment part the cset is defined as it follows:
cset {
<variable name>: <List of type paths coupled with the correlation variable>
}
In the behavioural part, the cset is initialized as it follows:
csets.<variable name> = <variable value>
A precise definition of the syntax can be found in the section below
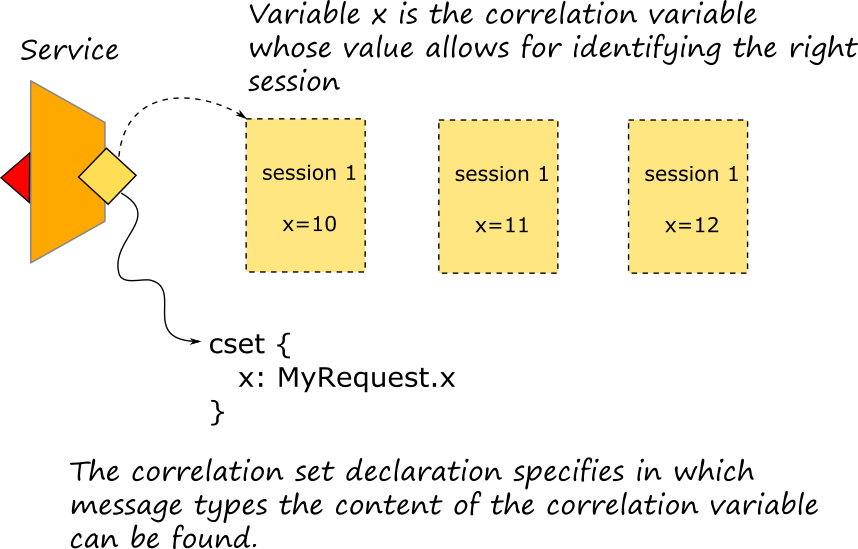
When a message is received, the interpreter looks into the message for finding the data node which contains the value to be compared with the correlation values. In the diagram above, the variable x is the correlation variable and it can be found in the message of type MyRequest in the subnode x.
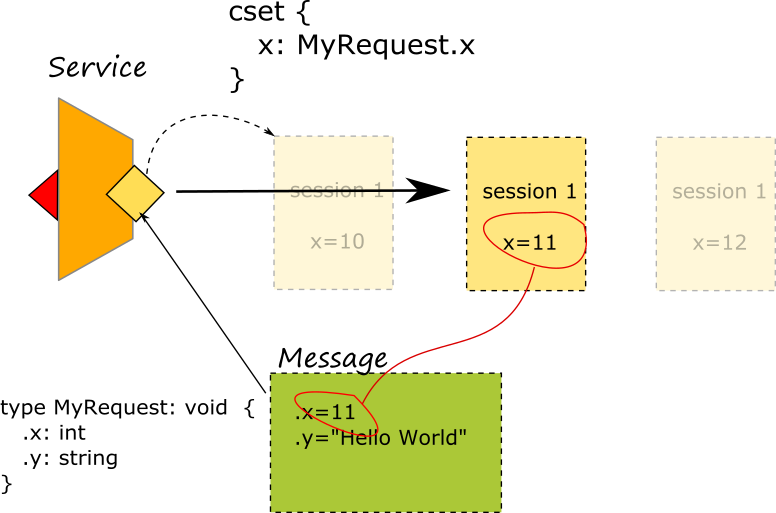
In the example of the tris game, the cset is defined in file tris.ol as it follows:
cset {
token: MoveRequest.game_token
}
where MoveRequest is a message type related to operation move defined in the interface TrisGameInterface.
type MoveRequest: void {
.game_token: string
.participant_token: string
.place: int
}
It is worth noting that the correlation variable is named token but it can be found in node game_token within the type MoveRequest.
Let us now commenting the behavioural part of the example: a game is started by means of operation startGame sent from a user to the tris service. If the startGame message does not contain any token, a new game token is generated by means of the primitive new together a a specific token for each participant, that which plays with circles and that which plays with crosses.
token = new;
...
global.games.( token ).circle_participant = new;
...
global.games.( token ).cross_participant = new;
All these token are stored into an hashmap at the level of a global variable. The circle and the game token are returned to the caller which starts to wait for a contender. When a second user calls the operation startGame by specifying a game token of an existing pending game (retrieved thanks to the operation listOpenGames), the game can be initiated and the second user receives the token for playing with the cross and the game token. At this point, the server calls itself on the operation initiateGame sending all the tokens.
The session started by the invocation of operation initiateGame is actually the game session to which the players must send their moves. Indeed, the fist action performed by such a session is the initialization of the correlation variable token with the actual token of the game:
csets.token = request.game_token;
Finally a loop is started for managing the right moves from the players. Each of them receives the actual status of the game on the operation syncPlaces and they will send their moves using the operation move. As we shown before, the message of operation move contains the node game_token which brings the actual token to be correlated with the variable token.
The primitive new
Jolie provides the primitive new which returns a fresh value to a correlation variable. new guarantees to return a value never returned by one of its previous calls. Its usage is very simple, it is sufficient to assign a variable with the value new:
x = new
Correlation sets syntax
Correlation sets are declared in the deployment part of a program using the following syntax:
cset {
correlationVariable_1: alias_11 alias_12, ...
correlationVariable_2: alias_21 alias_22, ...
}
The fact that correlation aliases are defined on message types makes correlation definitions statically strongly typed. A static checker verifies that each alias points to a node that will surely be present in every incoming message of the referenced type; technically, this means that the node itself and all its ancestors nodes are not optional in the type.
For services using sequential or concurrent execution modalities, for each operation used in an input statement in the behaviour there is exactly one correlation set that links all its variables to the type of the operation. Since there is exactly one correlation set referring to an operation, we can unambiguously call it the correlation set for the operation.
Whenever a service receives a message through an input port (and the message is correctly typed with relation to the port's interface) there are three possibilities, defined below.
- The message correlates with a behaviour instance. In this case the message is received and given to the behaviour instance, which will be able to consume it through an input statement for the related operation of the message.
- The message does not correlate with any behaviour instance and its operation is a starting operation in the behavioural definition. In this case, a new behaviour instance is created and the message is assigned to it. If the starting operation has an associated correlation set, all the correlation variables in the correlation set are atomically assigned (from the values of the aliases in the message) to the behaviour instance before starting its executing.
- The message does not correlate with any behaviour instance and its operation is not a starting operation in the behavioural definition. In this case, the message is rejected and a
CorrelationErrorfault is sent back to the invoker.
Another correlation set example
Let us consider an example in which a server prints at console concurrent messages coming from different clients. The complete code can be found here. Each time a client logs in, the server instantiates a unique sid, by means of the new function. To request any other operation (print or logout), each client must send its own sid in order to identify its session with the server.
type LoginRequest {
name: string
}
type Message {
sid: string
message?: string
}
interface PrinterInterface {
RequestResponse: login( LoginRequest )( Message )
OneWay: print( Message ), logout( Message )
}
The interface file contains the declaration of operations and data types. Since the sid subtype (OpMessage.sid) will be used as a variable of the correlation set, it is defined as a non-optional subtype (defaulted to [1,1]) and must be present in any message sent and received by all correlated operations.
//printer.ol
from PrinterInterface import PrinterInterface
from PrinterInterface import Message // we need to import also type Message to be used in the cset
from console import Console
service Printer {
/* here we define the correlation set we will use for correlating messages inside the same session */
cset {
/* sid is the variable used inside the session to identify the correlation set.
The values which come from messages whose type is OpMessage and the node is .sid will be stored
inside variable sid as identification key */
sid: Message.sid
}
embed Console as Console
execution: concurrent
inputPort PrintService {
location: "socket://localhost:2000"
protocol: sodep
interfaces: PrinterInterface
}
init {
keepRunning = true
}
main
{
/* here the session starts with the login operation */
login( request )( response ){
username = request.name
/* here we generate a fresh token for correlation set sid */
response.sid = csets.sid = new
response.message = "You are logged in."
}
while( keepRunning ){
/* both print and logout operations receives message of type OpMessage,
thus they can be correlated on sid node */
[ print( request ) ]{
println@Console( "User "+username+" writes: "+request.message )()
}
[ logout( request ) ] {
println@Console("User "+username+" logged out.")();
keepRunning = false
}
}
}
}
cset is the scope containing correlation variable declarations. A correlation variable declaration links a list of aliases. A correlation alias is a path (using the same syntax for variable paths) starting with a message type name, indicating where the value for comparing the correlation variable can be retrieved within the message.
In our example the correlation variable sid is linked to the alias Message.sid.
In scope main, the csets prefix is used to assign a value to the correlation variable sid. The same value is assigned to response.sid (via chained assignment), which is passed as a response to the client.
//client.ol
from PrinterInterface import PrinterInterface
from console import Console
from console import ConsoleInputInterface
service Client {
embed Console as Console
inputPort ConsoleInputPort {
location: "local"
interfaces: ConsoleInputInterface
}
outputPort PrintService {
location: "socket://localhost:2000"
protocol: sodep
interfaces: PrinterInterface
}
init {
registerForInput@Console()()
}
main
{
print@Console( "Insert your name: " )()
in( request.name )
keepRunning = true
login@PrintService( request )( response )
opMessage.sid = response.sid
println@Console( "Server Responded: " + response.message + "\t sid: "+opMessage.sid )()
while( keepRunning ){
print@Console( "Insert a message or type \"logout\" for logging out > " )()
in( opMessage.message )
if( opMessage.message != "logout" ){
print@PrintService( opMessage )
} else {
logout@PrintService( opMessage )
keepRunning = false
}
}
}
}
Finally, in its scope main, the client assigns the sid value to its variable opMessage.sid. It will be used in any other message sent to the server to correlate client's messages to its session on the server.
Correlation variables and aliases
So far we have shown how a correlation variable can be related to a one single subnode of a type, but generally there could be more messages which can contain a value to be correlated. We say there could be more aliases for the same correlation variable. Aliases ensure loose coupling between the names of the correlation variables and the data structures of incoming messages.
Let us consider the following scenario: a chat server allows its users to log in and choose the channel (identified by an integer) they want to join. Once subscribed into a channel a user can send a message, log out from the server or switch channel, by sending another subscription request.
Such a scenario can be modelled by means of four message type definitions (one for each operation), as shown in the snippet below:
// inteface.ol
type LoginType: void {
.name: string
}
type SubscriptionType: void {
.channel: int
.sid: string
}
type MessageType: void {
.message: string
.sid: string
}
type LogType: void {
.sid: string
}
interface ChatInterface {
RequestResponse:
login( LoginType )( LogType )
OneWay:
subscribe( SubscriptionType ),
sendMessage( MessageType ),
logout( LogType )
}
// server.ol
cset {
sid: SubscriptionType.sid
MessageType.sid
LogType.sid
}
It is worth noting that the correlation variable sid is linked to aliases SubscriptionType.sid, MessageType.sid, LogType.sid. Each time the server will receive a correlated-operation request, it will correlate any client to its corresponding session by checking the aliased value of sid.
Multiple correlation sets
Multiple correlation sets can be used in order to manage distributed scenarios. In the authentication example we model the case of an application which delegates the authentication phase to an external identity provider.
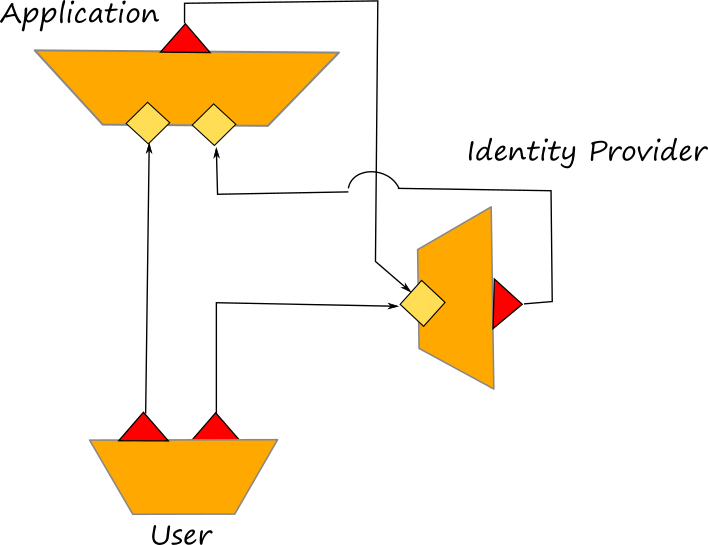
The sequence chart https://github.com/jolie/examples/tree/master/v1.10.x/02_basics/5_sessions/authentication of the exchanged messages follows:

First of all the user call the application for requesting a login and it is redirected to the identity provider. Before replying to the user, the application opens an authentication session on the identity provider (calling the operation openAuthentication) which returns a correlation identifier called auth_token. The auth_token is sent also to the user. At this point, the user can sends its credential to the identity_provider together with the auth_token in order to be authenticated. If the authentication has success, the identity_provider sends a success to the application, a failure otherwise. Finally, the user can check if it has access to the application calling the operation getResult, together with the session_id, on the application. The session_id is generated by the application after receiving the reply from the identity_provider.
It is worth noting that the in the application we define two correlation sets:
cset {
auth_token: OpenAuthenticationResponse.auth_token
AuthenticationResult.auth_token
}
cset {
session_id: GetResultRequest.session_id
PrintMessageRequest.session_id
ExitApplicationRequest.session_id
}
The former permits to identify the session thanks to auth_token whereas the latter exploits the session_id. Both of them identify the same session, but the token auth_token is used for identifying the messages related to the identity_provider whereas the session_id it is used for identifying the session initiated by the user into the application. Once logged indeed, the auth_token is not used anymore, whereas the session_id can be used by the user for accessing the application. It is worth noting that, after the reception of a success or a failure by the application, the auth_token is still available as a variable inside the session. But, since there are no more operations correlated with it in the behaviour (only the operations getResult, printMessage and exitApplication can be used), it is not possible that the auth_token can be used again for correlating the session.
The provide-until statement
The provide until statement eases defining workflows where a microservice provides access to a set of resources until some event happened. Such a statement is useful in combination with correlation sets, because it allows for accessing a specific subset of operations once a session is established.
The syntax is
provide
[ IS_1 ] { branch_code_1 }
[ IS_i ] { branch_code_i }
[ IS_n ] { branch_code_n }
until
[ IS_m ] { branch_code_m }
[ IS_j ] { branch_code_j }
[ IS_k ] { branch_code_k }
The inputs IS_1, ..., IS_n will be continuously available until one of the operations under the until (IS_m, ..., IS_k) is called.
In the authentication example described in the previous section, the application exploits a provide until for providing the operation printMessage to the final user, until she sends the exiting operation exitApplication:
provide
[ printMessage( print_request ) ] {
println@Console("Message to print:" + print_request.message )()
}
until
[ exitApplication( request ) ] {
println@Console("Exiting from session " + request.session_id )()
}
Sessions and Jolie libraries
Managing session-related calls impacts also on the libraries used by a Jolie program (after all, they are microservices too!). Sometimes it is useful to have a library "call back" its client, e.g., if executing some batch work or waiting for the user's input, for which we do not want to use a request-response pattern, but a one-way: the client enables the reception of some inputs from the library, which then will send a notification to the client each time a new input is ready.
A concrete example of that is operation in of the Console service, which, as seen in the example section on communication ports, receives inputs from the standard input.
While calling that operation on a single-session service does not pose any problem on where to route the incoming request, that is not the case for the concurrent and sequential execution modalities, where many instances can prompt the insertion of some data to the user.
To correctly route input messages to the appropriate session, the Console service puts in place the operation subscribeSessionListener (and its complementary unsubscribeSessionListener). That operation is useful to signal to the Console service that it should "tag" with a token given by the user (more on this in the next paragraph) the input received from the standard input, so that incoming input messages can be correctly correlated with their related session.
Technically, to support that functionality, we need to define a cset targeting the node InRequest.token (visible at the beginning of the code below) and to enable the tagging of input messages by the Console API, calling the operation registerForInput with a request containing the enableSessionListener node set to true. Then, to receive some message from the standard input (e.g., in( message )) we:
- define this session's token (e.g., we define a variable
tokenassigning to it a unique value with thenewprimitive); - subscribe our listener with this session's token (
subscribeSessionListener@Console( { token = token } )()); - wait for the data from the prompt (e.g.,
in( message ));
Finally, when we terminated this session's inputs, we can unsubscribe our listener for this session (unsubscribeSessionListener@Console( { token = token } )());
For a more comprehensive example, we report the code below.
// we define a cset on the InRequest.token node
cset {
sessionToken: InRequest.token
}
main
{
test()( res ){
// we registerForInput, enabling sessionListeners
registerForInput@Console( { enableSessionListener = true } )()
// we define this session's token
token = new
// we set the sessionToken for the InRequest
csets.sessionToken = token
// we subscribe our listener with this session's token
subscribeSessionListener@Console( { token = token } )()
// we make sure the print out to the user and the request for input are atomic
synchronized( inputSession ) {
println@Console( "insert response data for session " + token + ":" )()
// we wait for the data from the prompt
in( res )
}
// we unsubscribe our listener for this session before closing
unsubscribeSessionListener@Console( { token = token } )()
}
}
Dynamic Binding
Dynamic binding
Jolie allows output ports to be dynamically bound, i.e., their locations and protocols (called binding informations) can change at runtime. Such a feature is very important because it allows for the creation of dynamic systems where components (microservices) can be bound at runtime.
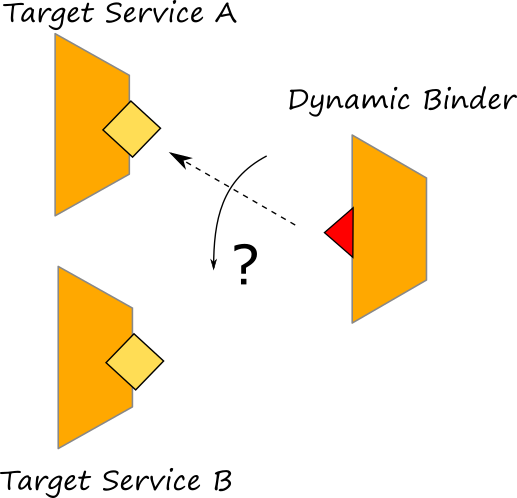
Dynamic binding in Jolie
Changes to the binding information of an output port is local to a session: the configuration of the output ports are considered part of the local state of each session, indeed. Dynamic binding is obtained by treating output ports as variables. As an example, let us consider this example, where there is a printer-manager that is in charge to forward a message to print, to the right target service depending on the printer selection of the client. There are two printer services available: printer1 and printer2. Both of them share the same interface.

In particular the code of the printer-manager follows:
from PrinterInterface import PrinterInterface
from PrinterManagerInterface import PrinterManagerInterface
service PrinterManager {
execution: concurrent
outputPort Printer {
protocol: sodep
interfaces: PrinterInterface
}
inputPort PrinterManager {
location: "socket://localhost:8000"
protocol: sodep
interfaces: PrinterManagerInterface
}
main {
print( request )( response ) {
if ( request.printer == "printer1" ) {
Printer.location = "socket://localhost:8001"
} else if ( request.printer == "printer2" ) {
Printer.location = "socket://localhost:8002"
}
printText@Printer( { text = request.text } )()
}
}
}
Here the dynamic binding is simply obtained by using a variable assignment.
if ( request.printer == "printer1" ) {
Printer.location = "socket://localhost:8001"
} else if ( request.printer == "printer2" ) {
Printer.location = "socket://localhost:8002"
}
Note that the location of port Printer can be simply overwritten by referring to it using the path Printer.location.
Example: programming a chat
We show a usage example of dynamic binding and binding transmission by implementing a simple chat scenario. It is composed by a chat-registry which is in charge to manage all the open chats and participants, and a user service which is in charge to manage a single participant connected to a chat. There are no limits to the users that can be connected to a chat. In the following diagram we report an example of the architecture where three users are connected to the service chat-registry.
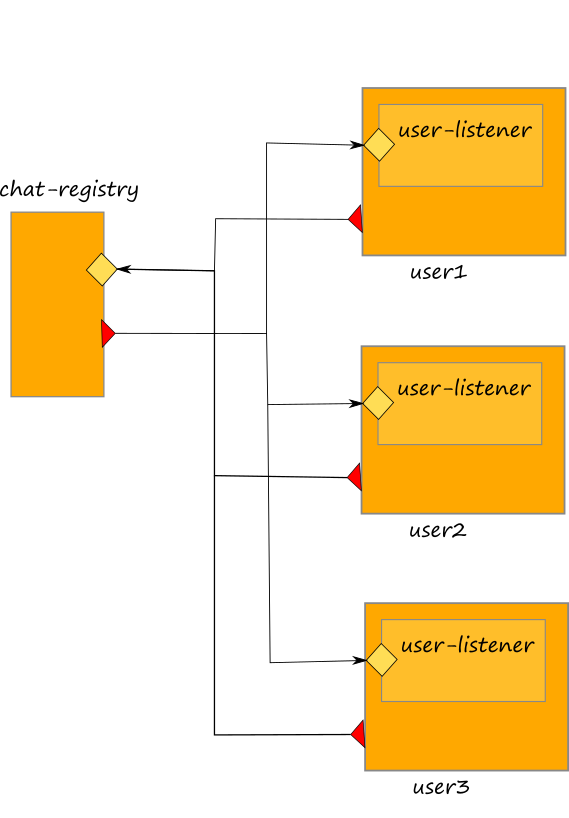
The code can be consulted at this link.
The chat-registry and each user service exhibit an inputPort for receiving messages. The outputPort of the chat-registry which points to users is not bound to any service, but it needs to be bound dynamically depending on the users connected to a chat.
The chat-registry offers two operations: addChat and sendMessage. The former operation permits to a user to connect to a chat, whereas the latter is exploited by the user to send messages to all the participants of a chat. The user service is composed by two services: service User, which is the main one, and service UserListener which is embedded by the former. Service UserListener is in charge to receive messages from the chat-registry whereas the latter just manages the console for enabling human interactions and sending local messages to the chat-registry.
Dynamic binding is exploited in the implementation of the sendMessage operation of the chat-registry where every time a message is received the user's outputPort is bound to each registered user for forwarding messages. Note that user's locations are stored into the hashmap global.chat.\( \).users.\( \).location which is set every time a user requests to be connected to a chat by using operation addChat.
[ sendMessage( request )( response ) {
/* validate token */
if ( !is_defined( global.tokens.( request.token ) ) ) {
throw( TokenNotValid )
}
}] {
/* sending messages to all participants using dynamic binding */
chat_name = global.tokens.( request.token ).chat_name
foreach( u : global.chat.( chat_name ).users ) {
/* output port dynamic rebinding */
User.location = global.chat.( chat_name ).users.( u ).location
/* message sending */
if ( u != global.tokens.( request.token ).username ) {
msg << {
message = request.message
chat_name = chat_name
username = global.tokens.( request.token ).username
}
scope( sending_msg ) {
install( IOException =>
target_token = global.chat.( chat_name ).users.( u ).token
undef( global.tokens.( target_token ) )
undef( global.chat.( chat_name ).users.( u ) )
println@Console("User service not found, removed user " + u + " from chat " + chat_name )()
)
setMessage@User( msg )
}
}
}
}
The operation setMessage is exploited by the chat-registry to send a message to each participant of the chat. Note that such an operation is exhibited in the inputPort of the service UserListener at the user side.
Compatibility of the interfaces
It is worth noting that, in case of dynamic binding, the interfaces defined in the output port must be compatible with those defined into the receiving input port. The following rules must be respected for stating that there is compatibility between two interfaces:
- all the operations defined in the interfaces at the output ports must be declared also in the interfaces at the input port (it does not matter in which interface an operation is defined, it is important that it is defined).
- all the types of the messages defined for the operations of the output port, must be compatible with the the correspondent type of the same operation at the receiving input port.
- a sending message type is considered compatible with the correspondent receiving one, when all the message it represents can be received without producing a TypeMismatch on the receiver part.
Dynamic Parallel
In Jolie, dynamic parallelism can be used for instantiating parallel activities within a service behaviour. It is achieved by using the primitive spawn but, differently from the parallel operator which allows for the parallel composition of statically defined activities, the spawn primitive permits to design a set of parallel activities whose number is defined at runtime.
The syntax of the spawn follows:
spawn( var over range ) in resultVar {
spawned session
}
where var is the index variable which ranges over range. resultVar is the variable vector which will contain all the results from each spawned activity. spawn session represents the session code to be executed in parallel for each spawn instantiation.
Semantics The execution of a spawn statement is completed when all its spawned sessions are completed. All the spawned sessions must be considered as common_service sessions_ instantiated by the spawn primitive and executed in parallel under the following conditions:
- they cannot contain input operations, thus they cannot receive messages from an external service (with the exception of the response messages of solicit responses).
- they can be instantiated only by means of the spawn primitive
- they cannot exploit correlation sets
- they inherit all the variable values and the outputPort declarations of the current service session which is executing the spawn
- as usual sessions, all the variables they manage are local to the scope of the spawned session
- they can exploit global variables. Note that global variables are in common to all the sessions of the service
Example: Temperature Average
In the following example whose code can be found at this link, the spawn primitive is used for collecting the temperature read from a bunch of sensors. This is the case of a IoT scenario, where several sensors are placed in different places of a building. Each sensor is modelled with a specific service called temperature_sensor.ol which just returns the current temperature at that node. The service temperature_collector.ol is a central service able to communicate with all the sensors. Each sensor registers itself to the central collector during the init.

In the following, we report the implementation of the operation getAverageTemperature which exploits the primitive spawn for collecting the temperatures reading from the sensors.
[ getAverageTemperature( request )( response ) {
index = 0;
foreach( sensor : global.sensor_hashmap ) {
/* creates the vector for ranging over in the spawn primitive */
sensor_vector[ index ] << global.sensor_hashmap.( sensor );
index++
};
/* calling the spawn primitive */
spawn( i over #sensor_vector ) in resultVar {
scope( call_sensor ) {
install( IOException =>
/* de-register a sensor if it does not respond */
undef( global.sensor_hashmap.( sensor_vector[ i ].id ) )
);
Sensor.location = sensor_vector[ i ].location;
getTemperature@Sensor()( resultVar )
}
}
;
/* calculate the average */
for( y = 0, y < #resultVar, y++ ) {
total = total + resultVar[ y ]
};
response = total / #resultVar
}]
All the locations of the sensors are stored into the global hashmap called sensor_hashmap. Before calling the spawn primitive the vector sensor_vector is prepared to keep all the necessary information about each sensor. In each spawn session the variable i, which ranges over the size of the vector sensor_vector, takes the value of the current spawn session, thus it is possible to bind the outputPort Sensor to each different sensor location.
The results are stored into variable resultVar which is a vector where, at each index, stores the response of the i-th sensor. Finally, the calculation of the average temperature is very easy to be made.
It is worth noting that each spawn session must be considered as a separate session with its own local variables, thus the location of the port Sensor can be bound separately from the others spawned sessions because its value is local and independent. At the same time all the variables of the parent session are available to be used (e.g. sensor_vector.
Advanced usage of the spawn primitive
The previous example has been modified at this link in order to consider the case that the sensors require to communicate asynchronously with the collector. In such a scenario the architecture has been modified as reported in the following diagram:
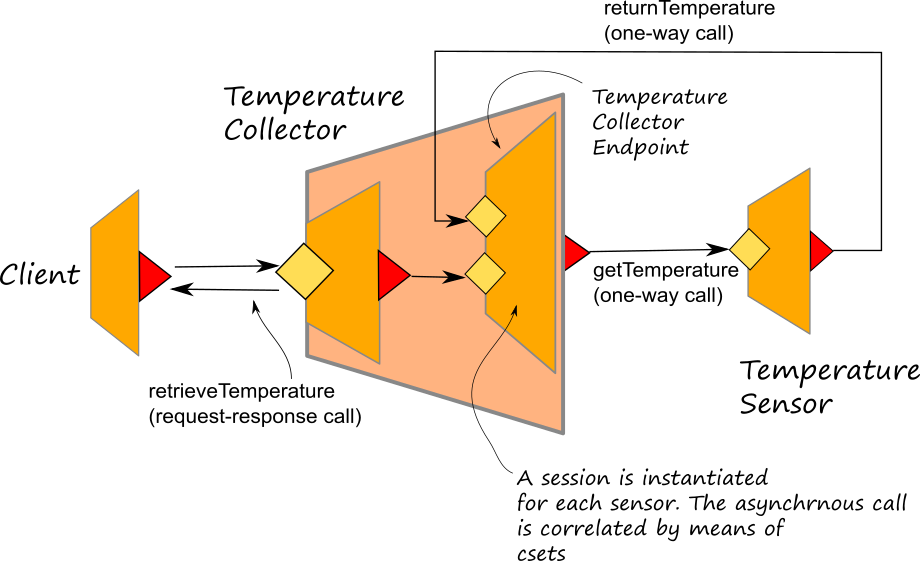
In this case an embedded service, called TemperatureCollectorEndpoint has been introduced for the TemperatureCollector in order to deal with the asynchronous communication with the sensors. In this case, the spawn primitive runs a session into the TemperatureCollectorEndpoint synchronously calling the operation retrieveTemperature (a request-response operation). In the request message the target location of the sensor is specified.
spawn( i over #sensor_vector ) in resultVar {
scope( call_sensor ) {
install( IOException =>
undef( global.sensor_hashmap.( sensor_vector[ i ].id ) )
);
rq_temp.sensor_location = sensor_vector[ i ].location;
retrieveTemperature@TemperatureCollectorEndpoint( rq_temp )( resultVar )
}
}
Once triggered, the TemperatureCollectorEndpoint session calls the sensor on a OneWay operation (getTemperature) and the sensor will reply by means of another OneWay operation (returnTemperature).
[ getTemperature( request ) ] {
random@Math()( r );
response.temperature = r*40;
response.token = request.token;
random@Math()( t );
timetosleep = t*10000;
println@Console("Simulate delay, sleeping for " + timetosleep + "ms" )();
sleep@Time( int( timetosleep ) )();
returnTemperature@TemperatureCollectorEndpoint( response )
}
The correlation between the two calls inside the TemperatureCollectorEndpoint is kept thanks to a correlation set freshly generated at the beginning of the session and joined to the variable named token.
retrieveTemperature( request )( response ) {
csets.token = new;
req_temp.token = csets.token;
Sensor.location = request.sensor_location;
getTemperature@Sensor( req_temp );
/* asynchrnous call */
returnTemperature( result );
response = result.temperature
}
Fault Handling
Basic fault handling in Jolie involves three main concepts: scope, fault and throw. They are not so different from other languages. The primitive install allows for the instantiation of the fault handlers within a scope.
Jolie is different from other common languages when we consider termination_handlers and compensation_handlers. In these cases the primitive install is used for promoting the compensation handlers for a given scope, instead of the fault handlers.
Scopes and faults
Scopes
A scope is a behavioural container denoted by a unique name and able to manage faults. Remarkably, in a service behaviour, the main is a scope named main. We say that a scope terminates successfully if it does not raise any fault signal; a scope obtains this by handling all the faults thrown by its internal behaviour.
The primitive throw
A fault is a signal, identified by its name, raised by a behaviour towards the enclosing scope when an error state is reached, in order to allow its recovery.
Jolie provides the statement throw to raise faults.
Scope and throw syntax follows.
scope( scope_name )
{
// omitted code
throw( FaultName )
}
Fault handlers, the primitive install
The install statement provides the installation of dynamic fault handlers within a scope. The primitive install joins a fault to a process and its handler is executed when the scope catches the fault.
scope( scope_name )
{
install (
Error1 => // fault handling code,
...
ErrorN => // fault handling code
);
// omitted code
throw( fault_name )
}
A fault which is not caught within a scope, is automatically re-thrown to the parent scope. In the following example whose runnable code can be found here, a simple jolie script asks the user to insert a number, if the number does not correspond to the secret one, a fault is raised.
include "console.iol"
main
{
registerForInput@Console()();
install( WrongNumberFault =>
/* this fault handler will be executed last */
println@Console( "A wrong number has been inserted!" )()
);
/* number to guess */
secret = 3;
scope( num_scope )
{
install( WrongNumberFault =>
/* this fault handler will be executed first, then the fault will be re-thrown */
println@Console( "Wrong!" )();
/* the fault will be re-thrown here */
throw( WrongNumberFault )
);
print@Console( "Insert a number: " )();
in( number );
if ( number == secret ) {
println@Console("OK!")()
} else {
/* here the fault is thrown */
throw( WrongNumberFault )
}
}
}
It is worth noting that the fault is firstly caught by the first handler defined within the scope num_scope which will execute the following code:
println@Console( "Wrong!" )();
throw( WrongNumberFault )
It will print the string "Wrong!" in the console and then it will re-throw the fault to the parent scope, the scope main. At this point the second fault handler defined at the level of the main scope will be executed:
println@Console( "A wrong number has been inserted!" )()
Install statement priority
An install statement may execute in parallel to other behaviours that may throw a fault. This introduces a problem of nondeterminism: how can the programmer ensure that the correct handlers are installed regardless of the scheduling of the parallel activities? Jolie solves this issue by giving priority to the install primitive with relation to the fault processing, making handler installation predictable.
As an example, consider the following code which can be found also here:
scope( s )
{
throw( f ) | install( f => println@Console( "Fault caught!" )() )
}
where, inside the scope s, we have a parallel composition of a throw statement for fault f and an installation of a handler for the same fault. The priority given to the install primitive guarantees that the handler will be installed before the fault signal for f reaches the scope construct and its handler is searched for.
RequestResponse Pattern and transmission of data into a fault
Uncaught fault signals in a request-response body are automatically sent to the invoker. Hence, invokers are always notified of unhandled faults. We introduced the syntax for declaring a fault into an interface at Section Interfaces
Here we transform the previous example script into a service in order to introduce a request-response operation (operation guess). You can find the complete code here
type NumberExceptionType: void{
.number: int
.exceptionMessage: string
}
interface GuessInterface {
RequestResponse: guess( int )( string ) throws NumberException( NumberExceptionType )
}
The interface defines the operation guess able to throw a NumberException, whose message type is NumberExceptionType.
include "GuessInterface.iol"
include "console.iol"
execution{ concurrent }
inputPort Guess {
Protocol: sodep
Location: "socket://localhost:2000"
Interfaces: GuessInterface
}
init {
secret = int(args[0]);
install( FaultMain =>
println@Console( "A wrong number has been sent!" )()
);
install( NumberException =>
println@Console( "Wrong number sent!" )();
throw( FaultMain )
)
}
main
{
guess( number )( response ){
if ( number == secret ) {
println@Console( "Number guessed!" )();
response = "You won!"
} else {
with( exceptionMessage ){
.number = number;
.exceptionMessage = "Wrong number, better luck next time!"
};
/* here the throw also attach the exceptionMessage variable to the fault */
throw( NumberException, exceptionMessage )
}
}
}
The server implements the throw statement in the else branch of operation guess behaviour. If the number sent by the client is different than the secret one, the request-response operation will send a NumberException fault to the client along the fault data.
Joining data to a fault
The syntax for joining data into a fault is a simple extension of the throw syntax given previously.
scope ( scope_name )
{
install ( FaultName => /* fault handling code */ );
// omitted code
throw ( FaultName, faultData )
}
In the server of the example above, it is obtained by the following piece of code:
with( exceptionMessage ){
.number = number;
.exceptionMessage = "Wrong number, better luck next time!"
};
throw( NumberException, exceptionMessage )
Let us check the client of the example in order to show how it handles the raise of the fault and prints the data sent from it:
main
{
install( NumberException=>
println@Console( main.NumberException.exceptionMessage )()
);
guess@Guess( 12 )( response );
println@Console( response )()
}
It is worth noting that, in order to correctly reference fault data within a fault handler, it is necessary to specify the scope path where the fault is contained. The path is always built in the following way:
- name of the scope.Name of the fault.Node of the message to access
Thus in the example, since we want to access the node exceptionMessage, we use the following path:
main.NumberException.exceptionMessage )()
Accessing a fault caught in a scope: the alias default
In some cases, we do not want to specify all the handlers of all the faults raised within a scope, but we want to specify a unique handler for all those faults without a handler. In this case it is possible to check if scopes caught faults and also to access the contents of faults thanks to alias default.
With syntax scope_name.default we access the name of the fault caught by the scope.
Used in combination with dynamic lookup, with syntax scope_name( scope_name.default ).faultMessage, we can access the message sent with the fault, for instance msg in the example below.
scope ( s ){
install( MyFault =>
println@Console( "Caught MyFault, message: " + s.MyFault.msg )()
);
faultMsg.msg = "This is all MyFault!";
throw( MyFault, faultMsg )
};
println@Console( "Fault message from scope s: " + s.( s.default ).msg )()
Termination and Compensation
Termination and compensation are mechanisms which deal with the recovery of activities.
Termination deals with the recovery of an activity that is still running.
Compensation deals with the recovery of an activity that has successfully completed its execution.
Each scope can be equipped with an error handler that contains the code to be executed for its recovery. As for fault handlers, recovery handlers can be dynamically installed by means of the install statement. Besides using a specific fault name, which installs the handler as a fault handler, the handler can refer to this. The term this refers to a termination or a recovery handler for the enclosing scope.
Concepts
Each scope is equipped with a termination handler and a compensation handler by default. If no code is joint with these handlers they will never be executed. The termination handler permits to finalize a scope when it is interrupted during its execution, whereas a compensation handler permits to recover a scope which successfully finished its activities. A termination handler is automatically executed when the related scope is interrupted by a parallel activity. A compensation handler is always executed by a fault handler of the parent scope which receives that handler from the child scope when successfully finishes. The most important fact is that in Jolie, a termination handler and a compensation handler are the same with the exception that: a termination becomes a compensation handler when the related scope finishes with success.
Let us clarify a little but more these concepts with the help of Fig 1. The diagram displays a scenario in which a scope A contains an activity that executes:
- an activity P;
- the scope B;
- the scope C.
Let us suppose that C finishes its execution. As a result, its compensation handler is promoted at the level of its parent's compensation handler (1). Afterwards, if P rises a fault f while the scope B is still running its execution (2), the scope B is stopped and its termination handler is executed (3). When the termination handler of B is finished, the fault handler of A can be executed (4).
Fault handlers can execute compensations by invoking the compensation handlers loaded within the corresponding scope, e.g., in the previous scenario the fault handler of A invokes the compensation handler of C.

Fig.1 Code P is executed in parallel with scopes B and C within scope A. C is supposed to be successfully ended, whereas B is terminated during its execution by the fault f raised by P. The fault handler of A can execute the compensation handler loaded by C.
Termination
Termination is a mechanism used to recover from errors: it is automatically triggered when a scope is unexpectedly terminated from a parallel behaviour and must be smoothly stopped.
Termination is triggered when a sibling activity raises a fault. Let us consider the following example:
include "console.iol"
main
{
scope ( scope_name )
{
install( this =>
println@Console( "This is the recovery activity for scope_name" )()
);
println@Console( "I am scope_name" )()
}
|
throw( FaultName )
}
In the example above, the code at Lines 7 and 13 is executed concurrently. In scope_name, a recovery handler is initially installed and then the code at Line 10 is executed. Besides, the parallel activity may raise the fault at line 13. In that case a termination is triggered and the corresponding recovery code is executed. The complete code of this example can be found here
Terminating child scopes
When termination is triggered on a scope, the latter recursively terminates its own child scopes. Once all child scopes terminated, the recovery handler is executed. Let us consider the following example:
include "console.iol"
include "time.iol"
main
{
scope( grandFather )
{
install( this =>
println@Console( "recovering grandFather" )()
);
scope( father )
{
install( this =>
println@Console( "recovering father" )()
);
scope ( son )
{
install( this =>
println@Console( "recovering son" )()
);
sleep@Time( 500 )();
println@Console( "Son's code block" )()
}
}
}
|
throw( FaultName )
}
If the fault is raised when the scope son is still executing (we use Jolie's standard library time for making the child process wait for 500 milliseconds), a termination is triggered for scope grandFather, which triggers the termination of scope father. Finally, scope father triggers the termination of the scope son, which executes its own recovery handler. Inside-out, son's, father's and grandFather's recovery handlers are executed subsequently. You can find the code of this example here.
Dynamic installation of recovery handlers
Recovery handlers can be dynamically updated like fault handlers. Such a feature is particularly useful when we intend to update the termination handler depending on the activities executed successfully. As an example, let us consider the following script whose code can be downloaded here:
include "console.iol"
include "time.iol"
main
{
scope( scope_name )
{
println@Console( "step 1" )();
install( this => println@Console( "recovery step 1" )() );
sleep@Time( 1 )();
println@Console( "step 2" )();
install( this => println@Console( "recovery step 2" )() );
sleep@Time( 2 )();
println@Console( "step 3" )();
install( this => println@Console( "recovery step 3" )() );
sleep@Time( 3 )();
println@Console( "step 4" )();
install( this => println@Console( "recovery step 4" )() )
}
|
sleep@Time( 3 )();
throw( FaultName )
}
When a_fault is raised, the lastly installed recovery handler is executed.
Handler composition - the cH placeholder
Besides replacing a recovery handlers, it may be useful to add code to the current handler, without replacing the entire previously installed code. Jolie provides the keyword cH as a placeholder for the current handler.
Let us consider the following example whose executable code can be found here:
include "console.iol"
include "time.iol"
main
{
scope( scope_name )
{
println@Console( "step 1" )();
sleep@Time( 1 )();
install( this =>
println@Console( "recovery step 1" )()
);
println@Console( "step 2" )();
sleep@Time( 2 )();
install( this =>
cH;
println@Console( "recovery step 2" )()
);
println@Console( "step 3" )();
sleep@Time( 3 )();
install( this =>
cH;
println@Console( "recovery step 3" )()
);
println@Console( "step 4" )();
sleep@Time( 4 )();
install( this =>
cH;
println@Console( "recovery step 4" )()
)
}
|
sleep@Time( 3 )();
throw( FaultName )
}
cH can be composed within another handler by means of the sequence and parallel operators. The resulting handler will be the composition of the previous one (represented by cH) and the new one.
Compensation, the primitive comp
Compensation allows to handle the recovery of a scope which has successfully executed. When a scope finishes with success its own activities, its current recovery handler is promoted to the parent scope in order to be available for compensation.
Compensation is invoked by means of the comp statement, which can be used only within a handler.
Let us consider the following example showing how to perform a compensation. The executable code can be found here:
include "console.iol"
main
{
install( FaultName =>
println@Console( "Fault handler for a_fault" )();
comp( example_scope )
);
scope( example_scope )
{
install( this =>
println@Console( "recovering step 1" )()
);
println@Console( "Executing code of example_scope" )();
install( this =>
cH;
println@Console( "recovering step 2" )()
)
};
throw( FaultName )
}
When scope example_scope ends with success, its current recovery handler is promoted to the parent scope (main) in order to be available for compensation. At the end of the program, the a_fault is raised, triggering the execution of its fault handler, defined at Lines 5-8. At Line 7 the compensation of scope example_scope is executed, triggering the execution of the corresponding recovery handler (in this case, the one at Line 15, including the first at Line 11).
The electronic purchase example
Here we consider a simplified scenario of an electronic purchase where termination and compensation handlers are used. The full code can be checked here whereas the reference architecture of the example follows:
![]()
In this example a user wants to electronically buy ten beers invoking the transaction service which is in charge to contact the product store service, the logistics service and the bank account service. It is clearly an over simplification w.r.t. a real scenario, but it is useful to our end for showing how termination and compensation work. In the following we report the implementation of the operation buy of the transaction service:
[ buy( request )( response ) {
getProductDetails@ProductStore({ .product = request.product })( product_details );
scope( locks ) {
install( default =>
{ comp( lock_product ) | comp( account ) }
;
valueToPrettyString@StringUtils( locks.( locks.default ) )( s );
msg_failure = "ERROR: " + locks.default + "," + s;
throw( TransactionFailure, msg_failure )
);
scope( lock_product ) {
/* lock product availability */
with( pr_req ) {
.product = request.product;
.quantity = request.quantity
};
lockProduct@ProductStore( pr_req )( pr_res );
install( this =>
println@Console("unlocking product...")();
unlockProduct@ProductStore( { .token = pr_res.token })();
println@Console("product unlocking done")()
);
/* lock logistics delivery time */
getCurrentTimeMillis@Time()( now );
with( log_req ) {
.weight = product_details.weight * request.quantity;
.expected_delivery_date = now + 1000*60*60*72; // three days
.product = request.product
};
bookTransportation@Logistics( log_req )( log_res );
install( this =>
cH;
println@Console("cancelling logistics booking..." )();
cancelBooking@Logistics({ .reservation_id = log_res.reservation_id } )();
println@Console("cancelling logistics booking done")()
)
}
|
scope( account ) {
/* lock account availability */
with( cba ) {
.card_number = request.card_number;
.amount = request.quantity * product_details.price
};
lockCredit@BankAccount( cba )( lock_credit );
install( this =>
println@Console("cancelling account lock..")();
cancelLock@BankAccount( { .token = lock_credit.token })();
println@Console("cancelling account lock done")()
)
}
}
;
/* commit */
{
commit@BankAccount({ .token = lock_credit.token })()
|
confirmBooking@Logistics({ .reservation_id = log_res.reservation_id })()
|
commitProduct@ProductStore({ .token = pr_res.token })()
}
;
response.delivery_date = log_res.actual_delivery_date
}]
Here the transaction service starts two parallel activities:
- contact the product store and the logistics for booking the product and the transportation service. In particular it executes a sequence of two calls: lockProduct@ProductStore and bookTransportation. The former locks the requested product on the Product Store whereas the latter books the transportation service.
- contact the bank account for locking the necessary amount
Note that in the former activity, after each invocation a termination handler is installed:
with( pr_req ) {
.product = request.product;
.quantity = request.quantity
};
lockProduct@ProductStore( pr_req )( pr_res );
install( this =>
println@Console("unlocking product...")();
unlockProduct@ProductStore( { .token = pr_res.token })();
println@Console("product unlocking done")()
);
/* lock logistics delivery time */
getCurrentTimeMillis@Time()( now );
with( log_req ) {
.weight = product_details.weight * request.quantity;
.expected_delivery_date = now + 1000*60*60*72; // three days
.product = request.product
};
bookTransportation@Logistics( log_req )( log_res );
install( this =>
cH;
println@Console("cancelling logistics booking..." )();
cancelBooking@Logistics({ .reservation_id = log_res.reservation_id } )();
println@Console("cancelling logistics booking done")()
)
In particular, in the second one, the termination handler is installed as an update of the previous one thanks to the usage of the keyword cH. Indeed, after the second installation the handler will appear as it follows:
println@Console("unlocking product...")();
unlockProduct@ProductStore( { .token = pr_res.token })();
println@Console("product unlocking done")();
println@Console("cancelling logistics booking..." )();
cancelBooking@Logistics({ .reservation_id = log_res.reservation_id } )();
println@Console("cancelling logistics booking done")()
On the other hand a termination is installed for unlocking the amount of money. All these termination handlers are promoted at the parent scope, and in case of fault, they will be compensated:
install( default =>
{ comp( lock_product ) | comp( account ) }
...
If we simulate that the user has not enough money into the bank account, the fault CreditNotPresent is raised by the bank account service. In this case, the compensation handlers of the sibling activities are executed by rolling back the lock of the product and the book of the transportation service.
In case there are no faults, all the activities are finalized in the last parallel of the operation buy where all the involved services are called for committing the previous lock of resources.
Installation-time variable evaluation
Handlers need to use and manipulate variable data often and a handler may need to refer to the status of a variable at the moment of its installation. Hence, Jolie provides the ^ operator which "freezes" a variable state within an installed handler. ^ is applied to a variable by prefixing it, as shown in the example below whose executable code can be found here.
include "console.iol"
include "time.iol"
main
{
install( FaultName =>
comp( example_scope )
);
scope( example_scope )
{
install( this => println@Console( "initiating recovery" )() );
i = 1;
while( true ){
sleep@Time( 50 )( )
install( this =>
cH;
println@Console( "recovering step" + ^i )()
);
i++
}
}
|
{
sleep@Time( 200 )( )
throw( FaultName )
}
}
The install primitive contained in the while loop updates the scope recovery handler at each iteration. In the process the value of the variable i is frozen within the handler. In the example above, the calls to sleep@Time just simulate computational time.
At this link we modified the electronic purchase example described above, introducing the possibility to buy a set of products instead of a single one. In such a case, the transaction service performs a locking call to the store service for each received product and, for each of these calls, it installs a related termination handler. In the termination handler, we exploits the freeze operator for freezing variables i, token and reservation_id at the values they have in the moment of the installation:
scope( locks ) {
install( default =>
{ comp( lock_product ) | comp( account ) }
;
valueToPrettyString@StringUtils( locks.( locks.default ) )( s );
msg_failure = "ERROR: " + locks.default + "," + s;
throw( TransactionFailure, msg_failure )
);
scope( lock_product ) {
/* lock product availability */
for( i = 0, i < #request.product, i++ ) {
println@Console("processing product " + request.product[ i ] )();
with( pr_req ) {
.product = request.product[ i ];
.quantity = request.product[ i ].quantity
};
println@Console("locking " + request.product[ i ])();
lockProduct@ProductStore( pr_req )( pr_res );
token = product.( request.product[ i ]).token = pr_res.token ;
install( this =>
cH;
println@Console("unlocking product " + request.product[ ^i ] )();
unlockProduct@ProductStore( { .token = ^token })()
);
/* lock logistics delivery time */
getCurrentTimeMillis@Time()( now );
with( log_req ) {
.weight = products.( request.product[ i ] ).weight * request.product[ i ].quantity;
.expected_delivery_date = now + 1000*60*60*72; // three days
.product = request.product[ i ]
};
bookTransportation@Logistics( log_req )( log_res );
reservation_id = product.( request.product[ i ]).reservation_id = log_res.reservation_id;
install( this =>
cH;
println@Console("cancelling logistics booking for product " + request.product[ ^i ] )();
cancelBooking@Logistics({ .reservation_id = ^reservation_id } )()
)
}
}
|
scope( account ) {
/* lock account availability */
for( y = 0, y < #request.product, y++ ) {
amount = amount + request.product[ y ].quantity * products.( request.product[ y ] ).price
};
with( cba ) {
.card_number = request.card_number;
.amount = amount
};
lockCredit@BankAccount( cba )( lock_credit );
install( this =>
println@Console("cancelling account lock..")();
cancelLock@BankAccount( { .token = lock_credit.token })();
println@Console("cancelling account lock done")()
)
}
}
At lines 22-23 and 36-37 it is possible to find the usage of the freeze operator. Note that the operator cH allows for queueing all the installed handlers.
Solicit-Response handler installation
Solicit-Responses communication primitives allow for synchrnously sending a request and receiving a reply. Since the sending and the receiving are performed atomically in the same primitive, apparently it is not possible to install a handler after the request sending and before the reply reception. In Jolie it is possible to program such a behaviour using the following syntax:
operation_name@Port_name( request )( response ) [ this => handler code here ]
between the square brackets it is possible to install a termination handler which is installed after the sending of the request and before receiving a reply. Note that the handler is installed only in case of a successful reply, not in the case of a fault one.
At this link we report an executable example where a client calls a server with a solicit-response operation named hello. In particular, we install a println command after sending the request message:
scope( calling ) {
install( this => println@Console( "Before calling" )() );
hello@Server("hello")( response )
[
this => println@Console("Installed Solicit-response handler")()
]
}
In the same example the solicit-response is programmed with a fake activity which raises a fault thus triggering the termination handler of the Solicit-Response. It is worth noting how the solicit-response handler is installed before executing the termination triggered by the parallel fault.
Engine Arguments
When executed, the jolie engine can be parametrized with some arguments. The complete list can be checked by typing jolie --help. whose result in the console is:
Usage: jolie [options] program_file [program arguments]
Available options:
-h, --help Display this help information
-C ConstantIdentifier=ConstantValue Sets constant ConstantIdentifier to ConstantValue before starting execution
(under Windows use quotes or double-quotes, e.g., -C "ConstantIdentifier=ConstantValue" )
--connlimit [number] Set the maximum number of active connection threads
--conncache [number] Set the maximum number of cached persistent output connections
--responseTimeout [number] Set the timeout for request-response invocations (in milliseconds)
--correlationAlgorithm [simple|hash] Set the algorithm to use for message correlation
--log [severe|warning|info|fine] Set the logging level (default: info)
--stackTraces Activate the printing of Java stack traces (default: false)
--typecheck [true|false] Check for correlation and other data related typing errors (default: false)
--check Check for syntactic and semantic errors.
--trace [console|file] Activate tracer. console prints out in the console, file creates a json file
--traceLevel [all|comm|comp] Defines tracer level: all - all the traces; comm - only communication traces; comp - only computation
traces. Default is all.
--charset [character encoding, e.g., UTF-8] Character encoding of the source *.ol/*.iol (default: system-dependent, on GNU/Linux UTF-8)
-p PATH Add PATH to the set of paths where modules are looked up
-s [service name], --service [service name] Specify a service in the module to execute (not necessary if the module contains only one service definition)
--params json_file Use the contents of json_file as the argument of the service being executed.
--version Display this program version information
--cellId set an integer as cell identifier, used for creating message ids. (max: 2147483647)
Display this program version information
Comments
The comments' format is the same as in Java:
// single line
/*
multiple
lines
*/
Architectural Programming
In the section "Basics" we have shown how programming the behaviour of a service. In Architectural Programming section we will show how Jolie enables architectural composition through the usage of linguistic primitives.
Architectural Programming can be roughly divided in two main categories.
- programming the execution contexts: a service may execute services in the same execution engine in order to gain advantages in terms of resource control. The linguistic primitive which allows the programming of execution contexts is the embedding
- programming the communication topology: it allows for the programming of the connections between services in a microservice architecture. The primitives which allows for programming the communication topology are: aggregation, redirection, collection and couriers.
Embedding
Embedding is a mechanism for launching a service from within another service. A service, called embedder, can embed another service, called embedded service, by targeting it with the embed primitive.
The syntax for embedding is:
embed serviceName( passingValue ) [in existedPortName | as newPortName]
Above, we see that the embed statement takes as input a service name and an optional value.
Then, we can optionally bind an inputPort of the embedded service (which must be set as local) to an outputPort of the embedder.
To achieve that, we have two modalities:
- using the
inkeyword we bind the inputPort of the target to an existing outputPort defined by the embedder; - using the
askeyword we create a new outputPort that has the same interface of the inputPort of the embedded service, besides being bound to it.
When that trailing part is missing, the embedded service runs without any automatic binding — however that does not mean it is not callable in other ways, e.g., through a fixed TCP/IP address like "socket://localhost:8080" or though a local location like "local://A").
Embedding the standard library
The Jolie standard library comes as a collection of services that users can import and use through the embedding mechanism. The usage of statement import is documented in section Modules
The following example shows the usage of the Console service, which exposes operations for communication between Jolie and the standard input/output:
from console import Console
service MyService {
embed Console as C
main {
print@C( "Hello world!" )()
}
}
The section of the documentation dedicated to the standard library reports more information on the modules, types, and interfaces available to programmers with the standard Jolie installation.
An example of embedding
Embedding Jolie services is very simple. In order to show how it works, let us consider a simple example whose executable code can be found here.
In this example we want to implement a service which is able to clean a html string from the tags <div>, </div>, <br> and </br> replacing br with a line feed and a carriage return. In order to do this, we implement a parent service called clean_div.ol which is in charge to clean the div tags and another service called clean_br.ol in charge to clean the br tags. The service clean_div.ol embeds the service clean_br.ol:
from CleanBrInterface import CleanBrInterface
from CleanDivInterface import CleanDivInterface
from string_utils import StringUtils
from clean_br import CleanBr
service CleanDiv {
execution: concurrent
outputPort CleanBr {
Interfaces: CleanBrInterface
}
embed StringUtils as StringUtils
embed CleanBr in CleanBr
inputPort CleanDiv {
Location: "socket://localhost:9000"
Protocol: sodep
Interfaces: CleanDivInterface
}
main {
cleanDiv( request )( response ) {
replaceAll@StringUtils( request { regex="<div>", replacement="" })( request )
replaceAll@StringUtils( request { regex="</div>", replacement="\n" })( request )
cleanBr@CleanBr( request )( response )
}
}
}
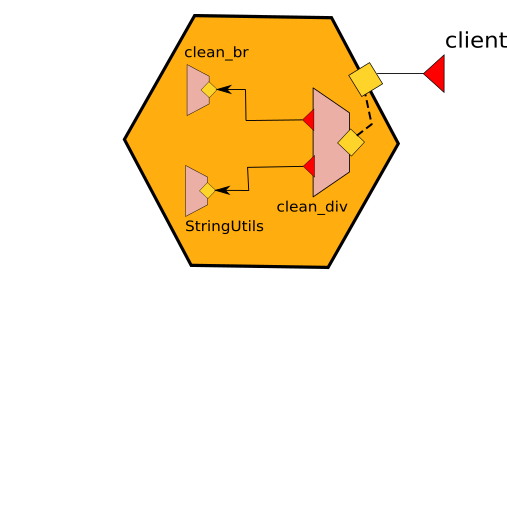
It is worth noting that:
- it is necessary to import the service CleanBr from module clean_br.ol and its interface from module CleanBrInterface
- the outputPorts CleanBr and StringUtils do not define nor the location and the protocol because they are set by the embedding primitive with location "local" and inner memory protocol.
- the embedding primitive joins the service clean_br.ol with the outputPort CleanBr thus implying that each time we use port CleanBr inside the behaviour we will invoke the embedded service:
cleanBr@CleanBr( request )( response )
- the StringUtils is a service embedded from the standard library
Hiding connections
Note that the embedding primitive, together with the usage of in-memory communication, allows for hiding connections among embedded microservices. In the example above the connection between the service clean_div.ol and clean_br.ol is hidden by the embedding and no external microservices can call the inputPort of the microservice clean_br.ol.
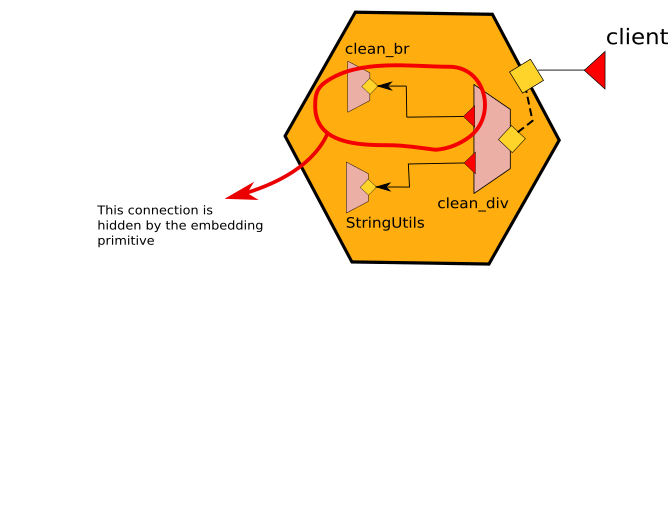
Cells (or multi services)
Here we introduce the concept of cells as a unique execution context for a set of services. In a cell, one or more services can be executed within the same execution context. When there is only one service, the definition of a cell corresponds to the same of a service. A cell exhibits only the public available ports of the inner services. The ports that are not reachable by external invokers are considered internal ports and they are hidden from the point of view of a cell. Operationally, a cell can be obtained by exploiting the embedding primitive.
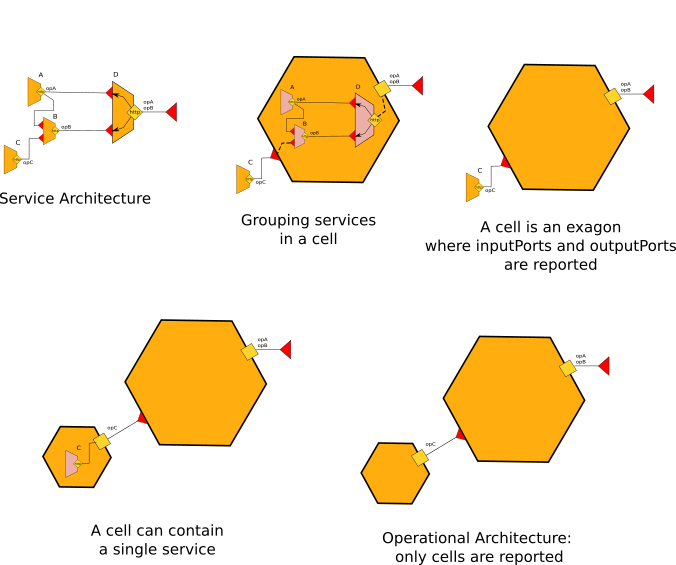
Creating a script from a service architecture
Afterwards, we can write a modified version of the client program of the previous example, in order to directly embed the service clean_dv.ol thus transforming the service architecture into a single script. The code of this example can be found here. Here we report the code of the script:
from CleanDivInterface import CleanDivInterface
from console import Console
from clean_div import CleanDiv
service Script {
outputPort CleanDiv {
Interfaces: CleanDivInterface
}
embed CleanDiv in CleanDiv
embed Console as Console
main
{
div = "<div>This is an example of embedding<br>try to run the encoding_div.ol<br>and watch the result.</div>"
println@Console("String to be cleaned:" + div )()
cleanDiv@CleanDiv( div )( clean_string )
println@Console()()
println@Console( "String cleaned:" + clean_string )()
}
}
It is worth noting that now the file script.ol embeds the service clean_div.ol which embeds the service clean_br.ol. Since script.ol does not implement any inputPort but it just executes a script, when it reach the ends all the embedded services are automatically shut down.
Dynamic Embedding
Dynamic embedding makes possible to associate a unique embedded instance to a single process of the embedder, thus allowing only that specific process to invoke the operations of the embedded service. Such a feature can be obtained by exploiting the API of the runtime service, in particular we will use operation loadEmbeddedService.
As an example let us consider the case of a calculator which offers the four arithmetic operators but it loads the implementation of them at runtime depending on the request selection. If the client specifies to perform a sum, the calculator will load the service which implements the sum and it will call it on the same operation run. The full code of the example can be found here, in the following we report the code of the calculator:
from runtime import Runtime
from .OperationInterface import OperationInterface
from .CalculatorInterface import CalculatorInterface
service Calculator {
execution: concurrent
embed Runtime as Runtime
/* common interface of the embedded services */
outputPort Operation {
interfaces: OperationInterface
}
inputPort Calculator {
location: "socket://localhost:8000"
protocol: sodep
interfaces: CalculatorInterface
}
/* this is the body of each service which embeds the jolie service that corresponds to the name of the operation */
define __embed_service {
emb << {
filepath = __op + ".ol"
type = "Jolie"
};
/* this is the Runtime service operation for dynamic embed files */
loadEmbeddedService@Runtime( emb )( Operation.location )
/* once embedded we call the run operation */
run@Operation( request )( response )
}
/* note that the embedded service is running once ofr each enabled session then it expires.
Thus each call produce a new specific embedding for that call */
main {
[ sum( request )( response ) {
__op = "sum";
/* here we call the define __embed_service where the variable __p is the name of the operation */
__embed_service
}]
[ mul( request )( response ) {
__op = "mul";
__embed_service
}]
[ div( request )( response ) {
__op = "div";
__embed_service
}]
[ sub( request )( response ) {
__op = "sub";
__embed_service
}]
}
}
The definition embed_service it is called within each operation offered by the calculator (sum, sub, mul, div) and it loads the specific service dynamically. Note that in this example the service files are named with the same name of the operations, thus there are the following files in the same folder of calculator.ol: sum.ol, sub.ol, mul.ol, div.ol. Each of them implement the same interface with different logics, thus they are polymorphic with respect the following interface:
type RequestType {
x: double
y: double
}
interface OperationInterface {
RequestResponse:
run( RequestType )( double )
}
It is worth noting that the embedded service is running once for each enabled session then it expires. Thus each call produce a new specific embedding for that call.
Aggregation
The Aggregation is an architectural operator between an inputPort and a set of outputPorts which allows for composing services in a way that the API of the aggregated services are merged with those of the aggregator. It is a generalisation of network proxies that allow a service to expose operations without implementing them in its behaviour, but delegating them to other services. Aggregation can also be used for programming various architectural patterns, such as load balancers, reverse proxies, and adapters.
The syntax for aggregation extends that given for input ports.
inputPort id {
location: URI
protocol: p
interfaces: iface_1, ..., iface_n
aggregates: outputPort_1, outputPort_2, ...
}
Where the aggregates primitive expects a list of output port names.
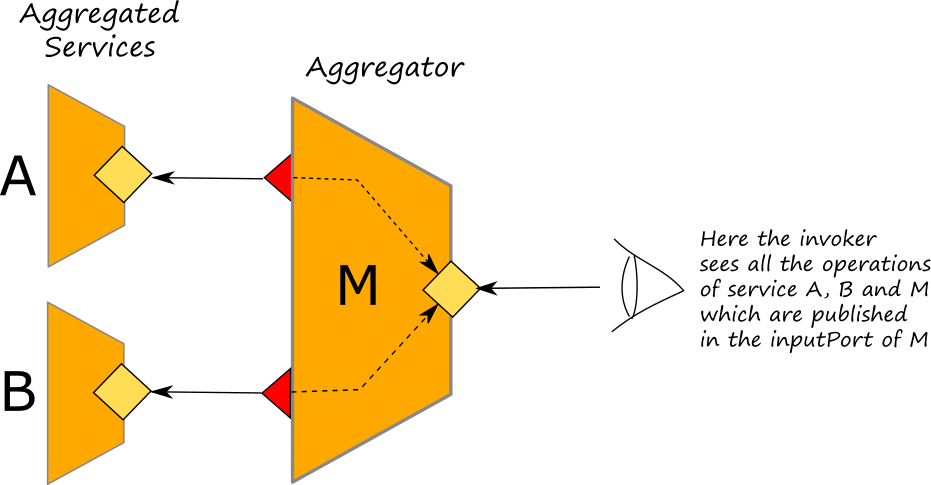
If we observe the list of the operations available at the inputPort of the aggregator, we will see the list of all the aggregated operations together with those of the aggregator.
How Aggregation works
We can now define how aggregation works. Given IP as an input port, whenever a message for operation OP is received through IP, we have three scenarios:
- OP is an operation declared in one of the interfaces of IP. In this case, the message is normally received by the program.
- OP is not declared in one of the interfaces of IP and is declared in the interface of an output port (OP_port) aggregated by IP. In this case the message is forwarded to OP_port port as an output from the aggregator.
- OP is not declared in any interface of IP or of its aggregated output ports. Then, the message is rejected and an
IOExceptionfault is sent to the caller.
We can observe that in the second scenario aggregation merges the interfaces of the aggregated output ports and makes them accessible through a single input port. Thus, an invoker would see all the aggregated services as a single one.
Remarkably, aggregation handles the request-response pattern seamlessly: when forwarding a request-response invocation to an aggregated service, the aggregator will automatically take care of relaying the response to the original invoker.
As an example let us consider the case of two services, the printer and fax, aggregated into one service which also add another operation called faxAndPrint. The code may be consulted here.
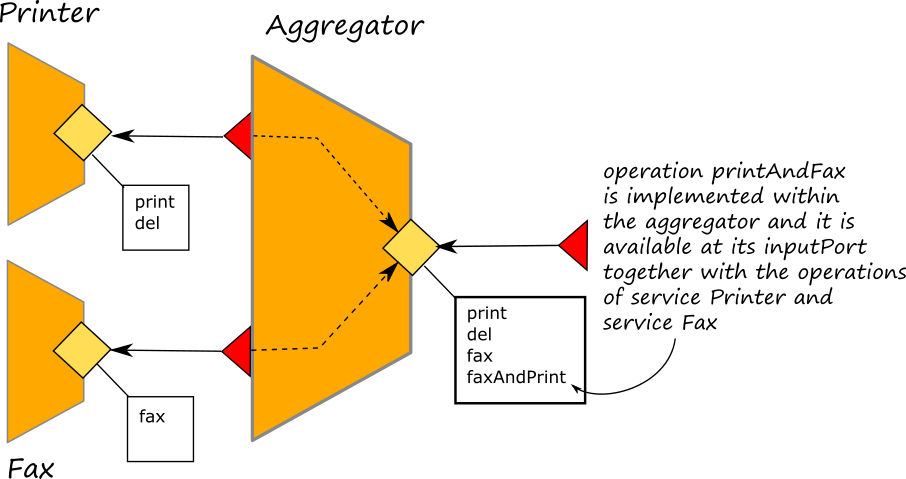
The service printer offers two operations called print and del. The former allows for the printing of a document whereas the latter allows for its deletion from the queue. On the other hand the service fax offers just one operation called fax. The aggregator, aggregates on its inputPort called Aggregator both the printer and fax services as it is shown below where we report the ports declaration of the aggregator service:
/* this outputPort points to service Printer */
outputPort Printer {
location: "socket://localhost:9000"
protocol: sodep
interfaces: PrinterInterface
}
/* this outputPort points to the service Fax */
outputPort Fax {
location: "socket://localhost:9001"
protocol: sodep
interfaces: FaxInterface
}
/* this is the inputPort of the Aggregation service */
inputPort Aggregator {
location: "socket://localhost:9002"
protocol: sodep
/* the service Aggregator does not only aggregates other services, but it also provides its own operations */
interfaces: AggregatorInterface
/* Printer and Fax outputPorts are aggregated here. All the messages for their operations
will be forwarded to them */
aggregates: Printer, Fax
}
The surface can be included by an invoker service for getting all the available operations for invoking the port Aggregator.
jolie2surface
One important characteristic of the surface is that it actually does not exist as a software artifact until it is automatically derived and created from an input port declaration. So, how could we create a surface?
The Jolie installation is equipped with a tool called jolie2surface which allows for the creation of a surface starting from a service definition. Its usage is very simple, it is sufficient to run the following command:
jolie2surface <filename.ol> <name of the port>
in order to obtain the surface of port Aggregator discussed in the previous section, the command is:
jolie2surface aggregator.ol Aggregator
if you need to save it into a file, just redirects the standard output:
jolie2surface aggregator.ol Aggregator > surface.iol
Note that the tool jolie2surface also adds the outputPort declaration connected to the input port.
Extracting surface programmatically
The surface can be extracted in a programmatic way too by exploiting the standard library of Jolie. In particular, we can use the services MetaJolie and MetaRender for getting the surface of a an input port of a service. The service MetaJolie provides a set of functionalities for getting important meta information about a service whereas the service MetaParser provides for transforming these information into a syntactically correct Jolie definition. If we want to extract the surface of an input port we can use the operation getInputPortMetaData@MetaJolie which returns a complete description of the input port of a service definition. Then, with the operation getSurface@Parser we can extract the surface by passing the definition of the input port obtained from the previous operation.
In the following you can find the example of the programmatic surface extraction of service aggregator.ol.
include "metajolie.iol"
include "metaparser.iol"
include "console.iol"
main {
getInputPortMetaData@MetaJolie( { .filename = "aggregator.ol" } )( meta_description );
getSurface@Parser( meta_description.input[ 0 ] )( surface );
println@Console( surface )()
}
The executable code can be found at this link
Protocol Transformation
Aggregation can be used for system integration, e.g., bridging services that use different communication technologies or protocols. As an example, let us consider the system discussed in the previous section but considering that the aggregated services offers they operation using different protocols like http/json and http/soap as depicted in the following picture:
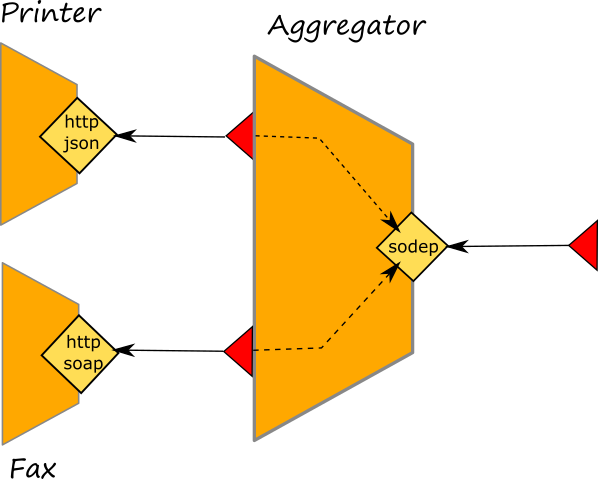
In this case the aggregator automatically transforms the messages thus enabling a transparent composition of services which exploit different protocols.
The full executable example can be found here. Here we report the input ports of both the fax and the printer services, and the output ports of the aggregator together with its main input port.
outputPort Printer {
location: "socket://localhost:9000"
protocol: http { .fomat = "json"; .debug=false }
interfaces: PrinterInterface
}
/* this outputPort points to the service Fax */
outputPort Fax {
location: "socket://localhost:9001"
protocol: soap { .wsdl = "fax.wsdl"; .debug=false }
interfaces: FaxInterface
}
/* this is the inputPort of the Aggregation service */
inputPort Aggregator {
location: "socket://localhost:9002"
protocol: sodep
/* the service Aggregator does not only aggregates other services, but it also provides its own operations */
interfaces: AggregatorInterface
/* Printer and Fax outputPorts are aggregated here. All the messages for their operations
will be forwarded to them */
aggregates: Printer, Fax
}
Couriers
Courier processes
Courier processes allow to enrich a service aggregation with context functionalities. They are joint to an aggregation operator and they are executed in between a message reception and its forwarding to the final target service. In a courier it is possible to program any kind of behaviour and they are usually exploited for managing all those functionalities which are not directly pertinent with the target service but they are useful for the network context like authentication and logging.

In the diagram above, we represent a courier process as a black square within an inputPort. A courier process does not alter the connection topology of a circuit but it just enhances the capabilities of an inputPort with a specific set of activities.
The syntax
A courier process is defined in terms of a scope prefixed with the keyword courier followed by the name of the input port where attaching the courier process:
courier <Name of the Input port> {
...
}
In the body of the scope, the list of the operations affected by the courier process must be defined. The list of operations follows this syntactical structure:
courier <Name of the Input port> {
[ <declaration of operation> ] {
// code
}
[ <declaration of operation> ] {
// code
}
[ <declaration of operation> ] {
// code
}
...
}
where the declaration of the operation can be twofold depending on the operation type: request response or one way:
courier <Name of the Input port> {
/* request response */
[ operation_name( request )( response ) ] {
// code of courier process executed for this operation
}
/* one way */
[ operation_name( request ) ] {
// code of courier process executed for this operation
}
}
The statement forward
The statement forward can be used within the courier process code of each operation for delivering the message to the final target, as specified in the input port definition for the given operation. The syntax of the forward is very simple and it just follows the structure of the request response or the one way operation:
courier <Name of the Input port> {
/* request response */
[ operation_name( request )( response ) ] {
// code of courier process executed for this operation
forward( request )( response )
}
/* one way */
[ operation_name( request ) ] {
// code of courier process executed for this operation
forward( request )
}
}
Example
As an example, try to add the following courier process to the service aggregator of the example described in Aggregation
courier Aggregator {
[ print( request )( response ) ] {
println@Console("Hello, I am the courier process")();
forward( request )( response )
}
}
Such a courier process is attached to port Aggregator and it is applied only on operation print which comes from the aggregated output port Printer. In the console of the service aggregator, as a result, you will see the string Hello, I am the courier process printed out every time the operation print is called. Concretely, the steps performed by the service aggregator above are the following:
- receive a message for operation
printon input portPrinter - recognize there is a courier process attached for the input port
- execute the courier process, passing the request message into the request variable---above, the variable
request - execute the behaviour associated with operation
printin the courier process:- execute the
printlnoperation, printingHello, I am the courier process - execute the
forwardinstruction, forwarding the request to the output portPrinter(the correct port is found by matching the interface, i.e., operation and type of the request) - wait to receive the response from the forwarded service, in variable
response
- execute the
- send back the obtained response to the original caller
Courier processes attached to interfaces
Sometimes it could happen that a courier process must be executed for all the operations of the same interface. In these cases could be quite annoying to list all the operations of that interface and write for each of them the same code. In Jolie it is possible to join a courier process to all the operations of a given interface. In this case the syntax is:
courier <Name of the Input port> {
/* all the request response operations of the interface*/
[ interface interface_name( request )( response ) ] {
// code of courier process executed for this operation
forward( request )( response )
}
/* all the one way operations of the interface */
[ interface interface_name( request ) ] {
// code of courier process executed for this operation
forward( request )
}
}
Instead of specifying the name of the operations it is sufficient to use the keyword interface followed by the name of the interface. All the operations of that interface will be attached of the courier process defined in the body code. It is worth noting that there are two different declarations for request response operations and one way operations just because the formers deal both both request and response messages whereas the latter only with the request one.
Couriers example
Here we extend the example presented in Section Aggregation by adding a logging service which is called into the couriers of the aggregator in order to log all the messages sent to the aggregator port.
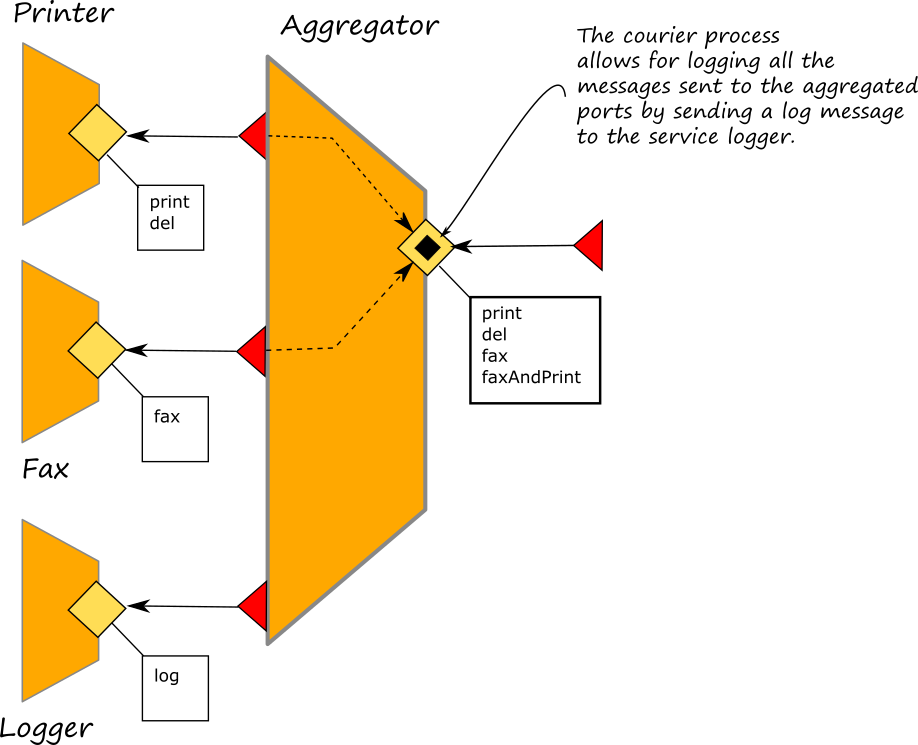
The complete code of the example can be checked here. In this case we add courier processes to the interfaces of the aggregated ports where, before forwarding the incoming messages to the target ports we call the logger service by sending the content of the message obtained with the operation valueToPrettyString of service StringUtils.
courier Aggregator {
[ interface PrinterInterface( request )( response ) ] {
valueToPrettyString@StringUtils( request )( s );
log@Logger( { .content = s } );
forward( request )( response )
}
[ interface PrinterInterface( request ) ] {
valueToPrettyString@StringUtils( request )( s );
log@Logger( { .content = s } );
forward( request )
}
}
It is worth noting that the output port of service Logger is just one of the output ports available within the service aggregator and it is normally defined like all the others.
outputPort Logger {
Location: Location_Logger
Protocol: sodep
Interfaces: LoggerInterface
}
Thus, a courier process can exploit all the available output ports of the service where it is defined for executing its activities.
Interface extension
Interface extension is a feature of Jolie language which can be used jointly with courier processes in order to extend the message types of the operations of an aggregated port. The interface extension alters the final surface at the aggregating input port without affecting the aggregated one.
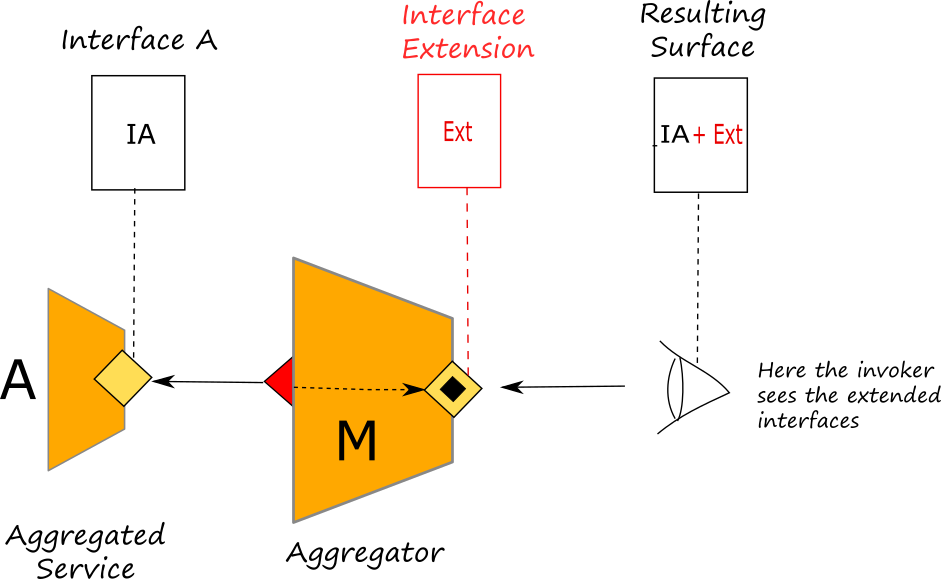
Interface extension can be particularly useful when it is necessary to enrich the message types of an aggregated ports due to the presence of a courier process attached to it. It is worth noting that the courier process will manage request and response messages conformant to the extended interfaces, but it will automatically forward messages cleaned from the extended parts.
How to define extension rules
interface extender is the keyword used in Jolie for defining the extending rules to overload the types of a given interface. The syntax follows.
interface extender extender_id {
OneWay: * | OneWayDefinition
RequestResponse: * | RequestResponseDefinition
}
The interface extender associates an identifier (extender_id) to a set of extending rules which takes the form of a standard operation declaration with the exception of the usage of the token * for denoting all the operations.
As an example let us consider the following interface extender:
type AuthenticationData: void {
.key:string
}
interface extender AuthInterfaceExtender {
RequestResponse:
*( AuthenticationData )( void ) throws KeyNotValid
}
This interface extender must be read in the following way:
- extends all the request response operations of a given interface with type
AuthenticationDatain request messages and typevoidin response messages. TheAuthenticationDatajust adds a nodekey:stringto each request message, whereas the typevoiddoes not actually alter the response messages. A new fault calledKeyNotValidcan be thrown by all the extended request response operations. In case we specify the name of the operation in the interface extender, the rule will be applied only to that operation. In the following example, the rule will be applied only to operations namedop1.
type AuthenticationData: void {
.key:string
}
interface extender AuthInterfaceExtender {
RequestResponse:
op1( AuthenticationData )( void ) throws KeyNotValid
}
How to apply the extension rules
Interface extenders can only be applied to aggregated output ports. In order to do that the keyword with is used for associating an aggregated output port to an interface extender. The syntax follows:
inputPort AggregatorPort {
// Location definition
// Protocol definition
Aggregates:
outputPort_1 with extender_id1,
// ...
outputPort_n with extender_idn
}
Such a declaration is sufficient for applying the extension rules. It is worth noting that at the level of courier processes, the statement forward will always erase the extended part of the message before forwarding them to the target port.
Interface extension example
For a better understanding of how aggregation and interface extension work, let us enhance the previous example with an interface extension. The full code can be checked here.
In this example we add a service called authenticator for checking the validity of an access key released to all the client which aims at accessing to the port Aggregator of the service aggregator.
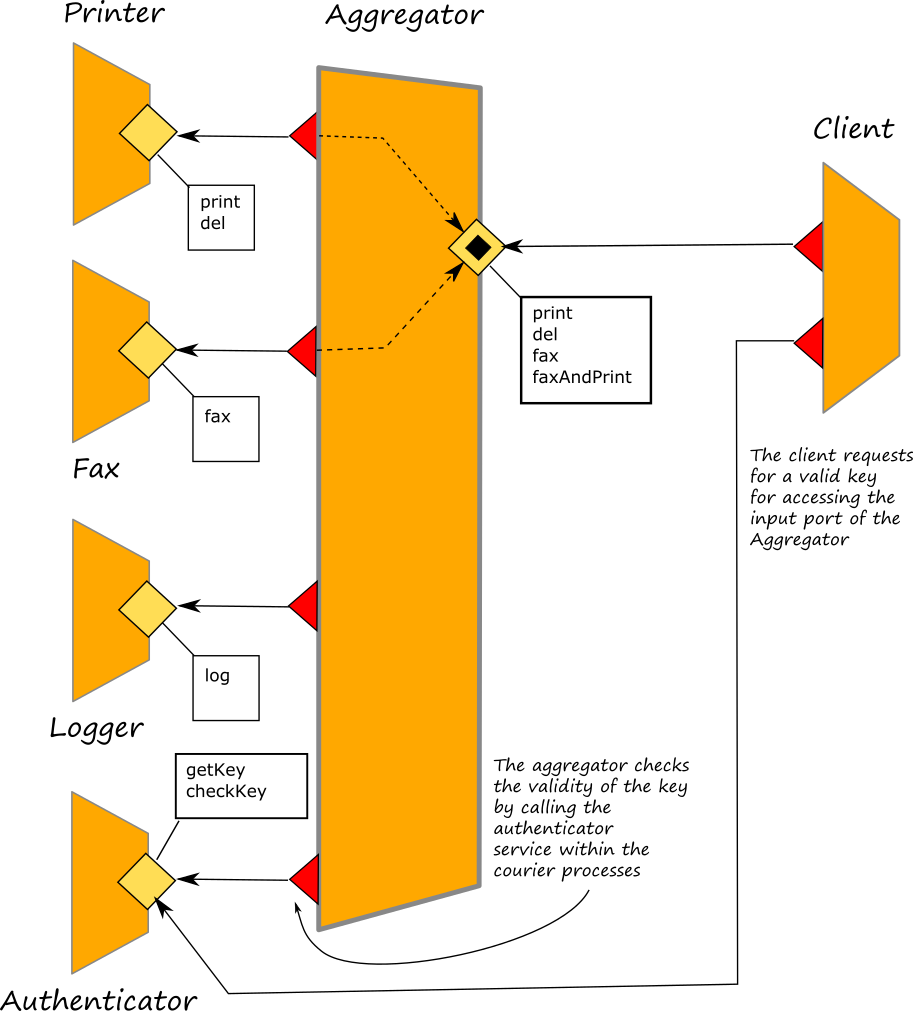
If we look into the service aggregator, we will find the following interface extension:
type AuthenticationData: void {
.key:string
}
interface extender AuthInterfaceExtender {
RequestResponse:
*( AuthenticationData )( void ) throws KeyNotValid
OneWay:
*( AuthenticationData )
}
and the following courier processes where a checkKey request is sent to the service Authenticator before forwarding the message to the target output port. Note that in case the key is not valid, a fault KeyNotValid generated by the service Authenticator is automatically sent back to the client:
courier Aggregator {
[ interface PrinterInterface( request )( response ) ] {
valueToPrettyString@StringUtils( request )( s );
log@Logger( { .content = s } );
checkKey@Authenticator( { .key = request.key } )();
forward( request )( response )
}
[ interface PrinterInterface( request ) ] {
valueToPrettyString@StringUtils( request )( s );
log@Logger( { .content = s } );
checkKey@Authenticator( { .key = request.key } )();
forward( request )
}
}
courier Aggregator {
[ interface FaxInterface( request )( response ) ] {
valueToPrettyString@StringUtils( request )( s );
log@Logger( { .content = s } );
checkKey@Authenticator( { .key = request.key } )();
forward( request )( response )
}
}
Important Note: as it is possible to see from the code of the aggregator service, the operation faxAndPrint implemented within the aggregator is not managed by the couriers, thus there is not any check of key validation for it.
It is not possible to apply a courier process to the operations actually implemented by the aggregator itself.
This is due to the fact that the aggregation statement, together with the courier definition, is an operator at the level of service network, not at the level of a single service. For this reason, if we need to put under courier processes also the operations which are orchestrating other sub services, it is better to place the final aggregator in a separate component with respect to the operation orchestrator, and then aggregates also it into the final aggregator. Here we report the service circuit as it should be in this case:
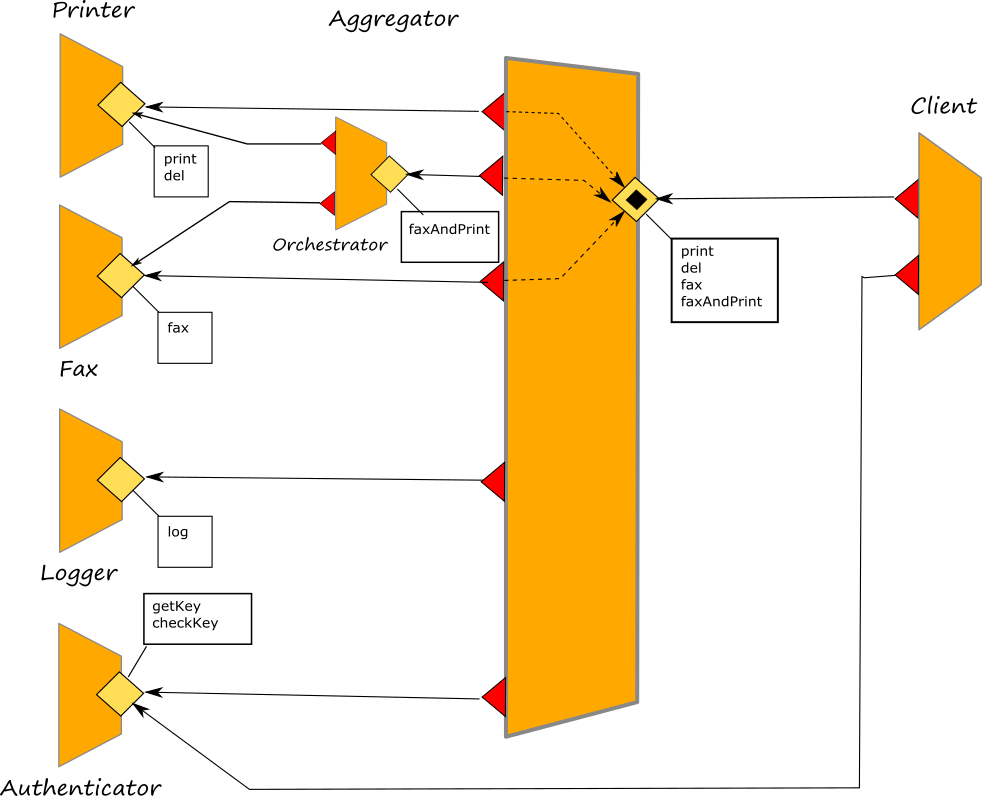
Redirection
Redirection
Redirection allows for the creation of a service, called proxy, acting as a single communication endpoint for multiple services, called resources. Similarly to an aggregator, a proxy receives all the messages meant for the system that it handles, but it transparently exposes the resource names of the redirected services. Redirection is syntactically obtained by binding an input port of the proxy service to multiple output ports, each one identifying a service by means of a resource name.
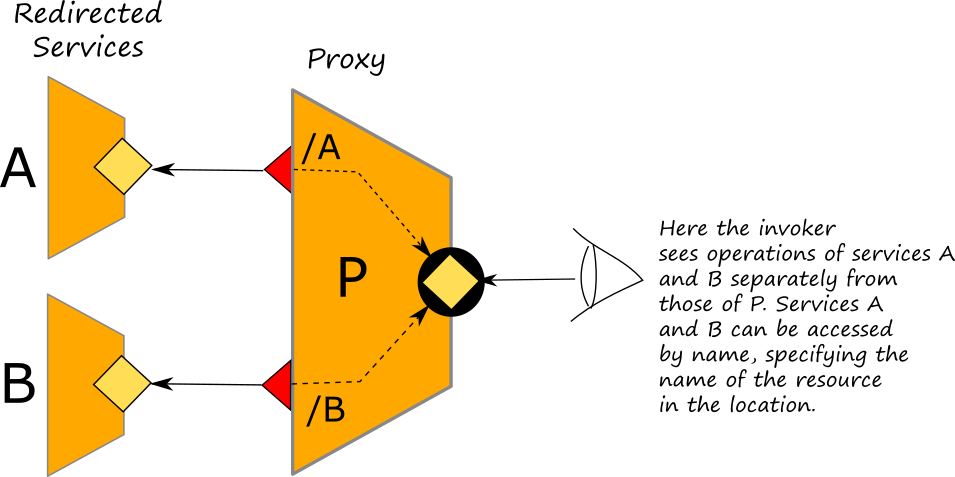
The main advantages of redirection are:
- the possibility to provide a unique access point to the system clients. In this way the services of the system could be relocated and/or replaced transparently to the clients;
- the possibility to provide transparent communication protocol transformations between the invoker and the master and the master and the rest of the system;
The syntax
The syntax of redirection is:
inputPort id {
Location: URI
Protocol: p
Redirects:
sid_1 => OP_id_1,
//...
sid_i => OP_id_i,
//...
sid_N => OP_id_N
}
where sid_i => OP_id_i associates a resource name sid_i to an output port identifier OP_id_i.
How to add a resource name to a location
The resource name must be specified into the location of service to invoke within the output port. The syntax os very simple, it i sufficient to put the token /!/ between the redirector location and the resource name. As an example let us consider the following locations:
socket://localhost:9000/!/A: wheresocket://localhost:9000is the base location of the redirector port andAis the resource name of the target service.socket://200.200.200.200:19000/!/MyService: wheresocket://200.200.200.200:19000is the base location of the redirector port andMyServiceis the resource name of the target service.
Example
In the following example we show a simple redirection scenario where a proxy provides a common endpoint for two services, Sum and Sub, which performs addiction and subtraction respectively. At this link it is possible to check the complete code.
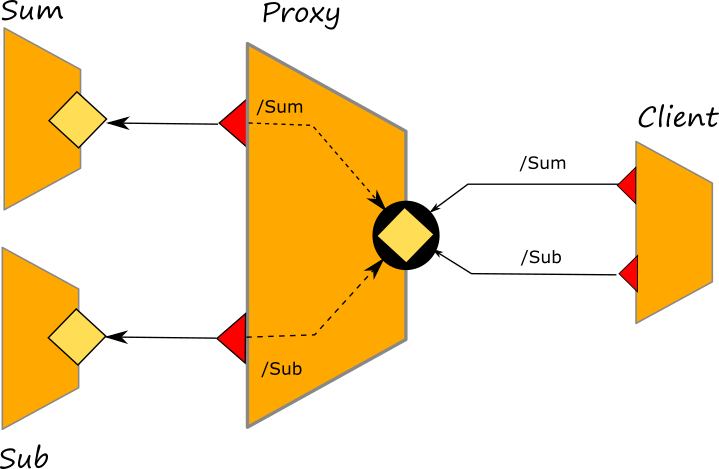
The redirection is obtained by simply using the Redirects keyword as explained above:
outputPort SubService {
Location: Location_Sub
Protocol: sodep
}
outputPort SumService {
Location: Location_Sum
Protocol: sodep
}
inputPort Redirector {
Location: Location_Redirector
Protocol: sodep
Redirects:
Sub => SubService,
Sum => SumService
}
It is worth noting that, differently from an aggregation scenario where the client just uses a unique output port for sending messages to the target service, here the client has two output ports, one for the service Sum and one for the service Sub.
outputPort Sub {
Location: "socket://localhost:9000/!/Sub"
Protocol: sodep
Interfaces: SubInterface
}
outputPort Sum {
Location: "socket://localhost:9000/!/Sum"
Protocol: sodep
Interfaces: SumInterface
}
From an architectural point of view, redirection and aggregation are different. The most important element to be kept in mind is what the client is able to see on the input port of the aggregator and on the input port of the redirector. On the former case, the client is not aware of the services handled by the aggregator because it just sees a unique service which exposes all the operations, whereas in the latter case, the client is aware of the target services and it needs to treat them as separate entities with different output ports.
Exploiting redirection for transparent protocol transformation
Redirection can be used for transparently transforming messages from a protocol to another. As an example let us consider the scenario discussed in the previous section where the redirector exposes a port using protocol sodep and but it internally communicates with the redirected services using protocol http. The complete code of the example can be found here.
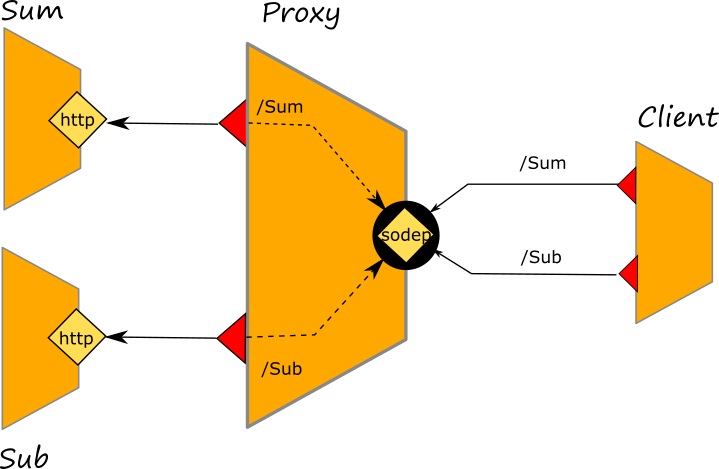
Collections
A collection is a set of output ports that share the same interface. They can be used in combination with Aggregation and Couriers in order to public their interface into an aggregator and then forward the message to an output port of the collection depending on a specific rule.
Collection syntax
The syntax of collection is very simple, it is sufficient to group the output ports with the same interface within curly brackets:
inputPort AggregatorPort {
Location: ...
Protocol: ...
Aggregates:
{ outputPort_11, outputPort_12, ... },
// ...
{ outputPort_n1, outputPort_n2, ... },
}
/*
where outputPort_11 and outputPort_12 share the same interface and,
outputPort_n1 and outputPort_n2 share another interface */
Once a message is received on the shared interface, a courier process can be executed for running specific logics for the message delivery. As an example let us consider the case of an aggregator which receives messages for two printers and it delivers the message by following a cyclic approach. In the following picture we report the architecture of the example, whereas the code can be found here

Note that at the input port of the Aggregator and the corresponding output ports of the two aggregated services appear as it follows:
outputPort Printer1 {
Location: ...
Protocol: sodep
Interfaces: PrinterInterface
}
outputPort Printer2 {
Location: ...
Protocol: sodep
Interfaces: PrinterInterface
}
inputPort AggregatorInput {
Location: Location_Aggregator
Protocol: sodep
Aggregates: { Printer1, Printer2 }
Interfaces: AggregatorInterface
}
Then, in the courier process a simple algorithm which cyclically delivers the messages to the two interfaces, is defined as it follows:
courier AggregatorInput {
[ interface PrinterInterface( request ) ] {
/* depending on the key the message will be forwared to Printer1 or Printer2 */
println@Console( ">>" + global.printer_counter )();
if ( (global.printer_counter % 2) == 0 ) {
forward Printer1( request )
} else {
forward Printer2( request )
}
;
synchronized( printer_count_write ) {
global.printer_counter++
}
}
}
Note that the variable global.printer_counter is counting the message received for operations of interface PrinterInterface.
Broadcasting messages
The collection can be easily used for broadcasting messages to output ports with the same interface. In this case it is sufficient to modify the courier process by forwarding the messages to all the target service as it is shown below:
courier AggregatorInput {
[ interface PrinterInterface( request ) ] {
forward Printer1( request ) | forward Printer2( request )
}
}
Note that here we use the parallel composition of the primitive forward. A complete example of message broadcasting through the usage of smart aggregation can be found here.
Collection and Interface extension
When using collections it is also possible to extend the interface of the collected output ports in order to add some extra data that are managed only by the aggregator. Interface extension can be applied to all the output ports of a collection.
A comprehensive example
Here we present a comprehensive example which includes interface extension by modifying the example described in the sections above. In this new scenario we have two printer services Printer1 and Printer2, the fax service Fax and the service Logger which are all part of our trusted intranet. The full code of the example can be found here.
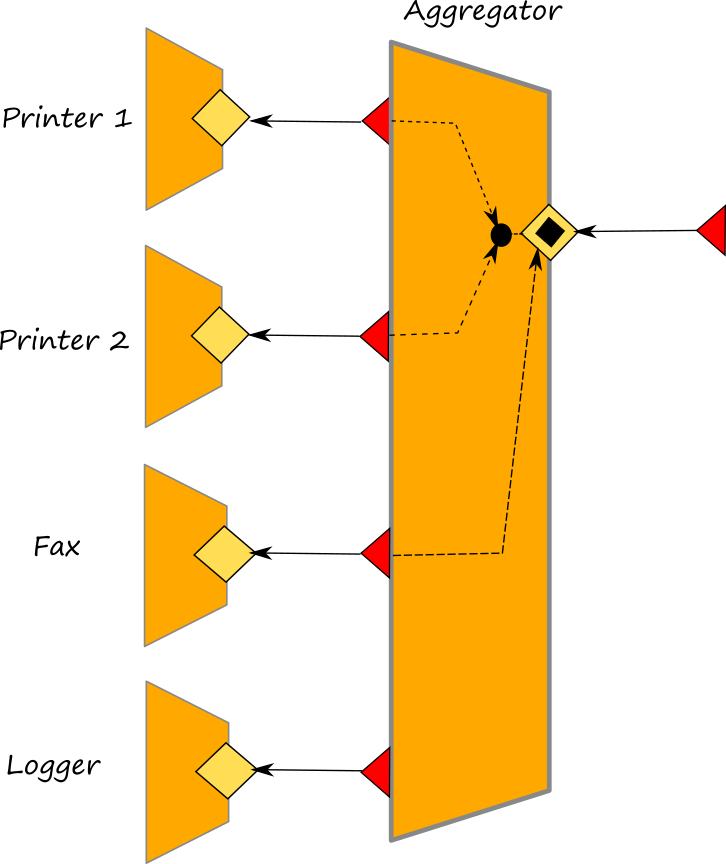
Our aim is to deploy a service that aggregates Printer1, Printer2, and Fax to accept requests from external networks (e.g., the Internet), but we want to authenticate the external users that use Printer1's and Printer2's service. In particular, we with the operation get_key provided by the aggregator, we allow the user to get the service key to use for accessing the target service. Here, for the sake of brevity, we just simulate the authentication. Once obtained the key, the client can add it to the request directed to the target service. It is worth noting that the key is an extra data added by means of the interface extender, thus when the message is forwarded to the target service, it will be erased. Such a fact implies that the target services are not aware of the authentication logics which is totally in charge to the aggregator.
In the following the code of the aggregator:
include "locations.iol"
include "printer.iol"
include "fax.iol"
include "console.iol"
include "logger.iol"
execution { concurrent }
type AuthenticationData:void {
.key:string
}
interface extender AuthInterfaceExtender {
RequestResponse:
*(AuthenticationData)(void)
OneWay:
*(AuthenticationData)
}
interface AggregatorInterface {
RequestResponse:
get_key(string)(string)
}
outputPort Printer1 {
Location: Location_Printer1
Protocol: sodep
Interfaces: PrinterInterface
}
outputPort Printer2 {
Location: Location_Printer2
Protocol: sodep
Interfaces: PrinterInterface
}
outputPort Logger {
Location: Location_Logger
Protocol: sodep
Interfaces: LoggerInterface
}
outputPort Fax {
Location: Location_Fax
Protocol: sodep
Interfaces: FaxInterface
}
inputPort AggregatorInput {
Location: Location_Aggregator
Protocol: sodep
Interfaces: AggregatorInterface
Aggregates: { Printer1, Printer2 } with AuthInterfaceExtender, Fax
}
courier AggregatorInput {
[ interface PrinterInterface( request ) ] {
if ( request.key == "0000" ) {
log@Logger( "Request for printer service 1" );
forward Printer1( request )
} else if ( request.key == "1111" ) {
log@Logger( "Request for printer service 2" );
forward Printer2( request )
} else {
log@Logger( "Request with invalid key: " + request.key )
}
}
[ interface FaxInterface( request ) ] {
log@Logger( "Received a request for fax service" );
forward ( request )
}
}
init
{
println@Console( "Aggregator started" )()
}
main
{
get_key( username )( key ) {
if ( username == "username1" ) {
key = "0000"
} else if ( username == "username2" ) {
key = "1111"
} else {
key = "XXXX"
};
log@Logger( "Sending key for username " + username )
}
}
Above, the aggregator exposes the inputPort AggregatorInput that aggregates the Fax service (as is) and Printer1 and Printer2 services. Printer1's and Printer2's operations types are extended by the AuthInterfaceExtender.
Synchronous vs Asynchronous Communication
Input and output primitives allows for the programming of both synchronous and asynchronous communications. Synchronous communication always deal with a message exchange between the sender and the receiver where the sender is blocked until the reply is received. Asynchronous communication deal with a single message exchange where the sender can continue to work after sending the message. The two communication patterns can be summarized in the following diagram:

It is worth noting that both of them have always an impact on the architecture of the system. The synchrOnous communication permits to have a double message exchange on the port of the receiver whereas the asynchronous one deals only with a single message exchange. Thus, if we need to implement an asynchronous request/reply message exchange we are forced to modify the architecture adding an input port to the sender and an output port to the receiver just for dealing with the reply message.
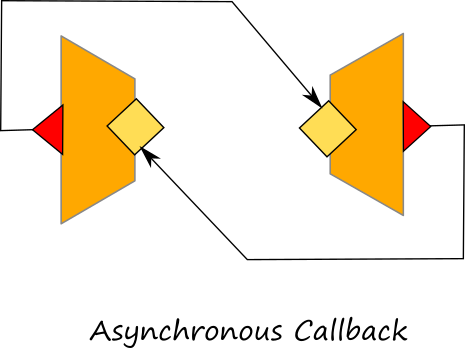
In the example reported at https://github.com/jolie/examples/tree/master/02_basics/6_async_vs_sync we modelled a message exchange both using a synchronous communication and an asynchronous one. Note that the synchronous version can be easily considered as a common pattern to be used as is in your projects, whereas the asynchronous one could require some more analysis from the point of view of the session management. Please, read the section about sessions in order to learn about session management.
Synchronous vs Asynchronous Communication
Input and output primitives allows for the programming of both synchronous and asynchronous communications. Synchronous communication always deal with a message exchange between the sender and the receiver where the sender is blocked until the reply is received. Asynchronous communication deal with a single message exchange where the sender can continue to work after sending the message. The two communication patterns can be summarized in the following diagram:
It is worth noting that both of them have always an impact on the architecture of the system. The synchrOnous communication permits to have a double message exchange on the port of the receiver whereas the asynchronous one deals only with a single message exchange. Thus, if we need to implement an asynchronous request/reply message exchange we are forced to modify the architecture adding an input port to the sender and an output port to the receiver just for dealing with the reply message.
In the example reported at https://github.com/jolie/examples/tree/master/02_basics/6_async_vs_sync we modelled a message exchange both using a synchronous communication and an asynchronous one. Note that the synchronous version can be easily considered as a common pattern to be used as is in your projects, whereas the asynchronous one could require some more analysis from the point of view of the session management. Please, read the section about sessions in order to learn about session management.
Documenting APIs
The documentation of the API of a service is an important phase of the development. Documentation indeed, allows external users to understand how to use the operation exposed by a service. In Jolie it is possible to add comments in the code which can be also used for documenting. Documentation can be automatically generated using the tool 'joliedoc'.
Special comment token for documenting
In order to insert comments in the code which can be used as documentation for joliedoc, it is necessary to use some special tokens in the code.
Documentation comments are used to document interface declarations, operation declarations, and types. The text included in them will be reported in the documentation generated by joliedoc.
Specifically, Jolie supports two kinds of documentation comments: forward and backward ones. Forward documentation comments work in the traditional way, commenting the syntactic node that follows them. Backward documentation comments appear after the syntactic node they are meant to document.
- Forward documentation comments:
/** ... */: multiline comment/// ...: inline comment
- Backward documentation comments:
/*< ... */: multiline comment//< ...: inline comment
Note that documentation comments (forward and backward) in types are always attributed to a node and not to their associated type.
joliedoc
Joliedoc is very easy to use, it is sufficient to run the command joliedoc followed by the file name of the service to be documented. Its usage is
joliedoc <filename> [--internals]
where --internals specifies if including also all the ports (both input and output ports) that are used locally. By default it is set to false.
As a result the command joliedoc produces a folder called joliedoc which contains a set of html files. Just open the file index.html with a common browser for navigating the documentation.
Example
As an example just try to run the joliedoc on the following simple service:
/** This type represents a message test type */
type TestRRRequest: void {
.field1: string //< this is field1
.field2: double //< this is field2
.field3: int {
.field4: raw //< this is field4
}
}
/** This type represents another message type */
type TestRRResponse: void {
.field5: string //< this is field 5
}
/** This type has a link with another type, try to click on the name of the linked type */
type TestOWRequest: TestRRRequest
/** This is a type with ust a native type */
type FaultType: string
/** this is the documentation of the interface */
interface TestInterface {
RequestResponse:
/** this is a simple request response operation which uses types */
testRR( TestRRRequest )( TestRRResponse ) throws FaultTest( FaultType ),
/** this is a simple request response operation which uses native types */
testRR2( string )( double ) throws FaulTest2( string )
OneWay:
/** this is a simple one way operation which uses types */
testOW( TestOWRequest ),
/** this is a simple one way operation which uses native types */
testOW2( string )
}
/** this is another interface */
interface AnotherInterface {
RequestResponse:
/** this is another test operation */
anotherTest( string )( string )
}
include "console.iol"
outputPort AnotherService {
Location: "socket://0.0.0.0:9000"
Protocol: soap
Interfaces: AnotherInterface
}
inputPort Service {
Location: "socket://localhost:8000"
Protocol: sodep
Interfaces: TestInterface
}
inputPort ServiceHTTP {
Location: "socket://localhost:8001"
Protocol: http
Interfaces: TestInterface
}
main {
[ testRR( request )( response ) {
anotherTest@AnotherService( "hello" )( res )
println@Console( res )()
response.field5 = res
}]
[ testRR2( request )( response ) {
println@Console( request )()
}]
[ testOW( request ) ]
{ nullProcess }
[ testOW2( request ) ]
{ println@Console( request )() }
}
Save it into a file called test.ol and try to generate the documentation with the default settings:
joliedoc test.ol
The tool generates a folder called joliedoc which contains html files. Open file index.html with a common browser. The result should look like the following one:
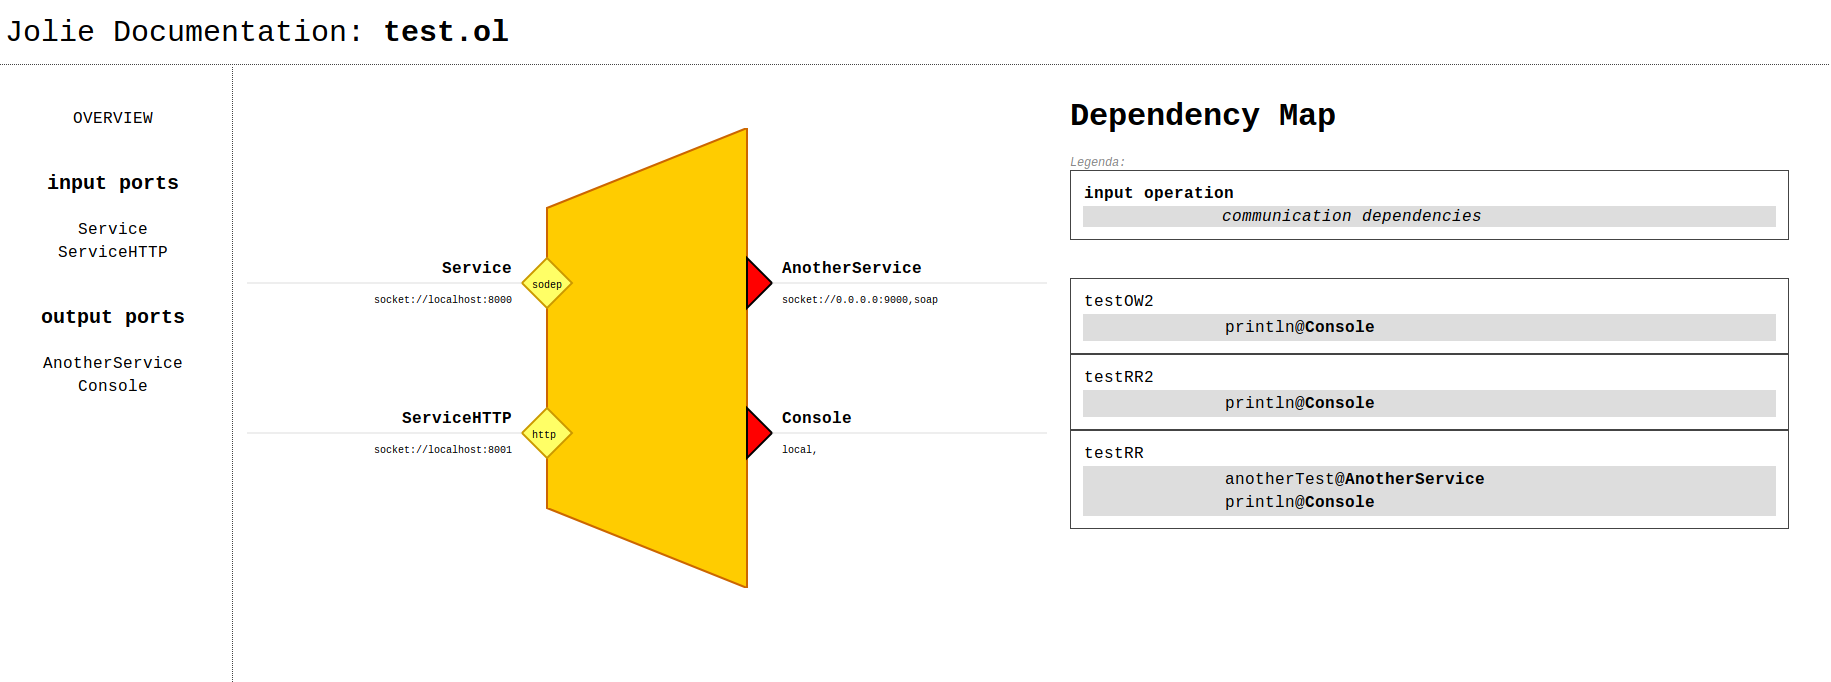
This is the overview of the service where all the internals ports are hidden. If you click on a port on the left menu, it is possible to navigate the api available at that port like in the following picture:
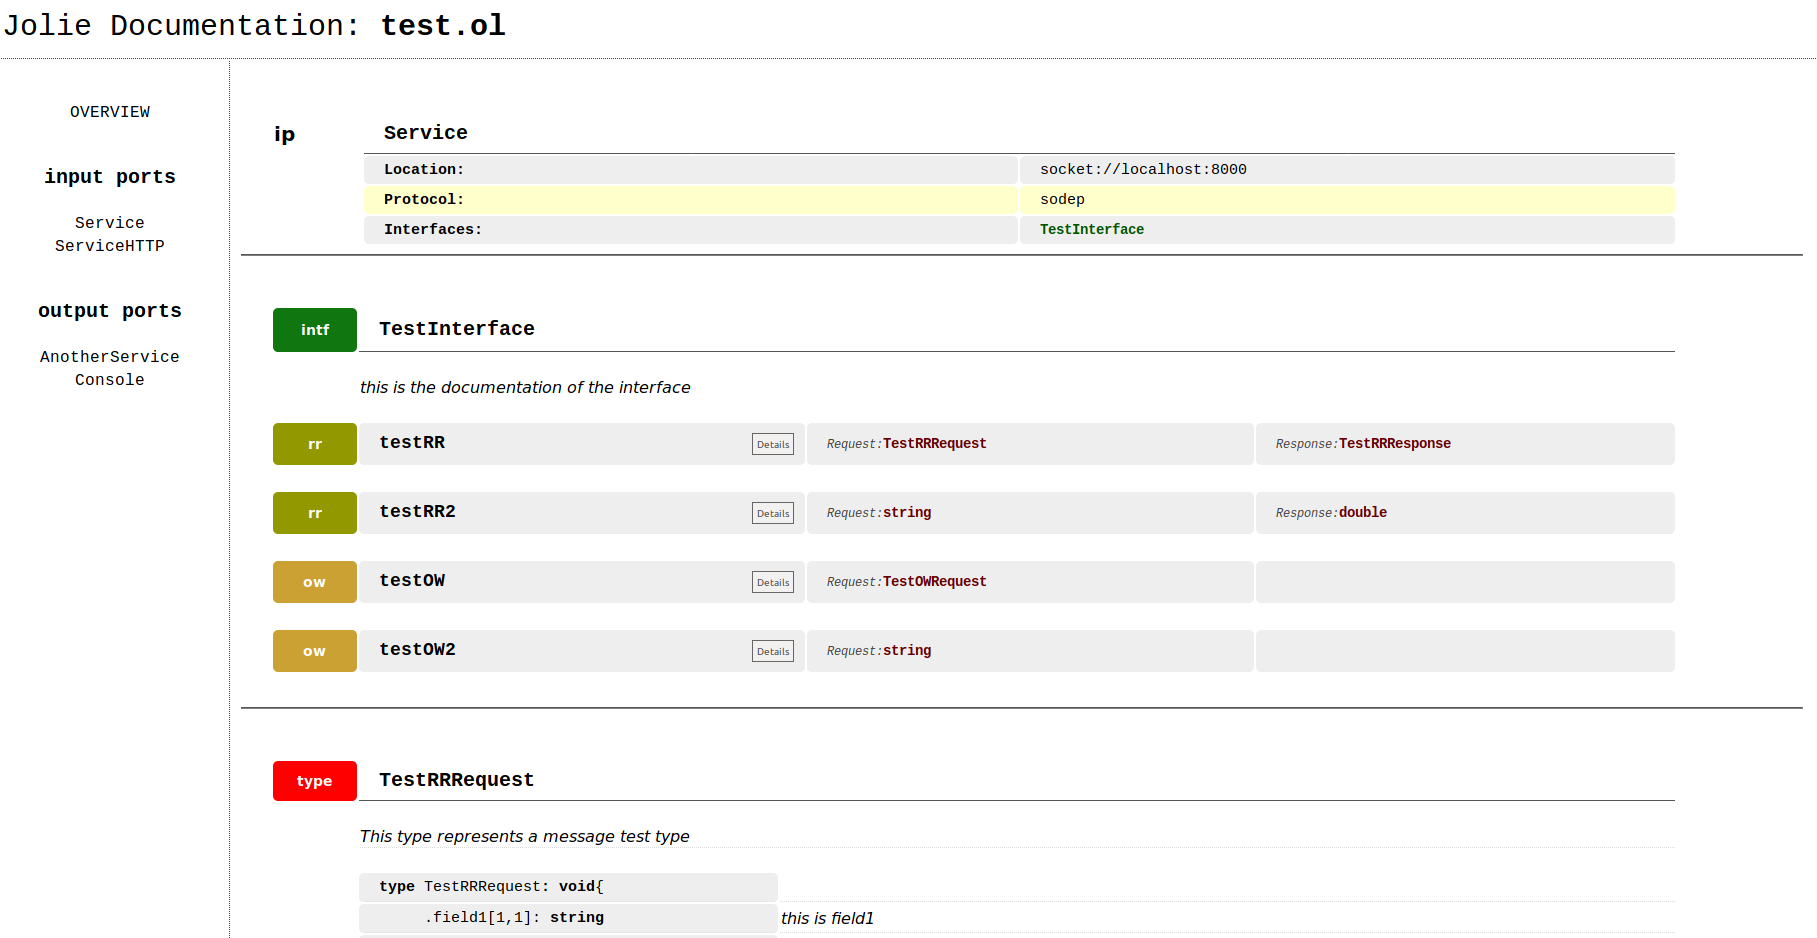
Finally, try to run the command specifying you want to add the internals:
joliedoc test.ol --internals
The result should look like the previous one but port Console also appears as output console and the usage of println@Console operation appears as communication dependencies in the dependency map.
Debugging
At the present, a complete step by step debugger is not available. Nevertheless a tracing tool exists and it can be easily used for debugging a Jolie program.
Tracing
A Jolie program can be easily traced enabling this feature in the command line with the parameter --trace. As an example, let us consider the helloworld program explained here. If you need to enable the tracer just run it using the following command line:
jolie --trace myFirstJolieService.ol
As a result, in the console, you should see the following lines:
[myFirstJolieService.ol] 1. ^ LOAD Java Service Loader joliex.io.ConsoleService
<yourpath>/myFirstJolieService.ol:52. << SR println@Console SENDING MSG_ID:1
Value: = Hello, world! : string
<yourpath>/myFirstJolieService.ol:53. << SR println@Console SENT MSG_ID:1
Value: = Hello, world! : string
Hello, world!
<yourpath>/myFirstJolieService.ol:54. << SR println@Console RECEIVED MSG_ID:1
Value:
it reports all the actions performed by the program. In the specific case it just reports the three actions related to the solicit-response println which are: SENDING, SENT, and RECEIVED. If it seems strange to you that printing something to the console triggers some message exchange actions, just remember that in Jolie everything is a service and also printing a message on the console requires a service. This is why we see the three actions related to the message sending.
Jolie Trace Viewer
When the Jolie program has a lot of lines of code it can be difficult to analyze a trace reported into the console. In this case it is possible to use a web tool which make the navigation of the traces more easy. In order to enable it, it is necessary to save the traces into a file instead of printing them in the console. In order to do this, just specify the parameter file after the term --trace as in the following example:
jolie --trace file myFirstJolieService.ol
In this case, no traces will be printed in the console, but they will be stored into a file named as <timestamp>.jolie.log.json. Such a file can be navigated using a called jolietraceviewer. You can install jolietraceviewer through npm:
npm install -g @jolie/jolietraceviewer
Once jolietraceviewer is installed, just run the command jolietraceviewer from the same folder where you ran the Jolie program. The following statement will appear in the console: Jolie Trace Viewer is running, open your browser and set the url http://localhost:8000. Thus, just open your browser at http://localhost:8000 and navigate through the traces generated by your Jolie program.
Running the jolietraceviewer on a different port
By default jolietraceviewer runs on port 8000 but it is possible to change it by specifying a different port as an argument. In the following example we run jolietraceviewer on port 8001. jolietraceviewer 8001
Defining the tracer level
By default the tracer just traces everything both communication and computation actions. It is possible to restricts the tracing only to communication actions or computation actions. Use the parameter ---traceLevel [ALL|COMP|COMM] for specifying the level. As an example let us consider the following:
jolie --trace file --traceLevel comm myFirstJolieService.ol
It just traces only the communication actions. Use comp for tracing only the computation ones.
Integration with other programming languages
This section is devoted to present all the possibility to integrate Jolie with other programming languages. These information are quite important in a real scenario where different technologies are used together in the same information system.
Java
Since the current interpreter of Jolie is written in Java, Java is a programming language which can be easily integrated in a Jolie program. In the following sections we discuss all the different possibilities to integrate Java and Jolie together:
- Jolie Client: generating a Java client for a Jolie service
- Java Services: writing Java classes to be used as functional supports for Jolie services
Java Client
The creation of a Java Client allows for an easy integration with an existing Jolie service from a Java application by simply using the sodep protocol. In this case you don't need to introduce a rest interface over a http protocol, or a SOAP communication layer, you can just exploit the easiest way offered by Jolie for building a service: the protocol SODEP.
In the following picture we briefly represent how the final architecture of the Jolie Client appears.
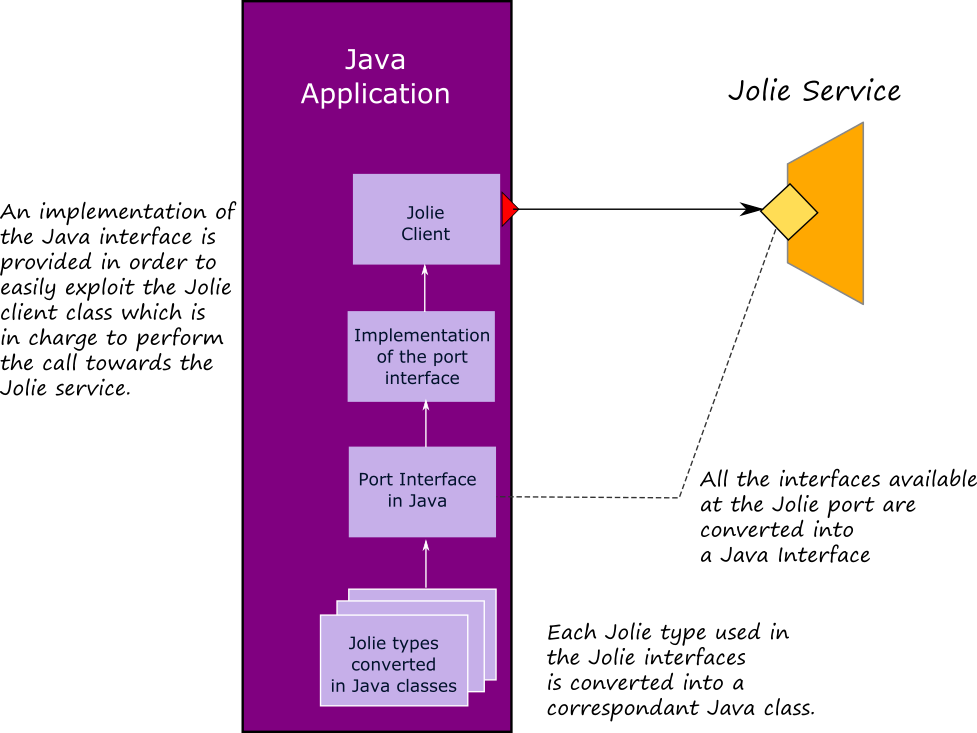
The Java client for a Jolie service can be automatically built starting from a Jolie outputPort declaration. In particular, the client takes the form of a package of classes where all the Jolie types declared in the interfaces used at the input port, are converted into classes in Java. Moreover, all the Jolie interfaces available at the given port are converted into one Java interface. An implementation of the Java interface is provided in order to easily call the Jolie service by exploiting the Jolie Java client.
There are two possible ways for generating the Java client starting from an outputPort:
- Using the tool jolie2java from command line
- Using the jolie2java-maven-plugin
jolie2java
The tool jolie2java is distributed together with the jolie engine. If you have already installed jolie you can run it in a simple way just typing the following command on a console:
jolie2java --help
You will see the following message on the console:
Usage: jolie2java --format [java|gwt] --packageName package_namespace [--targetPort outputPort_to_be_encoded] [ --outputDirectory outputDirectory ] [--buildXml true|false] [--addSource true|false] file.ol
where all the possible arguments to the tool are specified. They are:
--format: it can bejavaorgwtdepending on the target technology. The default isjava. Note that the generation of the gwt classes is deprecated--packageName: it is the name of the package which will contain all the generated classes. It is a mandatory argument.--targetPort: it is the name of the outputPort to be converted. It could be useful where the jolie file contains more than one outputPort and we just need to convert one of them. If it is not specified all the output ports will be converted.--outputDirectory: it is the name of the output directory where the generated files will be stored. The default value is./generated--buildXml: it specifies if the tool must generate also the filebuild.xmlwhich can be used by ant for building the generated classes and provide a unique library file in the form of a jar file. The default istrue.--addSource: when the generation of the filebuild.xmlis enabled it specifies if adding also the sources (files .java) to the jar. The default isfalse. In case the argumentbuildXmlis set tofalseit is ignored.
Let us now try to apply the tool jolie2java to the simple example at this link. Here there is a Jolie service which implements two operations getTemperature and getWind. The interface which describes them follows:
type GetTemperatureRequest: string {
.place?: void {
.longitude: string
.latittude: string
}
}
type GetWindRequest: void {
.city: string
}
interface ForecastInterface {
RequestResponse:
getTemperature( GetTemperatureRequest )( double ),
getWind( GetWindRequest )( double )
}
The client declaration we want to convert in a Java Client is defined within the file client.ol which is reported below:
include "ForecastInterface.iol"
outputPort Forecast {
Interfaces: ForecastInterface
}
main {
nullProcess
}
It is worth noting that the minimal definition we require in order to generate a Java Client is the declaration of an outputPort and its related interfaces. The main scope is defined but it is empty (nullProcess) just because we need to respect the minimal requirements for a service definition, otherwise a syntax error would be triggered by the tool.
Download in a folder both the main.ol and the ForecastInterface.iol file and run the following command from the same folder.
jolie2java --packageName com.test.jolie client.ol
As a result you will find a folder called generated whose content is:
-- build.xml
-- com
----|
----test
------|
------jolie
--------|
--------types
----------|
----------GetTemperatureRequest.java
----------GetWindRequest.java
--------Controller.java
--------ForecastImpl.java
--------ForecastInterface.java
--------JolieClient.java
The file build.xml can be used under ant for building a distributable jar file. See the subsection below for more details. The structure of the directories com/test/jolie corresponds to the package name given as argument to jolie2java.
Files Controller.java and JolieClient.java actually implement the client for sending requests to a Jolie service. The file ForecastInterface.java is the Java interface which corresponds to the Jolie ones available at the converted outputPort. The file ForecastImpl.java is the actual implementation of the ForecastInterface.java and it exploits the JolieClient class for directly invoking the operations of the Jolie service. The folder types contains all the classes which represent the types declared in the Jolie interface. In this example there are only two types: GetTemperatureRequest and GetTemperatureRequest.
Some important notes to the type conversion
Native types are converted into Java classes as it is described below:
- int -> Integer
- string -> String
- double -> Double
- long -> Long
- bool -> Boolean
- raw -> ByteArray (it is an class available from the jolie.jar library)
- undefined -> Value (it is an class available from the jolie.jar library)
- any -> Object
Structured types are converted by introducing inner classes inside the main one. For example, the type GetTemperatureRequest contains a subnode place which is mapped with an internal class called placeType as it is shown below where we report the first lines of the GetTemperatureRequest.java.
public class GetTemperatureRequest implements Jolie2JavaInterface {
public class placeType {
private String latittude;
private String longitude;
public placeType( Value v ) throws TypeCheckingException {
...
Root values. When a Jolie type requires a root value like in type GetTemperatureRequest where a string is requested as root type, in Java it is converted introducing a private filed called rootValue which can be accessed by using methods getRootValue and setRootValue.
Create a distributable jar with ant
In order to use the generated classes in a Java project it is possible to copy them by hand and then compile them. Note that you need to import also the directories which define the package name given as argument com/test/jolie. It is worth noting that you need to add the following libraries to your project in order to satisfy the dependencies:
jolie.jar:libjolie.jarsodep.jarjolie-java.jar
It is possible to retrieve all of them in the installation folder of Jolie. In particular, jolie.jar is in the installation folder, libjolie.jar and jolie-java.jar are in the folder lib and, finally, sodep.jar is in the folder extensions.
Alternatively, if you are confident with ant you can directly compile a distributable jar by exploiting the generated file build.xml. In this case it is sufficient to run the following command on the console from the same folder where the file build.xml is:
ant dist
The command generates three folders:
built: it contains the compiled Java classesdist: it contains the distributable jar of the Jolie Java clientlib: it contains all the jar dependencies of the Jolie Java client
Using the Jolie Java client in a project
Let us now to show how to use the generated client into a Java project. First of all, include the following jar files in the classpath of your project:
jolie.jar:libjolie.jarsodep.jarjolie-java.jarJolieClient.jar: it is the distributable jar of the client obtained compiling the sources with ant as described in the previous section.
In the following we show the code necessary to invoke the Jolie service of the example presented above. Here we assume that such a service is running on localhost at port 8000.
import com.test.jolie.ForecastImpl;
import com.test.jolie.JolieClient;
import com.test.jolie.types.GetTemperatureRequest;
import java.io.IOException;
public class JavaApplication
{
public static void main( String[] args ) throws IOException, InterruptedException, Exception
{
JolieClient.init( "localhost", 8000 );
ForecastImpl forecast = new ForecastImpl();
GetTemperatureRequest request = new GetTemperatureRequest();
request.setRootValue( "Cesena" );
System.out.println( forecast.getTemperature( request ));
}
}
- before using the client, it is necessary to initialize the location and the port of the service to invoke. The first row of the main does this:
JolieClient.init( "localhost", 8000 );
- then it is necessary to instantiate the object which implements the Java interface of the service:
ForecastImpl forecast = new ForecastImpl();
- now it is possible to prepare the request message:
GetTemperatureRequest request = new GetTemperatureRequest(); request.setRootValue( "Cesena" );
- finally, it is possible to perform the invocation:
forecast.getTemperature( request )
Using the jolie2java-maven-plugin
For those who are using maven for managing their Java projects, it is possible to use jolie2java within a specific maven plugin: jolie2java-maven-plugin. Just add the following lines to the pom of your project and the jolie2java tool can be used within the maven Lifecycle:
<!--dependencies-->
<dependency>
<groupId>jolie</groupId>
<artifactId>jolie</artifactId>
<version>1.8.1</version>
</dependency>
<dependency>
<groupId>jolie</groupId>
<artifactId>libjolie</artifactId>
<version>1.8.1</version>
</dependency>
<dependency>
<groupId>jolie</groupId>
<artifactId>jolie-java</artifactId>
<version>1.8.1</version>
</dependency>
<dependency>
<groupId>jolie</groupId>
<artifactId>sodep</artifactId>
<version>1.8.1</version>
</dependency>
<!-- maven plugin -->
<build>
<plugins>
<plugin>
<groupId>jolie</groupId>
<artifactId>jolie2java-maven-plugin</artifactId>
<version>1.0.0</version>
<configuration>
<joliePath>...</joliePath>
<outputDirectory>...</outputDirectory>
<packageName>...</packageName>
<includePath>...</includePath>
</configuration>
<executions>
<execution>
<goals>
<goal>joliegen</goal>
</goals>
</execution>
</executions>
</plugin>
</plugins>
</build>
where the configuration parameters are:
- joliePath: the path where the jolie files which describe the client can be found by maven
- outputDirectory: the outputDirectory where the generated classes must be copied
- packageName: the name of the package to be used in the generated classes
- includePath: the path where the jolie standard library include files are stored. Default
/usr/lib/jolie/include.
Note that the jolie2java-maven-plugin will be run during the generated-sources phase of maven, thus before the compilation one. So, take care to specify an outputDirectory inside your project which can be accessed by maven during the compilation.
Java Services
Embedding a Java service
When embedding a Java service, the path URL must unambiguously identify a Java class, which must also be in the Java classpath of the Jolie interpreter. The class must extend the JavaServices abstract class, offered by the Jolie Java library for supporting the automatic conversion between Java values and their Jolie representations.
Each method of the embedded class is seen as an operation from the embedder, which will instantiate an object using the class and bind it to the output port. Embedding Java services is particularly useful for interacting with existing Java code or to perform some task where computational performance is important.
The println@MyConsole example
Many services of the Jolie standard library (like Console) are Java services.
Each public method of the Java Service is an input operation invocable by the embedder. Depending on the output object, each method represents a one-way operation (if the output is void) or a request-response (for non-void outputs). This behaviour can be overridden by using the @RequestResponse annotation when declaring a void-returning operation.
Let us write our own MyConsole Java service that offers a println request-response operation. println is a public method of MyConsole class that takes a string as request and prints it at console.
package example;
import jolie.runtime.JavaService;
public class MyConsole extends JavaService {
public void println( String s ) {
System.out.println( s );
}
}
Once stored in the example folder, as defined by the package statement, our Java class must be compiled into a .jar library and added to the folder "javaServices" in Jolie's installation directory:
- run the Java compiler on our MyConsole.java file adding the jolie.jar library in the classpaths (
-cp):javac -cp /path/to/jolie.jar MyConsole.java; - compress the MyConsole.class file into a .jar library with the
jarcommand:jar cvf example.jar example/MyConsole.class - move the example.jar file into the
libfolder of your current directory.
Now that you have the implementation of your Java service, we need to make it accessible to Jolie code. For this, create a file called my-console.ol with the following content:
interface MyConsoleInterface {
OneWay: println( string )
}
service MyConsole {
inputPort Input {
location: "local"
interfaces: MyConsoleInterface
} foreign java {
class: "example.MyConsole"
}
}
It is now possible to embed MyConsole within a Jolie service, just like you would embed any other service:
from .my-console import MyConsole
service Main {
embed MyConsole as console main {
println@console( "Hello World!" )
}
}
Using a request-response operation in Java services
To practice on request-response operations between embedded and embedder, let us rewrite the twice service used in the section Embedding Jolie Services.
We use the previously written Java Service MyConsole to print the result and show how to embed multiple classes.
package example;
import jolie.runtime.JavaService;
public class Twice extends JavaService {
public Integer twiceInt( Integer request ) {
Integer result = request + request;
return result;
} public Double twiceDouble( Double request ) {
Double result = request + request;
return result;
}
}
Note that both input and output types of each method, although meant to be primitive types int and double, must be declared as their wrapping classes, respectively Integer and Double.
Define a twice.ol module accordingly:
interface TwiceInterface {
RequestResponse:
twiceInt( int )( int ),
twiceDouble( double )( double )
}
service Twice {
inputPort Input {
location: "local"
interfaces: TwiceInterface
} foreign java {
class: "example.Twice"
}
}
Following, the Jolie service embeds both MyConsole and Twice classes:
from .my-console import MyConsole
from .twice import Twice
service {
embed MyConsole as console
embed Twice as twice
main {
intExample = 3;
doubleExample = 3.14;
twiceInt@twice( intExample )( intExample );
twiceDouble@twice( doubleExample )( doubleExample );
println@console("intExample twice: " + intExample );
println@console("doubleExample twice: " + doubleExample )
}
}
Handling structured messages and embedder's operations invocation
A Java Service can also invoke operations of its embedder by means of the getEmbedder method offered by the JavaService class, which returns an Embedder object that can be used to perform the invocations.
To exemplify its usage, consider the following service.
from console import Console
type Split_req {
string:string
regExpr:string
}
type Split_res{
s_chunk*:string
}
interface SplitterInterface {
RequestResponse: split( Split_req )( Split_res )
}
interface MyJavaExampleInterface {
OneWay: start( void )
}
service Splitter {
inputPort Input {
location: "local"
interfaces: SplitterInterface
} foreign java {
class: "example.Splitter"
}
}
service JavaExample {
inputPort Input {
location: "local"
interfaces: MyJavaExampleInterface
} foreign java {
class: "example.MyJavaExample"
}
}
service Main {
embed Splitter as splitter
embed MyJavaExample as myJavaExample inputPort Embedder {
location: "local"
interfaces: SplitterInterface
}
main
{
start@myJavaExample();
split( split_req )( split_res ) {
split@splitter( split_req )( split_res )
}
}
The embedder acts as a bridge between two embedded Java Services, MyJavaExample which requests a split operation and, Splitter which implements it.
package example;
import jolie.runtime.JavaService;
import jolie.net.CommMessage;
import jolie.runtime.Value;
import jolie.runtime.ValueVector;
public class JavaExample extends JavaService { public void start(){
String s_string = "a_steaming_coffee_cup";
String s_regExpr = "_"; Value s_req = Value.create();
s_req.getNewChild("string").setValue(s_string);
s_req.getNewChild("regExpr").setValue(s_regExpr); try {
System.out.println("Sent request");
Value s_array = getEmbedder().callRequestResponse( "split", s_req );
System.out.println("Received response"); Value s_array = response.value();
ValueVector s_children = s_array.getChildren("s_chunk");
for( int i = 0; i
After start() is called by the embedder, our Java Service creates a Value object according to the Split_req type definition. In the try block, it then obtained a reference to the Embedder object (representing the embedder Jolie service) and uses its callRequestResponse method to invoke operation split at the embedder. The method returns a value (s_array) containing the response from the service. Notice that the embedder needs to expose this operation in an input port with location local.
After receiving the response, the service prints at console the subnodes of the response exploiting the ValueVector object.
The comprehensive code of this example can be downloaded here:
Creating a JavaService
This tutorial explains how to develop JavaService classes which can be easily embedded into a Jolie service. For the sake of clarity, here we consider to use Netbeans IDE as a project management tool, but the following instructions can be easily adapted to any kind of Java IDE.
The tutorial also presents some features of Java integration in Jolie, i.e., manipulating Jolie values in Java, calling operations from a Java service, and the dynamic embedding of JavaServices.
Creation of a JavaService project
- If you are using Maven, just click on “New Project” icon and then select Maven -> Java Application as reported in the following picture.
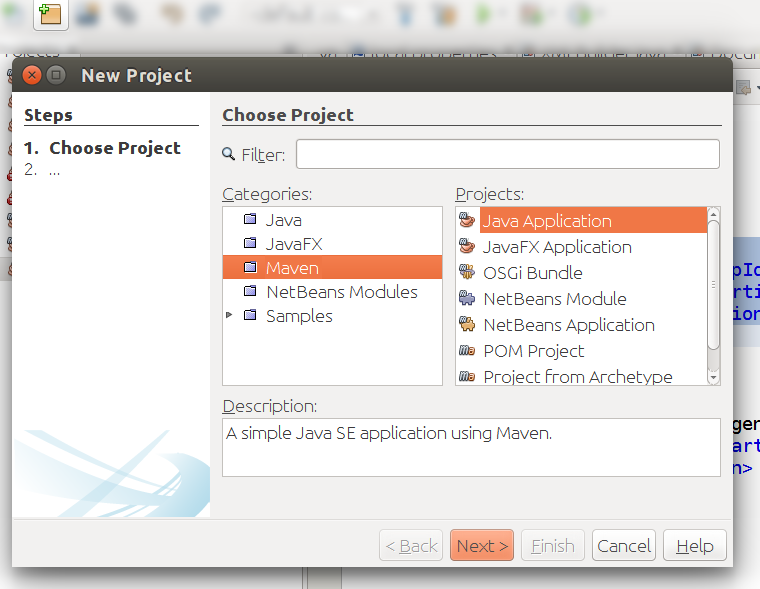
- If you are creating a new project from scratch click on “New Project” icon and then select Java -> Java Class Library
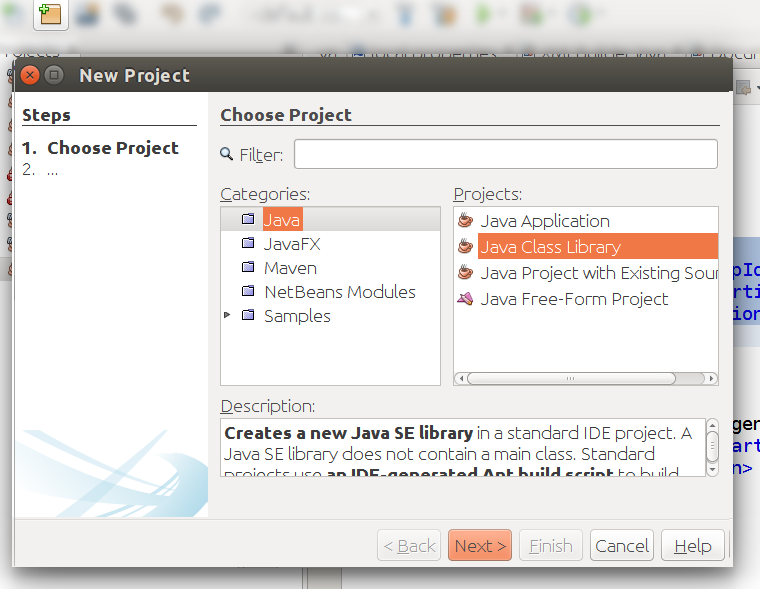
Then, follows the instructions and give a name to the project (ex: FirstJavaService) and define the working directory.
Dependencies
Before continuing with the development of a JavaService keep in mind that there is a dependency you need to add to your project to properly compile the JavaService code: the jar jolie.jar which comes with your Jolie installation. Follow these instructions to prepare the file to be imported into your project:
- Locate the
jolie.jarfile into your system: Jolie is usually installed into/usr/lib/joliefolder for linux like operating systems and inC:\Joliefor Windows operating systems. In the installation folder of Jolie you can find the filejolie.jar. If you are not able to locate thejolie.jarfile or you require some other Jolie versions, here you can find the complete list of all the available releases of Jolie. Download the release you need. - If you use Maven you could register the dependency in your local repo by using the following command
mvn install:install-file -Dfile=<path-to-jolie.jar>/jolie.jar -DgroupId=jolie -DartifactId=jolie -Dversion=<version> -Dpackaging=jar
NOTE We are working to register the dependency jolie.jar into Maven Central. If jolie.jar is available into Maven Central the step above can be skipped.
Importing the Jolie dependency into your JavaService project
If you use Maven it is very easy to import the Jolie dependency into your project, just add the following dependency into your pom.xml file:
<dependency>
<groupId>org.jolie-lang</groupId>
<artifactId>jolie</artifactId>
<version>1.10.5</version>
</dependency>
If you manually manage your project just add the jolie.jar as an external dependency. In Netbeans you have to:
- Expand your project
- Right mouse button on Libraries
- Select Add JAR/Folder
- Select the
jolie.jarfile from the path selector
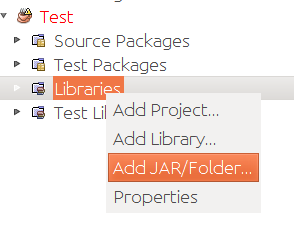
The first JavaService
As a first example of a JavaService we present a sample scenario where we suppose to extend the features of a Jolie service by exploiting native Java computation. The architecture of the final system will look as it is represented in the following picture:
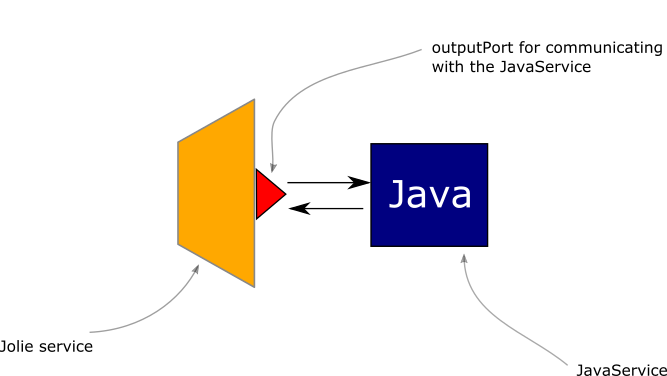
As it is possible to note, here the Jolie service communicates with the JavaService with a synchronous call equivalent to a RequestResponse.
Before writing the actual code of the JavaService it is important to create the package which will contain it. Let us name it org.jolie.example. Then, let us create the new Java file called FirstJavaService.java.
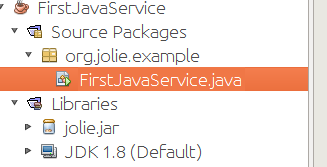
Writing the JavaService code
Here we present the code of our first JavaService which simply prints out on the console a message received from an invoker and then reply with the message I am your father.
package org.jolie.example;
import Jolie.runtime.JavaService;
import Jolie.runtime.Value;
public class FirstJavaService extends JavaService
{
public Value HelloWorld( Value request ) {
String message = request.getFirstChild( "message" ).strValue();
System.out.println( message );
Value response = Value.create();
response.getFirstChild( "reply" ).setValue( "I am your father" );
return response;
}
}
In the code there are some important aspects to be considered:
- We need to import two classes from the Jolie dependency:
jolie.runtime.JavaServiceandjolie.runtime.Value - the class
FirstJavaServicemust be extended as a JavaService:... extends JavaService - the request parameter and the response one are objects
Value - it is possible to navigate the tree of a
Valueby using specific methods likegetFirstChild(see below) - the request message has a subnode
messagewhich contains a string - the response message will contain the reply message in the subnode
reply - the core logic of the JavaService is just the line
System.out.println("message")which prints out the content of the variable message on the console
Building the JavaService
Now we can build the JavaService, in particular we need to create a resulting jar file to be imported into the corresponding Jolie project. To do this, just click with the mouse right button on the project and select Clean and Build.
If you are managing the project with Maven you will find the resulting jar in folder target, whereas if you are manually managing the project you can find it in the folder dist.
Executing the JavaService
Now we are ready for embedding the JavaService into a Jolie service. It is very simple, just follow these steps:
-
Create a folder where placing your Jolie files, ex:
JolieJavaServiceExample -
Create a subfolder named
lib(JolieJavaServiceExample/lib) -
Copy the jar file of your JavaService into the folder
lib(jolie automatically imports all the libraries contained in the subfolderlib) -
Create a Jolie file where defining the wrapping
serviceblock for your JavaService and name itfirst-java-service.ol. It is worth noting that all the public methods defined in the class FirstJavaService can be promoted as operations at the level of the wrapping Jolie service. In our example the interface is calledFirstJavaServiceInterfaceand it declares one operation calledHelloWorld(the name of the operation must be the same name of the corresponding operation in the JavaService). The request and response message types define two messages where the former has a subnode namedmessageand the latter is namedreply.
type HelloWorldRequest {
message:string
}
type HelloWorldResponse {
reply:string
}
interface FirstJavaServiceInterface {
RequestResponse:
HelloWorld( HelloWorldRequest )( HelloWorldResponse )
}
service FirstJavaService {
inputPort Input {
location: "local"
interfaces: FirstJavaServiceInterface
} foreign java {
class: "org.jolie.example.FirstJavaService"
}
}
- In the code of your Jolie service, embed the wrapper Jolie service. You can name the resulting output port as you prefer (there are no restrictions), in this example we use the name
firstJavaService.
from .first-java-service import FirstJavaService
service Main {
embed FirstJavaService as firstJavaService
- Complete your Jolie code.
Here we report a complete example of a Jolie code which calls the JavaService and prints out its response on the console. Save it in a file named main.ol.
from .first-java-service import FirstJavaService
from console import Console
service Main {
embed FirstJavaService as firstJavaService
embed Console as console main {
request.message = "Hello world!"
HelloWorld@firstJavaService( request )( response )
println@console( response.reply )()
}
}
At this point your Jolie working directory should look like the following one:
- your Jolie working directory
- lib
- FirstJavaService.jar
- first-java-service.ol
- main.ol
- lib
You can run the Jolie program by using the simple command jolie main.ol.
NOTE to avoid the creation of folder lib, it is possible to link the dependency FirstJavaService.jar in the command line as it follows: jolie -l <path-to-dependency>/FirstJavaService.jar main.ol. In this way you are free to place the dependency where it is more suitable for you.
Using the JavaService into a Jolie service
In the previous example we just wrote a Jolie program which exploits the JavaService FirstJavaService. Clearly, it is possible to exploit the same JavaService within a Jolie service by adding an inputPort to the previous program.
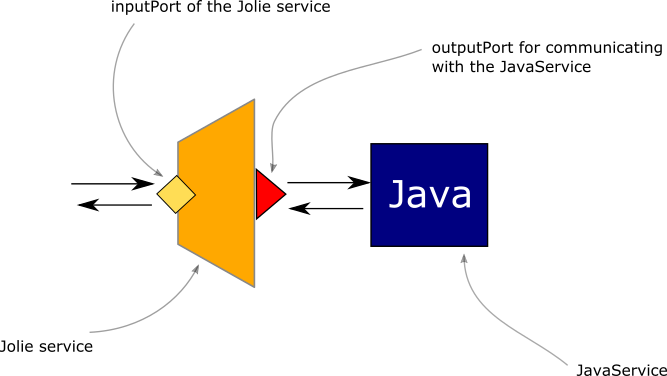
In the following case we present a possible solution where the operation of the JavaService is exported to the inputPort by exploiting the same interface FirstJavaServiceInterface with a new implementation of the operation HelloWorld in the main scope of the service.
from .first-java-service import FirstJavaService
from console import Console
service Main {
execution: concurrent embed FirstJavaService as firstJavaService
embed Console as console inputPort MyInputPort {
location: "socket://localhost:9090"
protocol: sodep
interfaces: FirstJavaServiceInterface
} main {
HelloWorld( request )( response ) {
println@console("I am the embedder")()
HelloWorld@firstJavaServiceOutputPort( request )( response )
}
}
}
Such a scenario is useful when we need to add some extra computation within the behaviour before invoking the JavaService (in the example we print out the request message before forwarding it to the JavaService). In those cases where there is no need to manipulate the messages in the behaviour, we could directly aggregate the JavaService outputPort in the inputPort of the service by obtaining a direct connection between the Jolie inputPort and the JavaService.
from .first-java-service import FirstJavaService
from console import Console
service Main {
execution: concurrent embed FirstJavaService as firstJavaService inputPort MyInputPort {
location: "socket://localhost:9090"
protocol: sodep
aggregates: firstJavaService
} main {
...
Manipulating Jolie values in Java
In this section we deepen the usage of the class Value which allows for the management of Jolie value trees within Java.
Creating a value
First of all, we need to create a Value in Java as we would do in Jolie. The following Java code creates a Value named v.
Value v = Value.create();
Getting the vector elements
In each Jolie tree, a node is a vector. To access/get the vector elements of a node, you can use the method getChildren( String subnodeName ) which returns the corresponding ValueVector of the subnode subnodeName. In the following example we get all the vector elements of the subnode subnode1.
ValueVector vVector = v.getChildren("subnode1");
All the items of a ValueVector are Value objects. To access the Value element at index i it is possible to use the method get( int index ). In the following example we access the third element of the subnode subnode1 where 0 is the index of the first element.
ValueVector vVector = v.getChildren("subnode1");
Value thirdElement = vVector.get( 2 );
Setting the value of an element
It is possible to use the method setValue( ... ) for setting the value content of an element as in the following example:
ValueVector vVector = v.getChildren("subnode1");
Value thirdElement = vVector.get( 2 );
thirdElement.setValue("Millennium Falcon");
Getting the value of an element
Once accessed a vector element (a value in general), it is possible to get its value by simply using one of the following methods depending on the type of the content:
strValue()intValue()longValue()boolValue()doubleValue()byteArrayValue().
In the following example we suppose to print out the content of the third element of the subnode subnode1 supposing it is a string.
ValueVector vVector = v.getChildren("subnode1");
Value thirdElement = vVector.get( 2 );
thirdElement.setValue("Millennium Falcon");
System.out.println( thirdElement.strValue() );
Annotations
Each public method programmed within a JavaService must be considered as an input operation that can be invoked from the embedder. Depending on the return object the method represents a OneWay operation or a RequestResponse one. If the return type is void, the operation is considered a OneWay operation, a RequestResponse operation otherwise. You can override this behaviour by using the @RequestResponse annotation, which forces Jolie to consider the annotated method as a RequestResponse operation.
Faults
Faults are very important for defining a correct communication protocol between a JavaService and a Jolie service. Here we explain how managing both faults from the JavaService to the embedder Jolie service and vice-versa.
Sending a Fault from a Java service
Let us consider the FirstJavaService example where we call the method HelloWorld of the JavaService. In particular, let us modify the Java code to reply with a fault in case the incoming message is wrong.
public Value HelloWorld( Value request ) throws FaultException {
String message = request.getFirstChild( "message" ).strValue();
System.out.println( message );
if ( !message.equals( "I am Luke" ) ) {
Value faultMessage = Value.create();
faultMessage.getFirstChild( "msg" ).setValue( "I am not your father" );
throw new FaultException( "WrongMessage", faultMessage );
}
Value response = Value.create().getFirstChild( message );
response.getFirstChild( "reply" ).setValue( "I am your father" );
return response;
}
Note that the method HelloWorld throws an exception called FaultException that comes from the jolie.runtime package. A simple Java exception is not recognized by the Jolie interpreter as a Fault, only those of FaultException type are. The creation of a FaultException is very simple, the constructor can take one or two parameters. The former one is always the name of the fault, whereas the latter one, if present, contains the fault value tree (in the example a message with a subnode msg). The fault value tree is a common object of type Value. On the Jolie service side, there is nothing special but the fault is managed as usual.
Getting to the code, we need to update the Jolie wrapper module for FirstJavaService such that it declares the fault:
type HelloWorldRequest {
message:string
}
type HelloWorldResponse {
reply:string
}
type WrongMessageFaultType {
msg:string
}
interface FirstJavaServiceInterface {
RequestResponse:
HelloWorld( HelloWorldRequest )( HelloWorldResponse ) throws WrongMessage( WrongMessageFaultType )
}
service FirstJavaService {
inputPort Input {
location: "local"
interfaces: FirstJavaServiceInterface
} foreign java {
class: "org.jolie.example.FirstJavaService"
}
}
We can then use it and manage the fault as usual in an embedding Jolie service:
from console import Console
from first-java-service import FirstJavaService
service Main {
embed FirstJavaService as firstJavaService
embed Console as console main {
install( WrongMessage => println@Console( main.WrongMessage.msg )() )
request.message = "I am Obi"
HelloWorld@FirstJavaServiceOutputPort( request )( response )
println@Console( response.reply )()
}
}
Managing fault responses
In Jolie a RequestResponse message can return a fault message which must be managed into the JavaService. Such a task is very easy and can be achieved by checking if the response is a fault or not by exploiting method isFault of the class CommMessage as reported in the following code snippet:
try {
Value response = getEmbedder().callRequestResponse( request );
System.out.println( response.value().strValue() );
} catch( FaultException e ) {
System.out.println( e.faultName() );
}
JavaService dynamic embedding
So far, we have discussed the possibility to statically embed a JavaService. In this case the JavaService is shared among all the sessions created by the embedder. In some cases, it could be particularly suitable to embed an instance of JavaService for each running session of the embedder. Such a task can be fulfilled by exploiting the dynamic embedding functionality supplied by the Runtime of Jolie. In the following example we present the Java code of a JavaService which simply returns the value of a counter that is increased each time it is invoked on its method start.
public class FourthJavaService extends JavaService {
private int counter;
public Value start( Value request ) {
counter++;
Value v = Value.create();
v.setValue( counter ); return v;
}
}
In the following code we report a classical embedding of this JavaService wrapper:
// fourth-java-service.ol
interface DynamicJavaServiceInterface {
RequestResponse:
start( void )( int )
}
service DynamicJavaService {
inputPort Input {
location: "local"
interfaces: DynamicJavaServiceInterface
}
foreign java {
class: "org.jolie.example.FourthJavaService"
}
}
if we run a client that calls the service ten times as in the following code snippet:
from fourth-java-service import DynamicJavaService
from console import Console
service main { embed DynamicJavaService as DynamicJavaService
embed Console as Console main {
for ( i = 0 , i < 10 , i ++ ){
println@Console("Received counter " + start@DynamicJavaService() )()
}
}
}
we obtain:
Received counter 1
Received counter 2
Received counter 3
Received counter 4
Received counter 5
Received counter 6
Received counter 7
Received counter 8
Received counter 9
Received counter 10
In this case the JavaService is shared among all the sessions and each new invocation will increase its inner counter.
Now let us see what happens if we dynamically embed it as reported in the following service:
from fourth-java-service import DynamicJavaServiceInterface
from console import Console
from runtime import Runtime
service main { embed Console as Console
embed Runtime as Runtime
outputPort DynamicJavaService {
Interfaces: DynamicJavaServiceInterface
}
main {
for ( i = 0 , i < 10 , i ++ ){
with( emb ) {
.filepath = "org.jolie.example.DynamicJavaService"
.type = "Java"
}
loadEmbeddedService@Runtime( emb )( DynamicJavaService.location )
println@Console("Received counter " + start@DynamicJavaService() )()
}
}
}
Note that we imported runtime package to exploit loadEmbeddedService operation. Such an operation permits to dynamically embed the JavaService in the context of the running session. The operation returns the memory location which is directly bound in the location DynamicJavaService.location that is the location of outputPort DynamicJavaService.
Now, if we run the same client as in the example before, we obtain the following result:
Received counter 1
Received counter 1
Received counter 1
Received counter 1
Received counter 1
Received counter 1
Received counter 1
Received counter 1
Received counter 1
Received counter 1
Such a result means that for each session enabled on the embedder, a new JavaService object is instantiated and executed, thus the counter will start from zero every invocation.
Javascript
Embedding a JavaScript Service enables to use both the JavaScript language and Java methods by importing their classes.
Let us rewrite the twice service example as a JavaScript embedded service.
importClass( java.lang.System );
importClass( java.lang.Integer );
function twice( request )
{
var number = request.getFirstChild("number").intValue();
System.out.println( "Received a 'twice' request for number: " + number );
return Integer.parseInt(number + number);
}
At Lines 1-2 we respectively import java.lang.System to use it for printing at console a message, and java.lang.Integer to send a proper response to the embedder. This is necessary because of JavaScript's single number type which, internally, represents any number as a 64-bit floating point number. At Line 6 the methods getFirstChild and intValue, belonging to Value class, are used to read the request's data. Finally at Line 8 we use the parseInt method of class Integer to return an Integer value to the invoker.
include "console.iol"
type TwiceRequest:void {
.number: int
}
interface TwiceInterface {
RequestResponse:
twice( TwiceRequest )( int )
}
outputPort TwiceService {
Interfaces: TwiceInterface
}
embedded {
JavaScript:
"TwiceService.js" in TwiceService
}
main
{
request.number = 5;
twice@TwiceService( request )( response );
println@Console( "Javascript 'twice' Service response: " + response )()
}
Like embedding Jolie Services, also JavaScript Services require the specification of the local file where the JavaScript Service is defined (i.e., TwiceService.js, Line 18).
Containerization
Jolie programming language does not directly deal with the containerization process, but it layers upon other technology frameworks in order to deploy jolie microservices inside a container. At the present, we only investigated the integration with Docker. In particular, we investigated the integration with Docker following two different approaches:
- Deploying a Jolie microservice as a Docker container.
- Using Jolie as orchestration language for controlling Docker. To this end we developed a Jolie wrapper for the Docker API which is called Jocker. Thanks to Jocker it is possible to call the Docker APIs using the protocol sodep.
Docker
Docker is a containerization technology. This section is devoted to show how deploy a Jolie microservice inside a Docker container. Basically, the only thing to do is to create a Dockerfile which allows for creating a Docker image that can be used for generating containers.
Before starting to show how to deploy a jolie microservice within a container docker, it is important to know that there is a Docker image which provides a container where Jolie is installed. Such an image can be found at this link on dockerhub. Such an image will be used in the following as base layer for deploying jolie services.
Deploying a jolie service in a container Docker
Let us now consider an example of a very simple jolie service to be deployed into a docker container, the helloservice.ol:
interface HelloInterface {
RequestResponse:
hello( string )( string )
}
execution{ concurrent }
inputPort Hello {
Location: "socket://localhost:8000"
Protocol: sodep
Interfaces: HelloInterface
}
main {
hello( request )( response ) {
response = request
}
}
The complete code of this example can be found at this link.
Creating a docker image
In order to create a docker image of this microservice, it is necessary to write down a Dockerfile. Thus, just open a text file in the same folder and name it Dockerfile. Then, edit it with a script like the following one:
FROM jolielang/jolie
MAINTAINER YOUR NAME <YOUR EMAIL>
EXPOSE 8000
COPY helloservice.ol main.ol
CMD jolie main.ol
A complete list of all the available command for the Dockerfile script can be found at this link. Here we briefly describe the list of the commands above:
FROM jolielang/jolie: it loads the imagejolielang/jolie;MAINTAINER YOUR NAME <YOUR EMAIL>: it just specifies the name and email address of the file maintainer;EXPOSE 8000: it exposes the port8000to be used by external invokers. Note that the servicehelloservice.olis programmed to listen to the locationsocket://localhost:8000. This means that the jolie microservice always listens on this port within the container.COPY helloservice.ol main.ol: it copied the filehelloservice.olwithin the image renaming it intomain.ol. Note that in case a microservice requires more than one file to work, all the files must be copied into the image by respecting the folder structure of the project.CMD jolie main.ol: this is the command to be executed by Docker when a container will be start from the image described by this Dockerfile.
Once the Dockerfile is ready, we need to run docker for actually creating the container image. Such a task can be achieved by typing the following command on the console:
docker build -t hello .
where docker build is the docker command which builds a docker image starting from a Dockerfile and hello is the name of the image to be created. Once executed, it is possible to check if docker has created it by simply running the command which lists all the available images locally:
docker images
Running the docker container starting from the image
Once the image is created, the container is ready to be run. Just execute the following command for starting it:
docker run -d --name hello-cnt -p 8000:8000 hello
where -d runs the container detached from the shell, hello-cnt is the name of the container and -p 8000:8000 maps the internal port of the container to the hosting machine port. In this particular case the port is always 8000. Finally, hello is the name of the image.
Once executed, the container is running and the jolie microservice can be easily invoked by a client. As an example you can try to invoke the service helloservice.ol using the following client:
include "console.iol"
interface HelloInterface {
RequestResponse:
hello( string )( string )
}
outputPort Hello {
Location: "socket://localhost:8000"
Protocol: sodep
Interfaces: HelloInterface
}
main {
hello@Hello( "hello" )( response );
println@Console( response )()
}
The container can be start and stop using the start and stop commands of docker:
docker stop hello-cnt
docker start hello-cnt
Passing parameters to the jolie microservices using environment variables
A microservice which is more complicated with respect to the service helloservice.ol discussed in the previous section, could require to be initialized with some parameters before being started. A possible solution to this issue is usually passing the parameters using the environment variables of the container. The command run of docker indeed, allows for specifying the environment variable of the container. As an example the command run presented in the previous section could be re-written as it follows:
docker run -d --name hello-cnt -p 8000:8000 -e TESTVAR=spiderman hello
where we added the parameter -e TESTVAR=spiderman which initializes the environment variable TESTVAR with the value spiderman. Once executed, the container will be started with variable TESTVAR correctly initialized with the parameter value we want.
But how could we read it from a jolie service?
Reading an environment variable from a Jolie service is very simple. It is sufficient to exploit the standard library, in particular the Runtime service. In this case we can use the operation getEnv which allows for reading the value of an environment variable and we could modify the previous example as it follows:
include "runtime.iol"
interface HelloInterface {
RequestResponse:
hello( string )( string )
}
execution{ concurrent }
inputPort Hello {
Location: "socket://localhost:8000"
Protocol: sodep
Interfaces: HelloInterface
}
init {
getenv@Runtime( "TESTVAR" )( TESTVAR )
}
main {
hello( request )( response ) {
response = TESTVAR + ":" + request + ":" + args[0]
}
}
The full code of this example can be consulted here. Note that in the scope init the service reads the environment variable TESTVAR and save it in the jolie variable with the same name TESTVAR. The variable TESTVAR is then used in the body of the operation hello for creating the response message. It is worth noting that at the beginning we need to include the runtime.iol service.
In order to try this example, just repeat the steps described at the previous section:
- build the image with command
docker build -t hello .. Note that the Dockerfile has not been modified. Remember to delete the previous container and image with commands:docker rm hello-cntanddocker rmi hello. - run the container specifying the environment variable as specified before:
docker run -d --name hello-cnt -p 8000:8000 -e TESTVAR=spiderman hello - try to run the same client for checking how the response appears.
Passing parameters by using a json configuration file
At this link we modified the previous example in order to show how it is possible to pass parameters through a json configuration file. In particular, we imagine to pass two parameters by using a file called config.json which is reported below:
{
"repeat":1,
"welcome_message":"welcome!"
}
The service helloservice.ol has been modified for reading the parameters from this file in the scope init instead of reading from the environment variables. Here we report the code of the modified service:
include "file.iol"
interface HelloInterface {
RequestResponse:
hello( string )( string )
}
execution{ concurrent }
inputPort Hello {
Location: "socket://localhost:8000"
Protocol: sodep
Interfaces: HelloInterface
}
init {
file.filename = "/var/temp/config.json";
file.format = "json";
readFile@File( file )( config )
}
main {
hello( request )( response ) {
/* dummy usage of the parameters for building a response string which depends from them */
response = config.welcome_message + "\n";
for ( i = 0, i < config.repeat, i++ ) {
response = response + request + " "
}
}
}
Note that here we exploit the standard API of File. In particular, we exploit the operation readFile@File where we specify to read from file /var/temp/config.json. It is worth noting that in this case the path /var/temp/ must be considered as an internal path of the container. Thus, when the service will be executed inside the container, it will try to read from its internal path /var/temp/config.json.
If we build the new image using the same Dockerfile as before, the service won't found the file config.json for sure because it is not contained inside the image. In order to solve such an issue we need to map the internal path /var/temp to a path of the host machine. The command run of docker allows to do such a map by using volume definition. Thus the run command will be like the following one:
docker run -d --name hello-cnt -p 8000:8000 -v <Host Path>:/var/temp hello
The parameter -v allows for specifying the volume mapping. The <Host Path> token must be replaced with your local path where the file config.json is stored, whereas the path /var/temp specifies where mapping the volume inside the container.
Configuring locations of outputPorts
Finally, let us point out the last issue you could encounter when deploying a jolie microservice within a docker container: the configuration of the outputPort locations. outputPorts often represent dependencies of the given microservice from other microservices. Dynamic binding can always be done from a programmatic point of view as we it is described here, but it could be useful to have a clean way for configuring these outputPorts at the startup of the service.
In order to show how to solve such an issue, we try to dockerize the example described in section Parallel. In particular, in this example there is an orchestrator which collects information from two microservices: TrafficService and ForecastService as depicted in the picture below.

The full code of the example can be found at this link. Here we are in the case where an orchestrator (infoService.ol) has dependencies with other services: ForecastService and TrafficService. Thus, we need to create three different containers, one for each service. In the example there are three different Dockerfiles for each service: DockerfileForecastService, DockerfileTrafficService and DockerfileInfoService.
The images can be created using the docker build command as explained in the previous sections:
docker build -t forecast_img -f DockerfileForecastService .docker build -t traffic_img -f DockerfileTrafficService .docker build -t info_img -f DockerfileInfoService .
Before creating the related containers, we need to consider the architectural composition of the services and noting that the orchestrator requires the location of both the forecast service and the traffic one in order to invoke them. Indeed, if we inspect its definition here we can note that there are two outputPorts declared: Forecast and Traffic. Here the issue, is to pass the correct locations to the two outputPorts before knowing their actual location provided by Docker.
In order to solve such a puzzle, we exploit one of the feature of Docker that is the possibility to define a virtual network where all the services can be identified by an abstract name. Thus we create a network called testnet:
docker create network testnet
All the containers we are going to create will have to be connected to network testnet. Here we report the three commands to execute for creating the containers starting from the previous docker images:
docker run -it -d --name forecast --network testnet forecast_imgdocker run -it -d --name traffic --network testnet traffic_imgdocker run -it -d --name info -p 8002:8000 -v <PATH TO config.ini>:/var/temp --network testnet info_img
Note that the parameter --network testnet is used for connecting the container to the network testnet. Thanks to this parameter the containers can be identified by using their name within testnet.
Now, the last step: passing the correct locations to the outputPorts of the service infoService. Here we can exploit the extension auto which allows for automatic defining a location of a port getting the value from an external file. In particular, in the example, we use a ini file for achieving such a result:
outputPort Forecast {
Location: "auto:ini:/Location/Forecast:file:/var/temp/config.ini"
Protocol: sodep
Interfaces: ForecastInterface
}
outputPort Traffic {
Location: "auto:ini:/Location/Traffic:file:/var/temp/config.ini"
Protocol: sodep
Interfaces: TrafficInterface
}
where the file ini is configured in this way:
[Location]
Traffic=socket://traffic:8000
Forecast=socket://forecast:8000
It is worth noting that here we use the name of the containers (traffic and forecast) for identifying them in the network. Docker will be responsible to resolve them within the context of testnet.
Jocker
Jocker is a Jolie service which provides a Jolie interface of the HTTP docker APIs. Thanks to Jocker it is possible to interact with a docker server just as it is a Jolie service. At this link it is possible to check the API supported by Jocker.
Jocker is available as a docker container, just type the following commands for activating a Jocker instance:
docker pull jolielang/jocker
docker run -it -p 8008:8008 --name jocker -v /var/run:/var/run jolielang/jocker
Important notes/
- Jocker is listening on the container internal port
8008, thus if you need to change it, just configure properly the container when running it using the parameter-p 8008:8008. - Jocker communicates with the docker server using the localsocket
/var/run/docker.sockas it is suggested by docker documentation. Thus, pay attention when creating the jocker container to share the host volume where such a socket is available by setting parameter-v /var/run:/var/run. - At the present Jocker is an experimental project, so use with cautions.
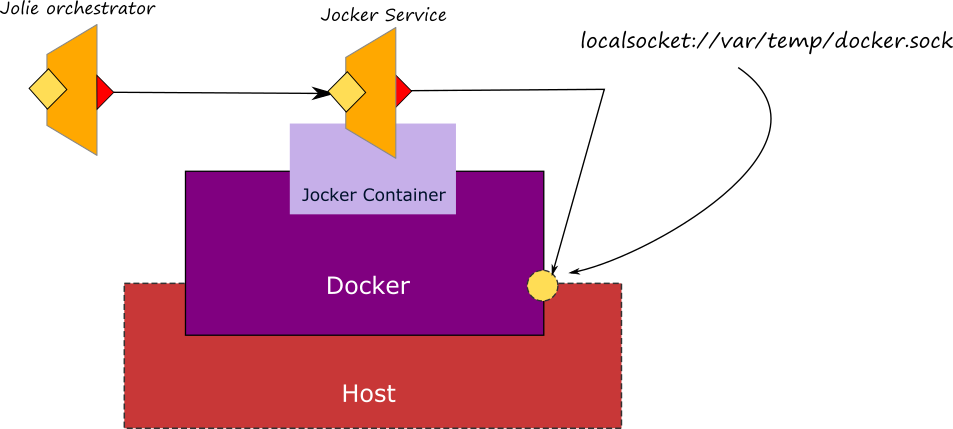
Once installed, it is possible to call Jocker as a usual Jolie service.
Example: creating a Jolie orchestrator for deploying a Jolie system into docker
In this example we show how to build a Jolie orchestrator which is able to deploy a Jolie system by exploiting the Jocker APIs. The full code of the example can be checked here.
In this example we aim at deploying the same system commented at section Basics/Composing Statements/Parallel altogether just executing a single orchestration jolie script. For the sake of brevity we grouped the three services into three different folders. At this link it is possible to navigate the three folders. Each folder contains all the necessary files for executing each single service, moreover it also contains the Dockerfile which defines how to deploy that specific service into docker as we explained in section Containerization/Docker/Create an image.
The code of the orchestrator can be evaluated here. Just try it running the following command:
jolie jockerOrchestrator.ol
The steps it implements are:
Creation of the system/
-
Creation of the docker images of the three services
build@Jocker(rqImg)(response); -
Creation of the network
testnetwhere connecting the containerscreateNetwork@Jocker( ntwCreate_rq )( ntwCreate_rs ); -
Creation of the three containers
createContainer@Jocker( cntCreate_rq )( cntCreate_rs ); -
Attaching each container to the network
testnetattachContainerToNetwork@Jocker( attachCnt2Ntw_rq )(); -
Starting of each container
startContainer@Jocker( startCnt_rq )(); -
Inspecting the container for checking it is running
inspectContainer@Jocker( inspect_rq )( inspect_rs );
Testing the system/
-
Invoking of the
infoServicefor testing if it is workinggetInfo@InfoService( { .city = "Rome" } )( info )
Disposing the system/
-
Stopping all the containers
stopContainer@Jocker( stopCnt_rq )(); -
Removing all containers
removeContainer@Jocker( stopCnt_rq )( ); -
Removing the network
testnetremoveNetwork@Jocker( ntwRemove_rq )(); -
Removing all the images
removeImage@Jocker( rmImage_rq )();
Kubernetes
Kubernetes is an open-source system for automating deployment, scaling, and management of containerized applications. Jolie microservices deployed inside a Docker container can be managed by Kubernetes as well. We are going to use what learnt in Docker section to deploy an easily-scalable application, with multiple containers running the same service behind a load balancer. To run the example a Kubernetes environment is needed, the easiest way to get it is to install Minikube.
Deploying "Hello" Jolie service in a container Docker
Let's make some modifications to helloservice.ol used in the previous Docker example:
include "runtime.iol"
interface HelloInterface {
RequestResponse:
hello( string )( string )
}
execution{ concurrent }
inputPort Hello {
Location: "socket://localhost:8000"
Protocol: sodep
Interfaces: HelloInterface
}
init {
getenv@Runtime( "HOSTNAME" )( HOSTNAME )
}
main {
hello( request )( response ) {
response = HOSTNAME + ":" + request
}
}
The HOSTNAME environment variable is set by Kubernetes itself and it's printed out to show what microservice instance is answering the request.
Creating a docker image
The Dockerfile needed to create a docker image of this microservice is the same seen in the Docker section:
FROM jolielang/jolie
EXPOSE 8000
COPY helloservice.ol main.ol
CMD jolie main.ol
Typing the following command in the console actually creates the image:
docker build -t hello .
Creating a Kubernetes Deployment
This image can now be wrapped in Pods, the smallest deployable units of computing that can be created and managed in Kubernetes. A Deployment describes in a declarative way the desired state of a ReplicaSet having the purpose to maintain a stable set of replica Pods running at any given time:
apiVersion: apps/v1
kind: Deployment
metadata:
name: jolie-sample-deployment
labels:
app: jolie-sample
spec:
replicas: 2
selector:
matchLabels:
app: jolie-sample
template:
metadata:
labels:
app: jolie-sample
spec:
containers:
- name: jolie-k8s-sample
image: hello
ports:
- containerPort: 8000
imagePullPolicy: IfNotPresent
To create the Deployment save the text above in jolie-k8s-deployment.yml file and type this command:
kubectl apply -f jolie-k8s-deployment.yml
After a few seconds you can see your pods up and running using this command:
kubectl get pods
Exposing Deployment by a Service
Now we have 2 running Pods, each one listening on port 8000, but with 2 issues: 1. they're reachable only from the internal Kubernetes cluster network; 2. they're ephemeral. As explained here, a Service is needed to expose the application in the right way. Following the Minikube tutorial, just type:
kubectl expose deployment jolie-sample-deployment --type=LoadBalancer --port=8000
to create such Service. The result can be verified with this command:
kubectl get services
and the output should be something like this:
NAME TYPE CLUSTER-IP EXTERNAL-IP PORT(S) AGE
jolie-sample-deployment LoadBalancer 10.109.47.147 <pending> 8000:30095/TCP 13s
kubernetes ClusterIP 10.96.0.1 <none> 443/TCP
The last step is to make the Service visible from your host going through a "minikube service":
minikube service jolie-sample-deployment
|-----------|-------------------------|-------------|-----------------------------|
| NAMESPACE | NAME | TARGET PORT | URL |
|-------------|---------------------------|---------------|-------------------------------|
| default | jolie-sample-deployment | | http://<your_IP>:<ext_port> |
| ----------- | ------------------------- | ------------- | ----------------------------- |
Invoking microservices from client
Now we a stable access door to our application, and it can be invoked by a client:
include "console.iol"
interface HelloInterface {
RequestResponse:
hello( string )( string )
}
outputPort Hello {
Location: "socket://<your_IP>:<ext_port>"
Protocol: sodep
Interfaces: HelloInterface
}
main {
hello@Hello( "hello" )( response );
println@Console( response )()
}
Each time you make a request typing:
jolie client.ol
your local is hit and the LoadBalancer redirects the request to one of the 2 available Pods running the service. Printing out the HOSTNAME variable makes visible the load balancing, showing which Pod is serving the response:
$ jolie client.ol
jolie-sample-deployment-655f8b759d-mq8cn:hello
$ jolie client.ol
jolie-sample-deployment-655f8b759d-bmzk7:hello
$ jolie client.ol
jolie-sample-deployment-655f8b759d-mq8cn:hello
$ jolie client.ol
jolie-sample-deployment-655f8b759d-bmzk7:hello
Rest Services
This section is devoted in illustrating how to create REST services with Jolie. Differently from standard Jolie services which are agnostic to protocols, in a REST approach we must take into account how the underlying HTTP protocol works. In a REST service indeed, only the four basic http methods can be used for defining actions on a service, they are: GET, POST, PUT and DELETE. The consequence of such a strong limitation on the possible actions to be used, is that the resulting programming style must provide expressiveness on data instead of verbs. Such a characteristic has the main consequence to focus the programming style to the resources: we are not free to program all the actions we would like, but we are free to program all the resources we would like.
In jolie a developer can follow two different approaches for programming REST APIs:
- Programming a self-contained REST service by using the
httpprotocol. - Adding a router in front of an existing service.
Programming a self-contained REST service
We demonstrate how to create a self-contained REST service with a simple example: a REST service that exposes an API for retrieving information about users. Users are identified by username and associated to data that includes name, e-mail address, and an integer representing "karma" that the user has in the system. In particular, two operations are possible:
- Getting information about a specific user (name, e-mail, and karma counter) by passing its username, for example by requesting
/api/users/jane. - Listing the usernames of the users in the system, with the possibility of filtering them by karma. For example, to get the list of usernames associated to minimum karma 5, we could request
/api/users?minKarma=5.
The code for implementing this service follows.
type User { name: string, email: string, karma: int }
type ListUsersRequest { minKarma?: int }
type ListUsersResponse { usernames*: string }
type ViewUserRequest { username: string }
interface UsersInterface {
RequestResponse:
viewUser( ViewUserRequest )( User ) throws UserNotFound( string ),
listUsers( ListUsersRequest )( ListUsersResponse )
}
service App {
execution: concurrent
inputPort Web {
location: "socket://localhost:8080"
protocol: http {
format = "json"
osc << {
listUsers << {
template = "/api/user"
method = "get"
}
viewUser << {
template = "/api/user/{username}"
method = "get"
statusCodes.UserNotFound = 404
}
}
}
interfaces: UsersInterface
}
init {
users << {
john << {
name = "John Doe", email = "john@doe.com", karma = 4
}
jane << {
name = "Jane Doe", email = "jane@doe.com", karma = 6
}
}
}
main {
[ viewUser( request )( user ) {
if( is_defined( users.(request.username) ) ) {
user << users.(request.username)
} else {
throw( UserNotFound, request.username )
}
} ]
[ listUsers( request )( response ) {
i = 0
foreach( username : users ) {
user << users.(username)
if( !( is_defined( request.minKarma ) && user.karma < request.minKarma ) ) {
response.usernames[i++] = username
}
}
} ]
}
}
Above, notice the use of the osc parameter of the http protocol to map operations to their respective HTTP configurations.
For example, operation viewUser is configured to use:
/api/useras URI template, bytemplate = "/api/user". See the official RFC on URI templates for more information about them.- GET as HTTP method, by
method = "get".
Adding a router
Following this approach, a specific http router, called jester, is introduced between the caller and the Jolie service to expose as a REST service. The http router is in charge to convert all the rest calls into the corresponding Jolie operations.
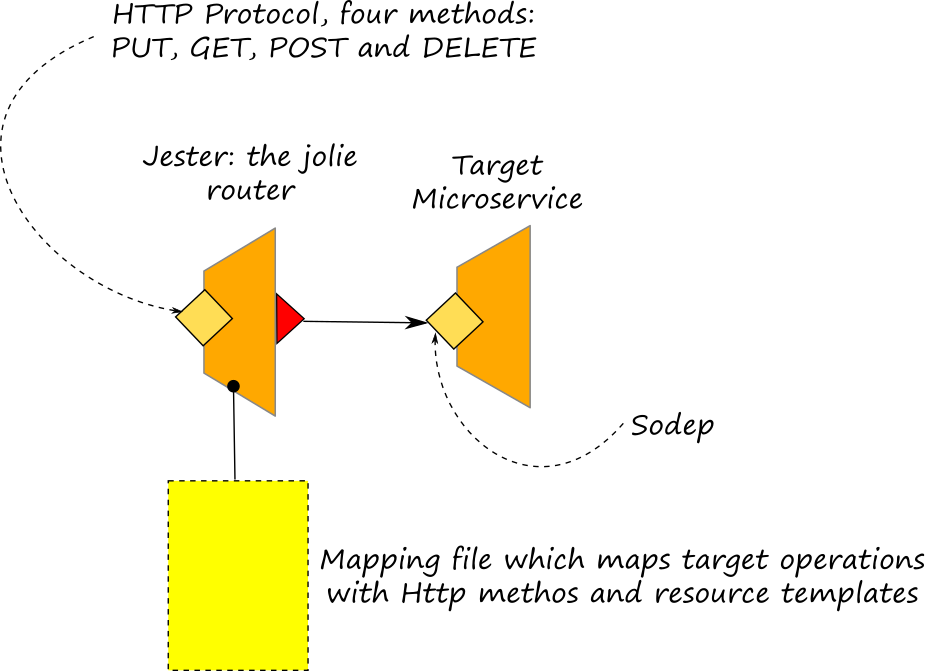
jester is distributed together with Jolie and it is possible to use it in your projects. The interested reader may consult the project repo of jester at this link. Here we just point out that jester requires a mapping between the operation of the target services and the http methods to expose together with the resource templates.
target operation ---> http method, rest resource template
Such a kind of mapping must be provided to jester in the form of a json file. In the section jolier we will explain how to correctly define a mapping file for jester.
The tools for enabling the deployment of a Jolie service as a REST service
In the following sections we will show how some tools which come together with the jolie installation can facilitate the deployment of a jolie service as a REST service. The tools are:
- jolier: like the command
jolie,jolierautomatically executes a jolie service as a REST service transparently embedding jester - jolie2openapi: it generates an openapi definition of a jolie interface
- openapi2jolie: it generates a jolie client which enable to invoking a rest service described by an openapi definition
jolier
jolier is a tool distributed with jolie which permits to easily deploy a jolie microservice as a REST service. jolier requires three parameters to work together with two other optional parameters. Moreover, it requires a mapping file called rest_template.json to be read at the boot for creating the mapping between the rest calls and the target operations. If you type the command in a shell without any argument, the following message will be prompt to the console:
Usage: jolier <service_filename> <input_port> <router_host> [-easyInterface] [-debug]
The required parameters are:
- service_filename: it is the path to the target service to be executed as a REST service;
- input_port: it is the input port of the target service which must be exposted as a REST service. It is important to note that the location of the target port must be set to
"local"; - router_host: it is the location where jester will listen for incoming requests;
- [-easyInterface]: it specifies if skipping the rest_template.json file and creating a standard map of the target operations. See the section below for details;
- [-debug]: it enables debug messages for jester in order to facilitate error identification.
Publishing your REST Service with SSL support
jolier is also able to publish your REST service using Https protocol by using the ssl command parameters
Usage: jolier <service_filename> <input_port> <router_host> [-easyInterface] [-debug] [-keyStore] [filePath] [-keyStorePassword] [password] [-trustStore] [filename] [-trustStorePassword] [password] [-sslProtocol] [ [protocol](../../protocols/ssl/README.md) ]
- [-keyStore]: sets the keyStore file location
- [-keyStorePassword]: sets the keyStore password
- [-trustStore]: sets the trustStore file location
- [-trustStorePassword]: sets the trustStore password
- [-sslProtocol]: sets the ssl protocol
To generate the ssl certificate you can use the keytool or indicate the location of your pre-exist java supported keystore file.
NOTE: You need to pay particular attention on key file location parameters if you are deploying your REST service with a Docker image.
Defining the rest calls mapping
The mapping of the rest templates is defined within file rest_templates.json. It is a json file structured as key value map, where the key reports the name of the target operation whereas the value reports the related call information to be used in the rest call. Here we present an example of a key value pair:
{
"getOrders": {
"method":"get",
"template":"/orders/{userId}?maxItems={maxItems}"
}
}
getOrders is the name of the target operation in the jolie service, whereas "method=get, template=/orders/{userId}?maxItems={maxItems}" contains the information for mappin the rest call. In particular, there are two information: method and template. method defines the http method to be used in the rest call (post, get, put or delete) whereas template defines how to place the request data within the url path.
In the example above, the operation getOrders of the target service will be invoked using a method get and finding the parameters userId and maxItems within the url. The parameter userId will be placed as part of the path, whereas the parameter maxItems as a parameter of the query.
It is worth noting that when we define a rest mapping, some restrictions to the target message types must be considered.
NOTE: the public URL where jester will serve the request is composed as it follows:
http://<router_host>/<template>|<operation_name>
where the operation_name is used when no template is given.
Restrictions on rest calls mapping
- when method
getis specified, all the parameters of the request must be specified within the url. Thus the target request message type cannot have structured type defined, but it can only be defined as a flat list of nodes. As an example the follwong type is sound with the template above:
type GetOrdersType: void {
.userId: string
.maxItems: int
}
whereas the following one is not correct w.r.t. template /orders/{userId}?maxItems={maxItems}
type GetOrdersType: void {
.userId: string {
.maxItems: int
}
}
- when
templateis not defined, the request will be completely read from the body of the message which must match the stype structure of the target operation - in case of methods
post,putanddeleteit is possible to place part of the parameters inside the url and the rest of them in the body. In this case the request type of the target operation must contain all of them and they must be defined as a list of flat nodes.
The parameter -easyInterface
When defined, the rest call mapping file is not necessary but all the operations will be converted into methods post and the request types will be reported in the body as they are defined in the target jolie interface.
Example
At this link it is possible to find a simple jolie service which can be deployed as a rest service. As it is possible to note, the jolie service called, demo.ol is a standard jolie service without any particular change or addition. It has an input port called DEMO configured with Location "local" and with interface DemoInterface. Four operations are defined in the interface: getOrders, getOrdersByItem, putOrder and deleteOrder.
The mapping file is defined as it follows where the operation getOrders is mapped on a specific url, whereas the others are mapped without specifying any template.
{
"getOrders": {
"method":"get",
"template":"/orders/{userId}?maxItems={maxItems}"
},
"getOrdersByItem": {
"method":"post"
},
"putOrder": {
"method":"put"
},
"deleteOrder": {
"method":"delete"
}
}
It is sufficient to run the following command for deploying the jolie service demo.ol as a rest service:
jolier demo.ol DEMO localhost:8000
Once run, it is possible to try to invoke it using a common tool for sending REST messages. In particular it is possible to make a simple test invoking the getOrders by simply using a web browser. Put the following url in your web browser and look at the result:
http://localhost:8000/orders/myuser?maxItems=0
jolie2openapi
jolie2openapi is a tool which converts a jolie interface into an OpenAPI 2.0 specification also knwon as Swagger. Such a tool can be used together with jolier for deploying a jolie service as a Rest service. In particular, the tool can be used for obtaining the OpenAPI spceification to distribute.
The tool can be used as it follows:
Usage: jolie2openapi <service_filename> <input_port> <router_host> <output_folder> [easy_interface true|false]
where:
- service_filename: it is the filename of the jolie service from which the interface must be extracted
- input_port: it is the name of the input port whose interfaces must be converted
- router_host: it is the url of the host to be contacted for using rest apis: This information will be inserted directly into the resulting openapi specification
- output_folder: it is the output folder where storing the resulting json file
- [easy_interface true|false]: if true no templates will be exploited for generating the json file, the mapping will be automaticallty generated assuming all the operations mapped on method post. Default is false.
As it happens for the tool jolier, also the tool jolie2openapi requires to read rest calls mapping from an external file. The name of the mapping file is the same and it is rest_templates.json, its configuration rules can be consulted at the related section of the tool jolier
Example
As an example, let us consider the service demo at this link. It is sufficient to run the following command for producing the openapi specification related to interface DemoInterface.
jolie2openapi demo.ol DEMO localhost:8000 .
The tool will generate a file called DEMO.json which contains the OpenAPI 2.0 specification. The file can be imported in tools enabled for processing OpenAPI specifications.
openapi2jolie
This tool generates a Jolie client starting from an OpenAPI 2.0 definition. The generated client can be embedded or exposed as a service to be invoked by other jolie services using sodep protocol. The usage of the tool follows:
Usage: openapi2jolie <url|filepath> <service_name> <output_folder> <protocol http|https> <ssl protocol>
where:
- url|filepath: it defines the url or the filepath of the OpenAPI specification to convert.
- service_name: it is the name of the service client to be generated
- output_folder: it is the output folder where storing the generated client
- http|https: it defines the protocol to use for preparing the client
- ssl protocol: when https is selected, it permits to define parameter 'ssl.protocol' if it is necessary
As a result the tool generates two files:
<service_name>Client.ol: it is the actual client to be embedded or exposed as a jolie service<service_name>Interface.iol: it is the jolie interface obtained from the conversion
Example
In order to show how the tool openapi2jolie works, let us try to generate a client for the PetStore example released by the Swagger community which can be found here. Run the openapi2jolie tool as it follows:
openapi2jolie https://petstore.swagger.io/v2/swagger.json SwaggerPetStore . https
two files are generated:
SwaggerPetStoreClient.olSwaggerPetStoreInterface.iol
The client can be now embedded in a jolie service for invoking the rest service described the OpenAPI at url https://petstore.swagger.io/v2/swagger.json. Here in the following we report a jolie script which invokes api /user/{username}
include "SwaggerPetStoreInterface.iol"
include "string_utils.iol"
include "console.iol"
outputPort SwaggerPetStoreClient {
Location: "local"
Protocol: sodep
Interfaces: SwaggerPetStoreInterface
}
embedded {
Jolie:
"SwaggerPetStoreClient.ol" in SwaggerPetStoreClient
}
main {
request.username = "user2"
getUserByName@SwaggerPetStoreClient( request )( response )
valueToPrettyString@StringUtils( response )( s )
print@Console( s )( )
}
Web Services
Web Services represent a special category of services. They are characterized by the usage of a set of specific XML based technologies like WSDL and SOAP. A Jolie service can both invoke existing web services and being exposed as a Web Service. It is very easy to do so, it is sufficient to parameterized a Jolie port (input or output) to use the protocol soap or the protocol soaps.
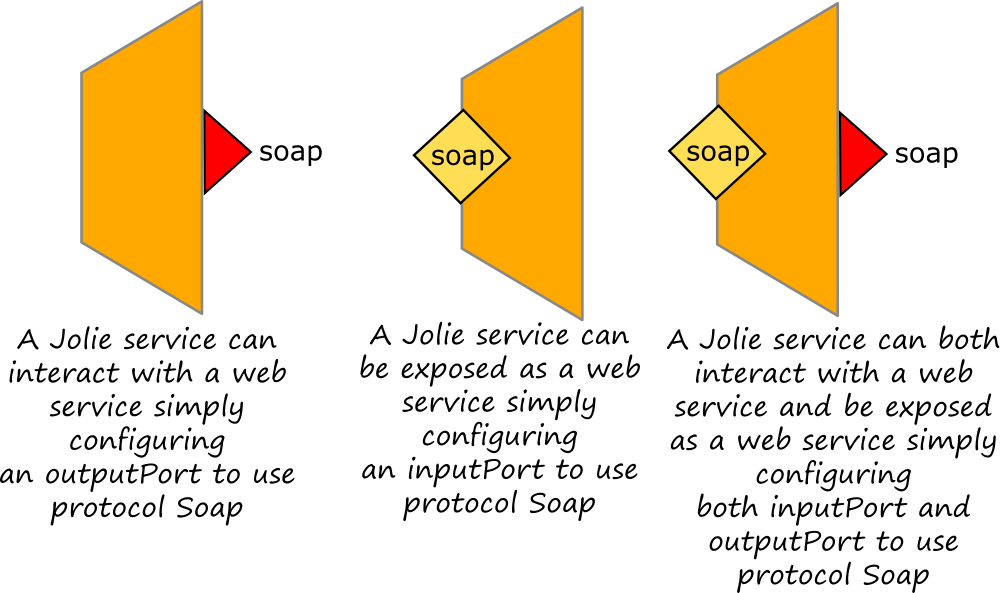
Exposing a web service
In order to show how to expose a jolie service as a web service, let us consider the following Jolie service example which returns the address of a person identified by his name and his surname. The example may be consulted also at this link
include "console.iol"
include "string_utils.iol"
execution{ concurrent }
type Name: void {
.name: string
.surname: string
}
type FaultType: void {
.person: Name
}
type GetAddressRequest: void {
.person: Name
}
type Address: void {
.country: string
.city: string
.zip_code: string
.street: string
.number: string
}
type GetAddressResponse: void {
.address: Address
}
interface MyServiceInterface {
RequestResponse:
getAddress( GetAddressRequest )( GetAddressResponse )
throws NameDoesNotExist( FaultType )
}
inputPort MyServiceSOAPPort {
Location: "socket://localhost:8001"
Protocol: soap
Interfaces: MyServiceInterface
}
main {
getAddress( request )( response ) {
if ( request.person.name == "Homer" &&
request.person.surname == "Simpsons" ) {
with( response.address ) {
.country = "USA";
.city = "Springfield";
.zip_code = "01101";
.street = "Evergreen Terrace";
.number = "742"
}
} else {
with( fault.person ) {
.name = request.person.name;
.surname = request.person.surname
};
throw( NameDoesNotExist, fault )
}
}
}
Once run, the service above is able to receive and send back SOAP messages but there is not any wsdl definition which can be shared with another web service client. The tool jolie2wsdl can be used for automatically generating a wsdl file starting from a jolie service.
It is worth noting that once generated, the wsdl file must be explicitly attached to the jolie input port using protocol parameters .wsdl and .wsdl.port where the former specifies the path to the wsdl definition file and the latter defines the port into the wsdl definition to be mapped with the jolie one.
The final definition of the input port should look like the following one:
inputPort MyServiceSOAPPort {
Location: "socket://localhost:8001"
Protocol: soap {
.wsdl = "MyWsdl.wsdl";
.wsdl.port = "MyServiceSOAPPortServicePort"
}
Interfaces: MyServiceInterface
}
where MyWsdl.wsdl is the file where the wsdl definition has been stored and MyServiceSOAPPortServicePort is the name of the port inside the wsdl definition to be joint with jolie input port MyServiceSOAPPort.
Invoking a web service
A web service can be easily invoked as a standard jolie service by simply defining an output port with protocol soap. We just need to generate the corresponding jolie interface from the wsdl definition of the web service to be invoked and then use it within the caller.
As an example, let us extract the jolie interface from the wsdl definition of the example described in the section above using the tool wsdl2jolie. The tool generates a .iol file which contains both the interface and the output port configured for interacting with the web service to be invoked. It is sufficient to import the file and invoking the web service as a standard jolie service. In the following example, where we suppose to name the generated file as generated_interface.iol, we show how to invoke the web service.
include "generated_interface.iol"
main {
with( request.person ) {
.name = "Homer";
.surname = "Simpsons"
}
getAddress@MyServiceSOAPPortServicePort( request )( response )
}
As it is possible to note, within a jolie service the the web service just appears as a simple output port called MyServiceSOAPPortServicePort and it can be invoked as a standard jolie service. The complete code of the example may be consulted at this link
wsdl2jolie
wsdl2jolie (whose executable is installed by default in Jolie standard trunk) is a tool that takes a URL to a WSDL document and automatically downloads all the related files (e.g., referred XML schemas), parses them and outputs the corresponding Jolie port/interface/data type definitions.
The syntax
The syntax of wsdl2jolie follows:
wsdl2jolie wsdl_uri [output filename]
wdsl_uri can be a URL or a file path (in case of local usage).
As an output the tool returns a set of service declarations (in Jolie) needed for invoking the web service. The output can be automatically saved into a file by specifying the optional parameter [output filename].
wsdl2jolie example
Let us consider an example of a WSDL document for a service that provides some basic mathematical operations, the WSDL URL is http://www.dneonline.com/calculator.asmx?WSDL.
Reading the raw XML is not so easy, or at least requires some time.
If we execute the command wsdl2jolie http://www.dneonline.com/calculator.asmx?WSDL our output will be
type NOTATIONType:any
type Add:void {
.intB:int
.intA:int
}
type Divide:void {
.intB:int
.intA:int
}
type MultiplyResponse:void {
.MultiplyResult:int
}
type DivideResponse:void {
.DivideResult:int
}
type SubtractResponse:void {
.SubtractResult:int
}
type Multiply:void {
.intB:int
.intA:int
}
type Subtract:void {
.intB:int
.intA:int
}
type AddResponse:void {
.AddResult:int
}
interface CalculatorSoap {
RequestResponse:
Add(Add)(AddResponse),
Subtract(Subtract)(SubtractResponse),
Multiply(Multiply)(MultiplyResponse),
Divide(Divide)(DivideResponse)
}
outputPort CalculatorSoap12 {
Location: "socket://localhost:80/"
Protocol: soap
Interfaces: CalculatorSoap
}
outputPort CalculatorSoap {
Location: "socket://www.dneonline.com:80/calculator.asmx"
Protocol: soap {
.wsdl = "http://www.dneonline.com/calculator.asmx?WSDL";
.wsdl.port = "CalculatorSoap"
}
Interfaces: CalculatorSoap
}
which is the Jolie equivalent of the WSDL document. Those .wsdl and .wsdl.port parameters are improvement to the SOAP protocol: when the output port is used for the first time, Jolie will read the WSDL document for processing information about the correct configuration for interacting with the service instead of forcing the user to manually insert it.
Once our interface is created, we can store it into a file, e.g., CalculatorInterface.iol, and use the output ports we discovered from Jolie code. As in the following:
include "CalculatorInterface.iol"
include "console.iol"
main
{
request.intA = 10;
request.intB = 11;
Add@CalculatorSoap( request )( response );
println@Console( response.AddResult )()
}
Our little program will output 21.
Remarkably, wsdl2jolie has two benefits: it acts as a useful tool that creates the typed interface of a Web Service from Jolie and creates a more human-readable form of a WSDL document (i.e., its Jolie form).
The generated document
wdsl2jolie creates a document which contains:
- the types contained into (or referred by) the WSDL;
- the Jolie interface with all the operation declarations;
- the Jolie outputPort ports needed for the Web Service invocation.
Mapping
In the following table we show the mapping between WSDL elements and Jolie elements:
| WSDL | Jolie |
|---|---|
<types> | type |
<messages> | type |
<portType> | interface |
<binding> | outputPort:Protocol |
<service:port> | outputPort |
SOAP outputPort
The SOAP outputPorts are generated with two parameters:
wsdl, which sets the location of the WSDL document;wsdl.port, which sets the WSDL port related to the current outputPort.
Plus, another parameter can be added in order to display debug messages, which is debug; if set to 1, all the SOAP messages of the current outputPort are displayed on the standard output.
The wsdl and wsdl.port parameters are needed for formatting the messages to and from the web service in conformance with the WSDL document.
Jolie Metaservice
Another feature that derives from the improvement of the SOAP protocol is that now Jolie standard library MetaService can act as a transparent bridge between Web Services.
Once set the addRedirection operation with the right protocol configuration (e.g., the .wsdl and .wsdl.port parameters), MetaService automatically downloads the WSDL document - which is automatically cached -, and make it callable by clients.
Hence, it becomes really easy to use libraries such as QtJolie which requires only the location of the WSDL document to enable a client to call the Web Service of interest.
Plus, using wsdl2jolie combined with other tools, such as jolie2plasma, enables to use the aforementioned Jolie intermediate representation for transforming a Web Service interface definition into one compatible with a (KDE) Plasma::Service XML. In the same way, C++ generators can be written for QtJolie, introducing ease and type-safeness to Web Services invocations.
So far not all the WSDL and SOAP features are supported, which can raise compatibility problems when using them:
- SOAP 1.2, currently NOT supported;
- XML Schema Extended types, currently NOT supported;
- HTTP GET and HTTP POST, currently HALF supported as Web Service calls.
jolie2wsdl
Jolie2wsdl is the counterpart of wsdl2jolie tool. It supports the creation of a WSDL document starting from a Jolie Interface.
The syntax
The syntax of jolie2wsdl follows:
jolie2wsdl [ -i include_file_path ] --namespace [target_name_space] --portName [name_of_the_port] --portAddr [address_string] --outputFile [output_filename] filename.ol
where:
-i include_file_pathmust be set if the jolie service includes.iolfiles belonging to Jolie standard library (e.g.,console.iol). For example this path, in a Linux environment, is/opt/jolie/include;--namespace target_name_spacename of WSDL namespace used by jolie types--portName name_of_the_portname of the port that is exposing the interface callable via SOAP--portName name_of_the_portaddress of the listening port--outputFile output_filenameis the file name where the generated WSDL document is stored (MyWsdl.wsdlis the default value).filename.olis the jolie service file whose input port must be transformed into a soap one
Jolie interface guidelines
When programming a Jolie interface to be transformed into a WSDL document, its recommended to follow these guidelines:
Native types in operation declaration are not permitted. For example, the following declaration is forbidden:
interface MyInterface {
RequestResponse:
myOp( string )( int )
}
All complex types must have a void value in the root. Hence, the following declaration are not permitted:
type Type1: int {
.msg: string
}
type Type2: string {
.msg: string
}
interface MyInterface {
myOp( Type1 )( Type2 )
}
Thus, the right types and interface declaration for our example may be:
type Type1: void {
.msg: int
}
type Type2: void {
.msg: string
}
interface MyInterface {
RequestResponse:
myOp( Type1 )( Type2 )
}
Web Applications
Leonardo: the Jolie Web Server
Leonardo is a web server developed in pure Jolie.
It is very flexible and can scale from service simple static HTML content to supporting powerful dynamic web applications.
Launching Leonardo and serving static content
The latest version of Leonardo is available from its GitHub page, at URL: https://github.com/jolie/leonardo.
After having downloaded and unpacked the archive, we can launch Leonardo from the leonardo directory with the command jolie leonardo.ol.
By default Leonardo looks for static content to serve in the leonardo/www subdirectory. For example, we can store an index.html file in www subdirectory containing a simple HTML page.
Then, pointing the browser at URL http://localhost:8000/index we can see the web page we created. In the same way other files (of any format) and subdirectories can be stored inside the www directory: Leonardo makes them available to web browsers as expected.
Configuration
Leonardo comes with a config.iol file, where are stored some constants for basic configuration. The content of the default config.iol file is shown below:
constants {
// The location for reaching the Leonardo web server
Location_Leonardo = "socket://localhost:8000/",
// Root content directory
RootContentDirectory = "www/",
// Default page to serve in case clients do not specify one
DefaultPage = "index.html",
// Print debug messages for all exchanged HTTP messages
DebugHttp = false,
// Add the content of HTTP messages to their debug messages
DebugHttpContent = false
}
As aforementioned, RootContentDirectory points to the www folder, which is the default container of static pages, but it can also be overridden by declaring the new path as the first parameter in Leonardo execution command, e.g.,
jolie leonardo.ol /path/to/my/content/directory
Serving dynamic content
Leonardo supports dynamic web application through the Jolie HTTP protocol. There are many ways this can be achieved, hereby we overview some of these:
- HTML querystring and HTML forms;
- via web development libraries like JQuery and Google Web Toolkit (GWT).
In the following examples we show how to interface a web application with some Jolie code through Leonardo. Specifically, we expose an operation - length - which accepts a list of strings, computes their total length and, finally, returns the computed value.
We do this by editing the code inside Leonardo, while in real-world projects, it is recommended to separated the application logic and the web server one: this can be achieved with ease by creating a separate service and aggregate it from the HTTP input port of Leonardo.
Creating our web application: the application logic
We start by creating the Jolie code that serves the requests from the web interface.
Let us open leonardo.ol and add the following interface:
type LengthRequest: void{
.item[ 1, * ]: string
}
interface ExampleInterface {
RequestResponse:
length( LengthRequest )( int )
}
Then we edit the main HTTP input port, HTTPInput, and add ExampleInterface to the published interfaces:
inputPort HTTPInput {
// other deployment code
Intefaces: HTTPInterface, ExampleInterface
}
Finally, we write the operation length by adding the code below to the input choice inside the main procedure in Leonardo:
main
{
// existing code in Leonardo
[ length( request )( response ){
response = #request.item }]
....
The code above iterates over all the received items and sums their lengths.
HTML querystrings
Once the server-side part is in place, we can start experimenting by invoking it from the browser, by pointing it to the address:
http://localhost:8000/length?item=Hello&item=World
which will reply with an XML response like the following:
<lengthResponse>10</lengthResponse>
Leonardo replies with XML responses by default, but the response can be formatted in fully-fledged HTML code by adding it in the code of operation length and setting the parameter .format inside input port HTTPInput as html.
Querystrings and other common message formats used in web applications, such as HTML form encodings, present the problem of not carrying type information. Instead, they simply carry string representations of values that were potentially typed on the invoker's side. However, type information is necessary for supporting services. To cope with such cases, Jolie introduces the notion of automatic type casting.
Automatic type casting reads incoming messages that do not carry type information and tries to cast their content values to the types expected by the service interface for the message operation.
HTML forms
Operations can be invoked via HTML forms too.
Let us consider a html page with a form which submits a request to the operation length.
After it is stored in our www directory, we can navigate to: http://localhost:8000/form.html where we can find the form containing both a text input and a file input fields. If we write something in the text field and choose a file to upload for the file input one, we can submit the request to the operation length that will reply with the sum of the length of both the text and the content of the file.
JQuery
Jolie fully supports asynchronous JavaScript and XML (AJAX) calls via XMLHttpRequest, which subsequently assures the support of most part of web application development libraries.
For the sake of brevity, we are not showing the boilerplate for building the HTML interface here, but it can be downloaded entirely from the link below:
Once downloaded and unpacked, we can launch Leonardo and navigate to address http://localhost:8000/. Inside the www directory there are a index.html with a form containing three text fields - text1, text2, and text3. Submitting the request, by pressing the submit button, the event is intercepted by the JavaScript code shown below:
$( document ).ready( function() {
$( "#lengthButton" ).click( function() {
Jolie.call(
'length',
{
item: [
$("#text1").val(),
$("#text2").val(),
$("#text3").val()
]
},
function( response ) {
$( "#result" ).html( response );
}
);
})
});
The code is contained in library jolie-jquery.js stored inside the lib directory.
Google Web Toolkit (GWT)
Jolie supports Google Web Toolkit too by means of the jolie-gwt.jar library stored inside the lib subdirectory of the standard trunk Jolie installation. Inside the library there is a standard GWT module, called JolieGWT, which must be imported into the GWT module we are using.
The module comes with support classes for invoking operations published by the service of Leonardo which is serving the GWT application. In our case, we can easily call the length operation with the following code:
Value request = new Value();
request.getNewChild( "item" ).setValue( "Hello" );
request.getNewChild( "item" ).setValue( "World!" );
JolieService.Util.getInstance().call(
"length",
request,
new AsyncCallback<Value> () {
public void onFailure( Throwable t ) {}
public void onSuccess( Value response )
{
Window.alert( response.strValue() );
}
});
HTTP GET/POST Requests
Let us focus on dealing with GET and POST request from web applications using the HTTP protocol directly (without Leonardo).
Receiving GET requests
To receive and handle a GET requests. Let us consider a Jolie program that supports the sum of two numbers, x and y, by means of an operation called sum.
execution { concurrent }
type SumRequest:void {
.x:int
.y:int
}
interface SumInterface {
RequestResponse: sum(SumRequest)(int)
}
inputPort MyInput {
Location: "socket://localhost:8000/"
Protocol: http
Interfaces: SumInterface
}
main
{
sum( request )( response ) {
response = request.x + request.y
}
}
Jolie transparently supports the reception of GET requests ad the automatic parsing of HTTP query string. Hence, we can simply execute jolie sum.ol and point the browser to: http://localhost:8000/sum?x=6&y=2 to obtain the result of the sum computed by the code in our example.
Sending GET requests
The sum service can be invoked from another Jolie program using a HTTP GET request. We can do this with the following client code:
include "console.iol"
type SumRequest:void {
.x:int
.y:int
}
interface SumInterface {
RequestResponse: sum(SumRequest)(int)
}
outputPort SumService {
Location: "socket://localhost:8000/"
Protocol: http { .method = "get" }
Interfaces: SumInterface
}
main
{
request.x = 4;
request.y = 2;
sum@SumService( request )( response );
println@Console( response )()
}
We use the method parameter of HTTP protocol to set our request method to GET.
Receiving POST requests
Handling POST requests is similar to handling GET ones. Let us reuse the code given before for the sum service submitting a POST request: Jolie HTTP protocol implementation automatically detects a POST call and convert it to a standard message. Since POST calls are usually sent by browsers through HTML forms, we provide one by a simple extension of our sum service:
execution { concurrent }
type SumRequest:void {
.x:int
.y:int
}
interface SumInterface {
RequestResponse:
sum(SumRequest)(int),
form(void)(string)
}
inputPort MyInput {
Location: "socket://localhost:8000/"
Protocol: http { .format = "html" }
Interfaces: SumInterface
}
main
{
[ sum( request )( response ) {
response = request.x + request.y
}]{ nullProcess }
[ form()( f ) {
f = "
<html>
<body>
<form action='sum' method='POST'>
<code>x</code>: <input type='text' value='3' name='x' />
<br/>
<code>y</code>: <input type='text' value='2' name='y' />
<br/>
<input type='submit'/>
</form>
</body>
</html>"
}]{ nullProcess }
}
This time we use the format = "html" HTTP parameter to support the dispatch of HTML responses by operation form which returns an HTML page containing a form that targets the sum operation. After executing the code and pointing the browser to http://localhost:8000/form, we should see an HTML form that submits the values x and y to operation sum and gets back a result.
Sending POST requests
The difference between sending GET and POST requests stands in setting the method parameter. Let us modify the previous code used to shown how to send GET requests:
include "console.iol"
type SumRequest:void {
.x:int
.y:int
}
interface SumInterface {
RequestResponse: sum(SumRequest)(int)
}
outputPort SumService {
Location: "socket://localhost:8000/"
Protocol: http { .method = "post" }
Interfaces: SumInterface
}
main
{
request.x = 4;
request.y = 2;
sum@SumService( request )( response );
println@Console( response )()
}
Protocols
A protocol defines how data to be sent or received shall be, respectively, encoded or decoded, following an isomorphism.
Jolie natively supports a large set of protocols:
- HTTP;
- HTTPS;
- JSON/RPC;
- XML/RPC;
- SOAP;
- SODEP;
- SODEPS;
- RMI.
Each protocol has its own parameters that can be set in order to adapt to the requirements of the communications.
In this section we explain what parameters can be set for each protocol.
Setting (static) parameters
The parameters of the protocol are specified in the input/output port definition. Unless required, if a parameter is not defined it is set to its default value according to its protocol specification.
Let us recall the examples given in HTTP GET/POST Requests where we set the parameters method and format, of protocol http, to define what kind of messages the port shall send or receive.
// HTTP GET input port
inputPort MyInput {
//Location: ...
Protocol: http
//Interfaces: ...
}
// HTTP GET output port
outputPort MyOutput {
//Location: ...
Protocol: http { .method = "get" }
//Interfaces: ...
}
// HTTP POST input port
inputPort MyInput {
//Location: ...
Protocol: http { .format = "html" }
//Interfaces: ...
}
// HTTP POST output port
outputPort MyOutput {
//Location: ...
Protocol: http { .method = "post" }
//Interfaces: ...
}
In the example above, we statically set - with an assignment = - some of http protocol's parameters in order to send get and post requests or to define what kind of requests will be received.
Besides defining a parameter as a static value, which remains the same during the whole execution of the program, we can exploit Jolie runtime variable evaluation to change them according to our application behaviour.
Setting dynamic parameters
Protocol's parameters can be set dynamically using the alias -> operator.
To exemplify how to dynamically set the parameters of a protocol, we refer to the Leonardo's inputPort definition:
inputPort HTTPInput {
Protocol: http {
.keepAlive = 0; // Do not keep connections open
.debug = DebugHttp;
.debug.showContent = DebugHttpContent;
.format -> format;
.contentType -> mime;
.statusCode -> statusCode;
.redirect -> location;
.default = "default"
}
//Location: ...
//Interfaces: ...
}
As shown, except keepAlive, debug.showContent, and default parameters that are statically set, all other parameters are aliased to a variable whose value can be changed at runtime, during the execution of Leonardo.
Besides aliasing protocol's parameter, we can access and modify them using the standard Jolie construct for dynamic port binding.
HTTP
HTTP Protocol
HTTP (Hypertext Transfer Protocol) is an application protocol for distributed, collaborative, hypermedia information systems.
Protocol name in Jolie port definition: http.
HTTP Parameters
type HttpConfiguration:void {
/* General */
/*
* Defines whether the underlying connection should be kept open.
* Remote webservers could have been configured to automatically close
* client connections after each request and without consideration of
* eventual "Connection: close" HTTP headers. If a Jolie client performs
* more than one request, the "keepAlive" parameter needs to be
* changed to "false", otherwise the client fails with:
* "jolie.net.ChannelClosingException: [http] Remote host closed
* connection."
*
* Default: true
*/
.keepAlive?:bool
/*
* Defines the status code of the HTTP message.
* The parameter gets set on inbound requests and is read out on outbound
* requests.
* Attention: for inbound requests the assigned variable needs to be
* defined before
* issuing the first request, otherwise it does not get set (e.g.,.
* statusCode = 0)
*
* e.g.,
* .statusCode -> statusCode
*
* Default: 200
* Supported Values: any HTTP status codes
*/
.statusCode?:string
/*
* Defines whether debug messages shall be
* activated
*
* Default: false
*/
.debug?:bool {
/*
* Shows the message content
*
* Default: false
*/
.showContent?:bool
}
/*
* Defines whether the requests handled by the service
* are thread-safe or not.
*
* Default:
* send -> true
* receive -> false
*/
.concurrent?: bool
/*
* Enable content compression in HTTP.
* On client side the "Accept-Encoding" header is set to "gzip, deflate"
* or according to "requestCompression". On the server the compression is
* enabled using gzip or deflate as the client requested it. gzip is
* preferred over deflate since it is more common.
* If the ne.g.,otiation was successful, the server returns the compressed
* data with a "Content-Encoding" header and an updated "Content-Length"
* field.
*
* Default: true
*/
.compression?:bool
/*
* Set the allowed mimetypes (content types) for compression.
* This flag operates server-side only and is unset per default, which
* means that common plain-text formats get compressed (among them
* text/html text/css text/plain text/xml text/x-js text/x-gwt-rpc
* application/json application/javascript application/x-www-form-urlencoded
* application/xhtml+xml application/xml).
* The delimitation character should be different to the mimetype names,
* valid choices include blank, comma or semicolon.
*
* "*" means compression for everything including binary formats, which is
* usually not the best choice. Many formats come pre-compressed, like
* archives, images or videos.
*
* Other webservers (Apache Tomcat, Apache HTTP mod_deflate) contain
* similar filter variables.
*
* Default: common plain-text formats
*/
.compressionTypes?:string
/*
* Enables the HTTP request compression feature.
* HTTP 1.1 per RFC 2616 defines optional compression also on POST
* requests, which works unless HTTP errors are returned, for instance 415
* Unsupported Media Type.
* Jolie allows to set the parameter to "gzip" or "deflate" which
* overrides also the "Accept-Encoding" header. This invites the server to
* use the same algorithm for the response compression.
* Invalid values are ignored, the compression mimetypes are enforced.
* If all conditions are met, the request content gets compressed, an
* additional "Content-Encoding" header added and the "Content-Length"
* header recalculated.
*
* Default: none/off
*/
.requestCompression?:string
/* Outbound */
/*
* Defines the HTTP response (outbound) message format.
* Supported values: xml, html, x-www-form-urlencoded, json,
* text/x-gwt-rpc, multipart/form-data, binary (data transfer in raw
* representation - no conversion), raw (data transfer in string
* representation with character set enforcement).
* It might be necessary to override the format with the correct content
* type, especially for "binary" and "raw" as shown below.
*
* Default: xml
*/
.format?:string
/*
* Defines the content type of the HTTP message.
* These are the default content types for each kind of format, override
* if necessary:
* xml : text/xml
* html : text/html
* x-www-form-urlencoded : application/x-www-form-urlencoded
* json : application/json
* text/x-gwt-rpc : text/x-gwt-rpc
* multipart/form-data : multipart/form-data
* binary : application/octet-stream
* raw : text/plain
*
* Default: none
*/
.contentType?:string
/*
* Defines the HTTP response (outbound) message character encoding
* Supported values: "US-ASCII", "ISO-8859-1",
* "UTF-8", "UTF-16"... (all possible Java charsets)
*
* Default: "UTF-8"
*/
.charset?:string
/*
* Set additional headers on HTTP requests
*
* Default: none
*/
.addHeader?:void {
/*
* "header" contains the actual headers with their values
* ("value") as children.
*
* e.g.,. for HTTP header "Authorization: TOP_SECRET":
* .addHeader.header[0] << "Authorization" { .value="TOP_SECRET" }
* Default: none
*/
.header*:string { .value:string } }
/*
* Defines the request method *
* Default: "POST"
* Supported values: "GET", "POST"
*/
.method?:string {
/*
* "queryFormat" on a GET request may be set to "json" to have the
* parameters passed as JSON
* Default: none
*/
.queryFormat?:string }
/*
* Defines a set of operation-specific aliases,
* multi-part headers, and parameters.
* Default: none
*/
.osc?:void {
/*
* Jolie operation name(s)
* e.g.,. .osc.fetchBib.alias="rec/bib2/%!{dblpKey}.bib" for operation
* fetchBib()() which listens on "rec/bib2/%!{dblpKey}.bib"
* e.g.,. .osc.default.alias="" for method default()() which listens on "/"
* Default: none
*/
.operationName*:void {
/*
* Defines a HTTP alias which represents
* an alternative name to the location of
* "operationName"
* Default: none
* Supported values: URL address, string raw
*/
.alias*: string
/*
* Defines the elements composing a multi-part
* request for a specific operation.
* Default: none
*/
.multipartHeaders?:void {
/*
* Defines the name of the part of
* the multi-part request
* Default: none
*/
.partName*:void {
/*
* Defines the name of the file
* corresponding to a specific part
* Default: none
*/
.filename?:string
}
}
}
}
/*
* HTTP request paths are usually composed by the medium's URI path
* as prefix and the resource name (or eventual aliases) as suffix.
* This works perfectly on IP sockets (medium "socket"), but is not
* desirable on other media like the UNIX domain sockets ("localsocket").
* Examples:
* - location: "socket://localhost:8000/x/", resource "sum" -> "/x/sum"
* - location: "localsocket://abs/s", resource "sum" -> "/ssum". "s"
* is just the file name of the UNIX domain socket and has no meaning
* in HTTP. With .dropURIPath = true the path component "s" is dropped
* and the result becomes "/sum".
*
*/ Default: false
.dropURIPath?:bool
/*
* Defines the cache-control header of the HTTP message.
*/
.cacheControl?:void {
/*
* Maximum age for which the resource should be cached (in seconds)
*/
.maxAge?:int
}
/*
* Defines the Content-Transfer-Encoding value of the HTTP message.
*
* Default: none
*/
.contentTransferEncoding?:string
/*
* Defines the Content-Disposition value of the HTTP message.
*
* Default: none
*/
.contentDisposition?:string
/* Inbound */
/*
* Specifies the default HTTP handler method(s) on a server
* This is required for CRUD applications but also used in Leonardo which sets
* it to default()() (.default = "default").
*
* Default: none
*/
.default?:string {
/*
* Handler for specific HTTP request methods, e.g.,.
* .default.get = "get";
* .default.put = "put";
* .default.delete = "delete"
*
* Default: none
*/
.get?:string
.post?:string
.head?:string
.put?:string
.delete?:string
}
/*
* If set to "strict", applies a more strict JSON array to Jolie value
* mapping schema when the JSON format is used.
*
* Default: none
*/
.json_encoding?:string
/*
* Defines the observed headers of a HTTP message.
*
* Default: none
*/
.headers?:void {
/*
* should be substituted with the actual header
* names ("_" to decode "-", e.g.,. "content_type" for "content-type")
* and the value constitutes the request variable's attribute where
* the content will be assigned to.
* Important: these attributes have to be part of the service's
* input port interface, unless "undefined" is used.
*
* e.g.,. in the deployment:
* .headers.server = "server"
* .headers.content_type = "contentType";
*
* in the behaviour, "req" is the inbound request variable:
* println@Console( "Server: " + req.server )();
* if ( req.contentType == "application/json" ) { ...
*
* Default: none
*/
.*: string
}
/*
* Defines the redirecting location subsequent to
* a Redirection 3xx status code
*
* Default: none
*/
.redirect?:string
/*
* Defines a set of cookies used in the http communication
*
* Default: none
*/
.cookies?:void {
/*
* Defines a cookie named
* "cookieName"
* Default: none
*/
.cookieName*:void {
/*
* Defines the configuration of a cookie
*
* Default: none
*/
.cookieConfig?:string{
/*
* Defines the domain of the cookie
*
* Default: ""
*/
.domain?:string
/*
* Defines the expiration time of the cookie
*
* Default: ""
*/
.expires?:string
/*
* Defines the "path" value of the cookie
*
* Default: ""
*/
.path?:string{}
/*
* Defines whether the cookie shall be encrypted
* and sent via HTTPS
*
* Default: 0
*/
.secure?:int{}
/*
* Defines the type of the cookie
*
* Default: string
*/
.type?:string
}
}
}
/*
* Overrides the HTTP User-Agent header value on incoming HTTP messages
*
* e.g.,.
* .userAgent -> userAgent
*
* Default: none
*/
.userAgent?:string
/*
* Overrides the HTTP host header on incoming HTTP messages
*
* e.g.,.
* .host -> host
*
* Default: none
*/
.host?:string
}
JSON/RPC
JSON-RPC Protocol
JSON-RPC is a remote procedure call protocol encoded in JSON (JavaScript Object Notation). Jolie implements version 2 over HTTP transport. Protocol name in Jolie port definition: jsonrpc.
JSON-RPC Parameters
type JsonRpcConfiguration:void {
/*
* Defines whether the underlying connection should be kept open.
*
* Default: true
*/
.keepAlive?: bool
/*
* Defines whether debug messages should be activated
*
* Default: false
*/
.debug?: bool
/*
* Enable the HTTP content compression
* On client side the "Accept-Encoding" header is set to "gzip, deflate"
* or according to "requestCompression". On the server the compression is
* enabled using gzip or deflate as the client requested it. gzip is
* preferred over deflate since it is more common.
* If the negotiation was successful, the server returns the compressed data
* with a "Content-Encoding" header and an updated "Content-Length" field.
*
* Default: true
*/
.compression?:bool
/*
* Enables the HTTP request compression feature.
* HTTP 1.1 per RFC 2616 defines optional compression also on POST requests,
* which works unless HTTP errors are returned, for instance 415 Unsupported
* Media Type.
* Jolie allows to set the parameter to "gzip" or "deflate" which overrides
* also the "Accept-Encoding" header. This invites the server to use the same
* algorithm for the response compression. Invalid values are ignored.
* If all conditions are met, the request content gets compressed, an
* additional "Content-Encoding" header added and the "Content-Length"
* header recalculated.
*
* Default: none/off
*/
.requestCompression?:string
}
XML/RPC
XML-RPC Protocol
XML-RPC is a remote procedure call protocol encoded in XML (Extensible Markup Language).
Protocol name in port definition: xmlrpc.
XML-RPC Transport
XML-RPC has the characteristic that all exchanged variables need to be listed in a child array param (this one becomes XML-RPC's params vector). Arrays need to be passed as child values called array eg. val.array[0] = 1, in which case all other eventual child values and the root of a particular value are ignored.
Some other notes to value mapping: Jolie variables of type long are unsupported in XML-RPC and not considered further. Date values (dateTime.iso8601) cannot be generated within Jolie and are considered strings, base64 values are mapped into raw.
This is an example of a primitive XML-RPC server:
execution { concurrent }
type SumRequest:void {
.param:void {
.x:int
.y:int
.z:void {
.a:int
.b:int
}
}
}
type SumResponse:void {
.param:int
}
interface SumInterface {
RequestResponse:
sum(SumRequest)(SumResponse)
}
inputPort MyInput {
Location: "socket://localhost:8000/"
Protocol: xmlrpc { .debug = true }
Interfaces: SumInterface
}
main
{
[ sum( request )( response ) {
response.param = request.param.x + request.param.y + request.param.z.a + request.param.z.b
}]{ nullProcess }
}
XML-RPC Parameters
type XmlRpcConfiguration:void {
/*
* Defines the aliases for operation names.
* Jolie does not support operation names with dots (e.g., myOp.operation),
* aliases are expressed as protocol parameters as
* aliases.opName = "aliasName"
*
*
* Default: none
* Supported values: any valid operation alias definition
*/
.aliases: void {
.operationName[ 1, * ]: void {
.operationName: string
}
}
/*
* Defines whether the underlying connection should be kept open.
*
* Default: false
*/
.keepAlive?: bool
/*
* Defines whether debug messages should be activated
*
* Default: false
*/
.debug?: bool
/*
* Enable the HTTP content compression
* On client side the "Accept-Encoding" header is set to "gzip, deflate"
* or according to "requestCompression". On the server the compression is
* enabled using gzip or deflate as the client requested it. gzip is
* preferred over deflate since it is more common.
* If the negotiation was successful, the server returns the compressed data
* with a "Content-Encoding" header and an updated "Content-Length" field.
*
* Default: true
*/
.compression?:bool
/*
* Enables the HTTP request compression feature.
* HTTP 1.1 per RFC 2616 defines optional compression also on POST requests,
* which works unless HTTP errors are returned, for instance 415 Unsupported
* Media Type.
* Jolie allows to set the parameter to "gzip" or "deflate" which overrides
* also the "Accept-Encoding" header. This invites the server to use the same
* algorithm for the response compression. Invalid values are ignored.
* If all conditions are met, the request content gets compressed, an
* additional "Content-Encoding" header added and the "Content-Length"
* header recalculated.
*
* Default: none/off
*/
.requestCompression?:string
}
SOAP
SOAP (Simple Object Access Protocol) is a protocol for exchanging structured information among Web Services. It relies on XML for its message format.
Protocol name in port definition: soap.
Useful tools
Some useful tools which deals with soap protocol are released together with jolie:
Check the links for more information.
SOAP Parameters
type SoapConfiguration:void {
/*
* Defines the XML Schema files containing
* the XML types to be used in SOAP messages
*
* Default: none
*/
.schema*:string
/*
* If true, converts XML node attributes to subnodes
* in the relative Jolie tree under the "@Attributes"
* node.
*
* Example:
* x.("@Attributes") = "hello"
* would be converted to:
*
* and vice versa.
*
* Default: false
*/
.convertAttributes?:bool
/*
* The URL of the WSDL definition associated to this SOAP protocol
*
* Default: none
* Supported values: any valid URL referring a WSDL
*/
.wsdl?:string {
/*
* The port to refer to in the WSDL file for communicating
* through this protocol.
*
* Default: none
* Supported values: any port name in the WSDL file
.port?:string
}
/*
* Use WS-Addressing
*
* Default: false
*/
.wsAddressing?:bool
/*
* Defines the SOAP style to use for message encoding
*
* Default: "rpc"
* Supported values: "rpc", "document"
*/
.style?:string {
/*
* Checked only if style is "document", it
* defines whether the message is to be wrapped or not
* in a node with the name of the operation.
*
* Default: false
*/
.wrapped?:bool
}
/*
* Defines additional attributes in the outgoing SOAP messages.
*
* Default: none
*/
.add_attribute?:void {
/*
* Defines an operation of the message
* This parameter is considered only if .wrapped in .style
* is true.
*/
.operation*:void {
.operation_name:string
.attribute:void {
/*
* Defines the prefix
* of the name of the attribute
*/
.prefix?:string
.name:string
.value:string
}
}
/*
* Defines additional attributes of the
* envelope
*/
.envelope?:void {
.attribute*:void {
.name:string
.value:string
}
}
}
/*
* Defines whether the message request path
* must be interpreted as a redirection resource or not.
*
* Default: false
*/
.interpretResource?:bool
/*
* The namespace name for outgoing messages.
*
* Default: void
*/
.namespace?:string
/*
* Drops incoming root return values.
* Certain (to the standard incompatible) SOAP implementations may return empty strings when a return value
* of void is expected.
* Please see the explanation at: https://github.com/jolie/jolie/issues/5
*
* Default: false
*/
.dropRootValue?:bool
/*
* Defines whether the underlying connection should be kept open.
*
* Default: true
*/
.keepAlive?:bool
/*
* Defines whether debug messages shall be
* activated
*
* Default: false
*/
.debug?:bool
/*
* Enable the HTTP content compression
* On client side the "Accept-Encoding" header is set to "gzip, deflate"
* or according to "requestCompression". On the server the compression is
* enabled using gzip or deflate as the client requested it. gzip is
* preferred over deflate since it is more common.
* If the negotiation was successful, the server returns the compressed data
* with a "Content-Encoding" header and an updated "Content-Length" field.
*
* Default: true
*/
.compression?:bool
/*
* Enables the HTTP request compression feature.
* HTTP 1.1 per RFC 2616 defines optional compression also on POST requests,
* which works unless HTTP errors are returned, for instance 415 Unsupported
* Media Type.
* Jolie allows to set the parameter to "gzip" or "deflate" which overrides
* also the "Accept-Encoding" header. This invites the server to use the same
* algorithm for the response compression. Invalid values are ignored.
* If all conditions are met, the request content gets compressed, an
* additional "Content-Encoding" header added and the "Content-Length"
* header recalculated.
*
* Default: none/off
*/
.requestCompression?:string
}
SODEP
SODEP Protocol
SODEP (Simple Operation Data Exchange Protocol) is a binary protocol created and developed for Jolie, in order to provide a simple, safe and efficient protocol for service communications.
Protocol name in port definition: sodep.
SODEP Parameters
type SodepConfiguration:void {
/*
* Defines the character set to use for (de-)coding strings.
*
* Default: "UTF-8"
* Supported values: "US-ASCII", "ISO-8859-1",
* "UTF-8", ... (all possible Java charsets)
*/
.charset?:string
/*
* Defines whether the underlying connection should be kept open.
*
* Default: true
*/
.keepAlive?:bool
}
SODEP data
SODEP maps three Jolie internal data structures: CommMessage?, FaultException?, and Value.
Basically, a SODEP message is the encoding of a CommMessage? object.
For the sake of clarity, we show (in Java pseudo-code) how these structures are composed and the meaning of their content before giving the formal specifications of the protocol.
CommMessage
longid: a unique identifier for this message, generated from the requester;StringresourcePath: the resource path this message should be delivered to. If the message is meant to be received from the service you are communicating with, the resource path should be "/";StringoperationName: the operation name this message refers to;FaultException?fault: the fault exception this message contains, if any;Valuevalue: the data this message contains, if any.
FaultException
StringfaultName: the fault name this FaultException? refers to;Valuevalue: the data regarding this fault, if any.
Value
Objectcontent: the content of this value. Can be a String, an Integer, or a Double;Map< String, Value[] >``: the children vectors of this value, mapped by name.
Formal specification
We represent the protocol encoding by using a BNF-like notation. Raw data types are supplied with additional information in round parentheses, in order to indicate what they represent.
trueandfalseare the respective boolean values;nullis the Java null value;intis a 32-bit integer value;longis a 64-bit integer value;doubleis a 64-bit double value;Stringelements are to be intended as standard UTF-8 encoded strings;*is to be intended as the asterisk (zero or more repetition);- raw numbers annotated with
byteare to be considered single bytes; - the special keyword epsilon means nothing.
SODEPMessage ::= long(message id) String(resource path) String(operation name) Fault Value
String ::= int(string length) string(UTF-8 encoded)
Fault ::= true String(fault name) Value(fault additional data) | false
Value ::= ValueContent int(how many ValueChildren) ValueChildren*
ValueContent ::= 0(byte) | 1(byte) String | 2(byte) int | 3(byte) double | 4(byte) byte array | 5(byte) bool | 6(byte) long
ValueChildren ::= String(child name) int(how many Value) Value* | epsilon
Security with SSL
SSL wrapping protocol
SSL (Secure Sockets Layer) is not a communication protocol on its own and it is used as a wrapping for SSL-based secure protocols, like SODEPS and HTTPS.
SSL Use
To make use of SSL, a valid private-key certificate deposited in a Java keystore is required. On the server side the two protocol parameters .ssl.keyStore pointing to the keystore file and .ssl.keyStorePassword in presence of a password need to be set.
Clients accessing SSL servers with unsafe (including self-signed) certificates usually deny operation. A truststore, likewise a Java keystore, contains trust entries also for potentially unsafe certificates. In Jolie it is specified over the protocol parameters .ssl.trustStore (path) and eventually .ssl.trustStorePassword.
Java's keytool helps to introspect key- and truststore: keytool -list -keystore <keystore/truststore>.jks -storepass <password>. In a keystore, a certificate with PrivateKeyEntry should be contained, in a truststore the same (fingerprint) with a trustedCertEntry.
SSL Parameters
type SSLConfiguration:void {
.ssl?:void{
/*
* Defines the protocol used in encryption.
*
* Default: "TLSv1"
* Supported values: all Java encryption protocols:
* SSL, SSLv2, SSLv3, TLS, TLSv1, TLSv1.1, TLSv1.2
*/
.protocol?:string
/*
* Defines the format used for storing
* keys
*
* Default: "JKS"
* Supported values: all java keystore formats:
* JKS, JCEKS, PKCS12
*/
.keyStoreFormat?:string
/*
* Defines the path of the file where keys are stored
*
* Default: null
*/
.keyStore?:string
/*
* Defines the password of the keystore
*
* Default: null
*/
.keyStorePassword?:string
/*
* Defines the format used in the trustStore
*
* Default: JKS
*/
trustStoreFormat?:string
/*
* Defines the path of the trustStore file
*
* Default: null
*/
.trustStore?:string
/*
* Defines the password of the trustStore
*
* Default: none
*/
.trustStorePassword?:string
}
}
SODEPs
SODEPS Protocol
SODEPS (SODEP Secure) is a secure communication protocol obtained by layering the SODEP protocol on top of the SSL/TLS protocol.
Protocol name in Jolie port definition: sodeps.
SODEPS Parameters
Since SODEPS is the SODEP protocol wrapped in an SSL encrypted message, SODEPS parameters are the same defined for SODEP.
HTTPs
HTTPS Protocol
HTTPS (HTTP Secure) is a secure communication protocol obtained by layering the HTTP protocol on top of the SSL/TLS protocol.
Protocol name in Jolie port definition: https.
HTTPS Parameters
Since HTTPS is the HTTP protocol wrapped in an SSL encrypted message, HTTPS parameters are the same defined for HTTP.
HTTPS with HTTP Compression
Unfortunately there exist some known HTTPS attacks with enabled HTTP compression like BREACH. Hence you might want to set the compression parameter to false when you are handling sensitive data.
SOAPs
SOAPS Protocol
SOAPS (SOAP Secure) is a secure communication protocol obtained by layering the SOAP protocol on top of the SSL/TLS protocol.
Protocol name in Jolie port definition: soaps.
SOAPS Parameters
Since SOAPS is the SOAP protocol wrapped in an SSL encrypted message, SOAPS parameters are the same defined for SOAP.
Locations
A location defines the medium on which a port sends and receive messages.
A location is always a URI in the form medium[:parameters], where medium is the medium identifier and the optional parameters is a medium-specific string
Jolie natively supports five media:
- local (Jolie in-memory communication);
- socket (TCP/IP sockets);
- btl2cap (Bluetooth L2CAP);
- rmi (Java RMI);
- localsocket (Unix local sockets).
In the following sections we explain the medium-specific properties of the locations provided by Jolie.
Automatic configuration of a location using extension auto
Both inputPort locations and outputPort locations can be automatically set from an external file by using the extension auto. auto is a special extension which can be defined instead of a usual location. When using auto two different kind of external files can be exploited for defining the locations: ini and json.
The form of the extension string for auto is:
auto:<file format ini|json>:<variable path>:file:<path to file>
ini file
Here we show an example of port definition which exploits the extension auto together with a file ini.
inputPort MyInput {
location: "auto:ini:/Location/MyInput:file:config.ini"
protocol: sodep
interfaces: DummyInterface
}
outputPort MyOutput {
location: "auto:ini:/Location/MyOutput:file:config.ini"
protocol: sodep
interfaces: DummyInterface
}
where the ini file is:
[Location]
MyInput=socket://localhost:8000
MyOutput=socket://100.100.100.100:8000
Note that the <variable path> take the following forms:
/Location/MyInput
/Location/MyOutput
where Location is the name of the section inside the ini file.
json file
Here we show an example of port definition which exploits the extension auto together with a file json.
inputPort MyInput {
location: "auto:json:MyInput.location:file:config.json"
protocol: sodep
interfaces: DummyInterface
}
outputPort MyOutput {
location: "auto:json:MyOutput.location:file:config.json"
protocol: sodep
interfaces: DummyInterface
}
where the json file is:
{
"MyInput": {
"location":"socket://localhost:8000"
},
"MyOutput": {
"location":"socket://100.100.100.100:8000"
}
}
Note that the <variable path> take the following forms:
MyInput.location
MyOutput.location
Socket
In Jolie a socket location defines a TCP/IP network socket.
Socket location name in Jolie port definition is socket.
A socket location is an address expressed as a URI in the form socket://host:port/path, where:
hostidentifies the system running the Jolie program. It can be either a domain name or an IP address;portdefines the port on which the communication takes place.
The couple host:port represents an authority, where:
pathcontains the path that identifies the Jolie program in the scope of an authority.
Local and remote socket locations
Sockets can identify:
- Local socket address, used when the communication is directed to a program running on the same location of the sender, i.e.,
socket://(localhost|127.0.0.1):port_number/path; - Remote socket address, used when the communication is directed to a program running on a remote location from the sender. In this case
host_names can be used in order to identify the resource via a Domain Name System, e.g.,www.google.com:80and173.194.71.147:80point to the same location, i.e.,socket://(host_name|IP_address):port_number/path.
Local
An embedded service in Jolie can communicate with its embedder exploiting the local medium. local communications uses the shared memory between embedded and embedder services in order to handle message delivery in an lightweight and efficient way.
The local medium needs no protocol when used into a port definition and it could be followed by an internal local label which univocally identifies the service within the embedded group.
The local medium can be defined in mainly two ways: statically or dynamically.
In the first case, the user can define a static location identified by a name, like "local://Calculator", "local://MyService". This is similar to e.g., traditional sockets, where a static address (e.g., localhost) is used to identify the location of the service.
In the second case, the user does not define a static location but only the usage of the local medium. At runtime, the Jolie interpreter assigns to inputPorts using that medium a unique name. To bind outputPorts, the user can use the operation as it follows, where MyOutputPort is the name of the outputPort to be bound getLocalLocation@Runtime()( MyOutputPort.location ).
An example using this medium can be found in part "Handling structured messages and embedder's operations invocation" of Embedding Java Services subsection.
The local medium can be used for service internal self communications, as shown in the example below:
include "runtime.iol"
include "string_utils.iol"
type HanoiRequest: void{
.src: string
.aux: string
.dst: string
.n: int
.sid?: string
}
type HanoiReponse: void {
.move?: string
}
interface LocalOperations{
RequestResponse:
hanoiSolver( HanoiRequest )( HanoiReponse )
}
interface ExternalOperations{
RequestResponse:
hanoi( HanoiRequest )( string )
}
outputPort Self{
Interfaces: LocalOperations
}
inputPort Self {
Location: "local"
Interfaces: LocalOperations
}
inputPort PowerService {
Location: "socket://localhost:8000"
Protocol: http{
.format = "html"
}
Interfaces: ExternalOperations
}
execution { concurrent }
init
{
getLocalLocation@Runtime()( Self.location )
}
main
{
[ hanoi( request )( response ){
getRandomUUID@StringUtils()(request.sid);
hanoiSolver@Self( request )( subRes );
response = subRes.move
}]{ nullProcess }
[ hanoiSolver( request )( response ){
if ( request.n > 0 ){
subReq.n = request.n;
subReq.n--;
with( request ){
subReq.aux = .dst;
subReq.dst = .aux;
subReq.src = .src;
subReq.sid = .sid
};
hanoiSolver@Self( subReq )( response );
response.move += "
" +
++global.counters.(request.sid) +
") Move from " + request.src +
" to " + request.dst + ";";
with ( request ){
subReq.src = .aux;
subReq.aux = .src;
subReq.dst = .dst
};
hanoiSolver@Self( subReq )( subRes );
response.move += subRes.move
}
}]{ nullProcess }
}
The operation hanoi receives an external http request (e.g., a GET http://localhost:8000/hanoi?src=source&aux=auxiliary&dst=destination&n=5) and fires the local operation hanoiSolver which uses the local location for recursively call itself and build the solution.
Btl2Cap
BTL2CAP
BTL2CAP is built upon the L2CAP (Logical Link Controller Adaptation Protocol) multiplexing layer and transmits data via the bluetooth medium.
BTL2CAP location name in Jolie is btl2cap.
BTL2CAP locations
The definition of a BTL2CAP location in Jolie is in the form btl2cap://hostname:UUID[;param1=val1;...;paramN=valN] where
hostnameidentifies the host system running the Jolie program;UUIDis the universally unique identifier that identifies the bluetooth medium service. UUIDs are 128-bit unsigned integers guaranteed to be unique across all time and space. In BTL2CAP location specification the UUID is defined by a 32 characters hexadecimal digit string, e.g.,3B9FA89520078C303355AAA694238F07.param1=val1is a bluetooth-specific parameter assignation. For a comprehensive list of the parameters refer to the following list.
type BTL2CAPParameters:void {
/*
* Defines a "friendly" name that can be used to
* identify the bluetooth service
*
* Default: ""
*/
.name?: string
/*
* Defines whether a bluetooth device shall require
* authentication to provide a particular service.
*
* Default: true
*/
.authenticate?: bool
/*
* Defines whether to encrypt the communication
* among authenticated bluetooth devices.
*
* Default: false
*/
.encrypt?: bool
/*
* Defines whether to allow the communication with another
* device only for the current time or to always allow
* the communication for an authenticated particular device.
*
* Default: false
*/
.authorize?: bool
/*
* Defines whether the bluetooth service
* acts as a master
*
* Default: false
*/
.master?: bool
/*
* Defines the reception maximum transmission unit (MTU)
*
* Default: 672 (bytes)
* Supported values: {48, 65536}
*/
.receivemtu?: string
/*
* Defines the reception maximum transmission unit (MTU)
*
* Default: 672 (bytes)
* Supported values: {48, 65536}
*/
.transmitmtu?: string
}
RMI
RMI (Remote Method Invocation) is a Java API provided as an object-oriented equivalent of remote procedure calls.
RMI location name in Jolie's port definition is rmi.
RMI locations and protocols
When using RMI Jolie registers the port into a Java RMI Register service. RMI locations are in the form rmi://hostname:port/name where the parameter name is mandatory and must be unique.
This transport uses its own internal RMI protocol, so theoretically no other protocol needs to be specified. Due to a Jolie parsing restriction, which forces all non-local input ports to have a protocol associated, users may set Protocol: sodep.
LocalSocket
Localsockets are Unix domain sockets, which are communication endpoints for exchanging data between processes executing within the same host operating system. The feature is limited to Unix-like OSs and not available on Windows.
The Jolie localsocket's port definition is localsocket. The implementation makes use of libmatthew-java which contains also a native (JNI) part not delivered within Jolie. It may be installed from the system's package repository (on Red Hat-like yum install libmatthew-java) or compiled manually. For running a localsockets program, the libunix-java.so library needs to be included in the system's ld cache (ldconfig) or specified by the LD_LIBRARY_PATH environment variable. This is a possible invocation: LD_LIBRARY_PATH=/usr/lib64/libmatthew-java jolie program.ol.
Localsockets locations
Localsockets locations can be regular or abstract. Abstract sockets are identical to the regular ones, except that their name does not exist in the file system. Hence, file permissions do not apply to them and when the file is not used any more, it is deleted, while the regular sockets persist.
- Abstract localsockets definition:
localsocket://abs/path/to/socket - Regular localsockets definition:
localsocket:///path/to/socket
Databases
Jolie can be used with various relational/SQL databases, using the Database service from the standard library. The Database service uses JDBC, so you need the correct driver JAR placed in the lib subdirectory (the one of the program or the global one, e.g., /usr/lib/jolie/lib/ in Linux).
Attention: if your JAR driver is called differently, you will have to rename it or create an apposite link, otherwise Jolie is not able to load it. The list of correct names for JAR drivers is given below.
| Database | Driver name (driver ) | JAR filename |
|---|---|---|
| PostgreSQL | postgresql | jdbc-postgresql.jar |
| MySQL | mysql | jdbc-mysql.jar |
| Apache Derby | derby_embedded or derby | derby.jar or derbyclient.jar |
| SQLite | sqlite | jdbc-sqlite.jar |
| SQLServer | sqlserver | sqljdbc4.jar |
| HSQLDB | hsqldb_embedded, hsqldb_hsql , hsqldb_hsqls , hsqldb_http or hsqldb_https | hsqldb.jar |
| IBM DB 2 | db2 | db2jcc.jar |
| IBM AS 400 | as400 | jt400.jar |
The Database service officially supports only the listed DB systems, which were tested and are known to work. If your DB system has not been covered, please contact us (jolie-devel@lists.sourceforge.net) and we will help you to get it added.
Using multiple databases
By default, the Database service included by database.iol works for connecting to a single database. If you need to use multiple databases from the same Jolie service, you can run additional instance by creating another output port and embedding the Database Java service again, as in the following:
outputPort Database2 {
Interfaces: DatabaseInterface
}
embedded {
Java:
"joliex.db.DatabaseService" in Database2
}
First example: WeatherService
This is a modification of the WeatherService client mentioned in section Web Services/web_services. It fetches meteorological data of a particular location (constants City and Country) and stores it in HSQLDB. If the DB has not been set up yet, the code takes care of the initialisation. The idea is to run the program in batch (eg. by a cronjob) to collect data, which could be interesting in Internet of Things (IoT) scenarios.
include "weatherService.iol"
include "string_utils.iol"
include "xml_utils.iol"
include "database.iol"
include "console.iol"
/*
* weatherServiceCallerSql.ol - stores weather data in a HSQLDB DB
*/
constants { City = "Bolzano", Country = "Italy" }
main
{
// fetch weather
with( request ) {
.CityName = City;
.CountryName = Country
};
GetWeather@GlobalWeatherSoap( request )( response );
r = response.GetWeatherResult;
// connect to DB
with ( connectionInfo ) {
.username = "sa";
.password = "";
.host = "";
.database = "file:weatherdb/weatherdb"; // "." for memory-only
.driver = "hsqldb_embedded"
};
connect@Database( connectionInfo )( void );
// create table if it does not exist
scope ( createTable ) {
install ( SQLException => println@Console("Weather table already there")() );
updateRequest =
"CREATE TABLE weather(city VARCHAR(50) NOT NULL, " +
"country VARCHAR(50) NOT NULL, data VARCHAR(1024) NOT NULL, " +
"PRIMARY KEY(city, country))";
update@Database( updateRequest )( ret )
};
// insert/update current record
scope ( update ) {
install ( SQLException =>
updateRequest =
"UPDATE weather SET data = :data WHERE city = :city " +
"AND country = :country";
updateRequest.city = City;
updateRequest.country = Country;
updateRequest.data = r;
update@Database( updateRequest )( ret )
);
updateRequest =
"INSERT INTO weather(city, country, data) " +
"VALUES (:city, :country, :data)";
updateRequest.city = City;
updateRequest.country = Country;
updateRequest.data = r;
update@Database( updateRequest )( ret )
};
// print inserted content
queryRequest =
"SELECT city, country, data FROM weather " +
"WHERE city=:city AND country=:country";
queryRequest.city = City;
queryRequest.country = Country;
query@Database( queryRequest )( queryResponse );
// HSQLDB needs the attributes to be upcased when requesting content
println@Console("City: " + queryResponse.row[0].CITY)();
println@Console("Country: " + queryResponse.row[0].COUNTRY)();
println@Console("Data: " + queryResponse.row[0].DATA)();
// shutdown DB
update@Database( "SHUTDOWN" )( ret )
}
Second example: TodoList
The next example provides a very easy CRUD (create, retrieve, update, delete) web service for a TODO list. The example is shown with HSQLDB but theoretically each DB could have been used. The HTTP's server output format is set to JSON, the input can be approached by both GET or POST requests.
include "console.iol"
include "database.iol"
include "string_utils.iol"
execution { concurrent }
interface Todo {
RequestResponse:
retrieveAll(void)(undefined),
create(undefined)(undefined),
retrieve(undefined)(undefined),
update(undefined)(undefined),
delete(undefined)(undefined)
}
inputPort Server {
Location: "socket://localhost:8000/"
Protocol: http { .format = "json" }
Interfaces: Todo
}
init
{
with (connectionInfo) {
.username = "sa";
.password = "";
.host = "";
.database = "file:tododb/tododb"; // "." for memory-only
.driver = "hsqldb_embedded"
};
connect@Database(connectionInfo)();
println@Console("connected")();
// create table if it does not exist
scope (createTable) {
install (SQLException => println@Console("TodoItem table already there")());
// some HSQLDB versions require "generated always" to be replaced by "generated by default"
update@Database(
"create table TodoItem(id integer generated always as identity, " +
"text varchar(255) not null, primary key(id))"
)(ret)
}
}
main
{
[ retrieveAll()(response) {
query@Database(
"select * from TodoItem"
)(sqlResponse);
response.values -> sqlResponse.row
} ]
[ create(request)(response) {
update@Database(
"insert into TodoItem(text) values (:text)" {
.text = request.text
}
)(response.status)
} ]
[ retrieve(request)(response) {
query@Database(
"select * from TodoItem where id=:id" {
.id = request.id
}
)(sqlResponse);
if (#sqlResponse.row == 1) {
response -> sqlResponse.row[0]
}
} ]
[ update(request)(response) {
update@Database(
"update TodoItem set text=:text where id=:id" {
.text = request.text,
.id = request.id
}
)(response.status)
} ]
[ delete(request)(response) {
update@Database(
"delete from TodoItem where id=:id" {
.id = request.id
}
)(response.status)
} ]
}
Client requests using curl:
- Create new record:
curl -v "http://localhost:8000/create?text=Shopping" - Retrieve all records:
curl -v "http://localhost:8000/retrieveAll" - Retrieve record - GET in x-www-form-urlencoded (web browser form):
curl -v "http://localhost:8000/retrieve?id=0" - Retrieve record - GET request in JSON:
curl -v "http://localhost:8000/retrieve?=\{\"id\":0\}" - Retrieve record - POST request in x-www-form-urlencoded (web browser form):
curl -v -d "id=0" -H "Content-Type: application/x-www-form-urlencoded" "http://localhost:8000/retrieve" - Retrieve record - POST request in JSON:
curl -v -d "{\"id\":0}" -H "Content-Type: application/json" "http://localhost:8000/retrieve"
Mock Services
Mock services are very useful when programming because they allow to test service calls to those services that are not available in the immediate.
Since in Jolie a service interface is fully defined, it is possible to automatically generate a mock service starting from an input port with the command joliemock
joliemock
joliemock generates a mock service which provides a fake implementation of all the operations exhibited within an inputPort.
Usually, a developer just has only the interface of a target service, in this case it is sufficient to build an empty service with an inputPort where the target interface is declared.
As an example let us consider the following service defined in the file named example.ol:
type TestRequest: void {
field1: string
field2: int
field3: void {
field4*: long
}
}
type TestResponse: void {
field5: string
field6: string
field7: double
field8*: string
field9: void {
field10: string
field11*: string
}
}
interface TestInterface {
RequestResponse:
test( TestRequest )( TestResponse )
}
inputPort PortName {
Location: "local"
Protocol: sodep
Interfaces: TestInterface
}
main {
nullProcess
}
In order to generate the correspondent mock service, the following command must be executed:
joliemock example.ol > mock_main.ol
It is worth noting that the code of the mock is generated in the standard output thus it is necessary to redirect it into a file in order to save it. In the example above, the generated content is saved into the file mock_main.ol.
The generated mock is:
type TestRequest:void {
.field1[1,1]:string
.field3[1,1]:void {
.field4[0,*]:long
}
.field2[1,1]:int
}
type TestResponse:void {
.field7[1,1]:double
.field6[1,1]:string
.field9[1,1]:void {
.field11[0,*]:string
.field10[1,1]:string
}
.field8[0,*]:string
.field5[1,1]:string
}
interface TestInterface {
RequestResponse:
test( TestRequest )( TestResponse )
}
include "console.iol"
include "string_utils.iol"
include "converter.iol"
execution{ concurrent }
inputPort PortName {
Protocol:sodep
Location:"local"
Interfaces:TestInterface
}
init {
STRING_CONST = "mock_string"
INT_CONST = 42
DOUBLE_CONST = 42.42
stringToRaw@Converter("hello")( RAW_CONST )
ANY_CONST = "mock any"
BOOL_CONST = true
LONG_CONST = 42L
VOID_CONST = Void
println@Console("Mock service si running...")()
}
main {
[ test( request )( response ) {
valueToPrettyString@StringUtils( request )( s ); println@Console( s )()
response = VOID_CONST
response.field7[ 0 ] = 21.0
response.field6[ 0 ] = "response.field6[ 0 ]"
response.field9[ 0 ] = VOID_CONST
response.field9[ 0 ].field11[ 0 ] = "response.field9[ 0 ].field11[ 0 ]"
response.field9[ 0 ].field11[ 1 ] = "response.field9[ 0 ].field11[ 1 ]"
response.field9[ 0 ].field11[ 2 ] = "response.field9[ 0 ].field11[ 2 ]"
response.field9[ 0 ].field11[ 3 ] = "response.field9[ 0 ].field11[ 3 ]"
response.field9[ 0 ].field11[ 4 ] = "response.field9[ 0 ].field11[ 4 ]"
response.field9[ 0 ].field10[ 0 ] = "response.field9[ 0 ].field10[ 0 ]"
response.field8[ 0 ] = "response.field8[ 0 ]"
response.field8[ 1 ] = "response.field8[ 1 ]"
response.field8[ 2 ] = "response.field8[ 2 ]"
response.field8[ 3 ] = "response.field8[ 3 ]"
response.field8[ 4 ] = "response.field8[ 4 ]"
response.field5[ 0 ] = "response.field5[ 0 ]"
}]
}
The mock service can be immediately executed taking care to define the location of the inputPort which comes as local.
joliemock parameters
The command joliemock accepts three parameters.
joliemock <filename> [-port <portname>] [-depth <vector depth>]
where:
- .port specifies the input port to be mocked. If it is not defined joliemock will generate starting from the first one.
- -depth specifies the number of elements to be generated for each vector. The default is 5
Standard Library API
Bluetooth
Inclusion code:
| Service Deployment | |||
|---|---|---|---|
| Port Name | Location | Protocol | Interfaces |
| Bluetooth documentation: | |||
| Bluetooth | - | - | BluetoothInterface |
List of Available Interfaces
BluetoothInterface
Interface documentation:
| Operation Name | Input Type | Output Type | Faults |
|---|---|---|---|
| inquire | void | BluetoothInquiryResponse | |
| setDiscoverable | int | int |
Operation Description
inquire
Operation documentation: Sets the current Bluetooth device as discoverable or not discoverable @request: 0 if the device has to be set not discoverable, 1 if the device has to be set discoverable.
Invocation template:
inquire@Bluetooth( request )( response )
Request type
Type: void
void : void
Response type
Type: BluetoothInquiryResponse
type BluetoothInquiryResponse: void {
.service*: void {
.location: string
}
.device*: void {
.address: string
.name: string
}
}
BluetoothInquiryResponse : void
service : voidlocation : string
device : voidaddress : stringname : string
setDiscoverable
Operation documentation: Sets the current Bluetooth device as discoverable or not discoverable @request: 0 if the device has to be set not discoverable, 1 if the device has to be set discoverable.
Invocation template:
setDiscoverable@Bluetooth( request )( response )
Request type
Type: int
int : int
Response type
Type: int
int : int
CallbackDefault
Inclusion code:
| Service Deployment | |||
|---|---|---|---|
| Port Name | Location | Protocol | Interfaces |
| SchedulerCallBack | local | - | SchedulerCallBackInterface |
List of Available Interfaces
SchedulerCallBackInterface
Interface documentation:
| Operation Name | Input Type | Output Type | Faults |
|---|---|---|---|
| schedulerCallback | SchedulerCallBackRequest | - |
Operation Description
schedulerCallback
Operation documentation:
Invocation template:
schedulerCallback( request )
Request type
Type: SchedulerCallBackRequest
type SchedulerCallBackRequest: void {
.jobName: string
.groupName: string
}
SchedulerCallBackRequest : void
jobName : stringgroupName : string
Console
Inclusion code:
| Service Deployment | |||
|---|---|---|---|
| Port Name | Location | Protocol | Interfaces |
| ConsoleInputPort | local | - | ConsoleInputInterface |
| Console documentation: | |||
| Console | - | - | ConsoleInterface |
List of Available Interfaces
ConsoleInputInterface
Interface documentation:
Operation Description
in
Operation documentation:
Invocation template:
in( request )
Request type
Type: InRequest
type InRequest: string {
.token?: string
}
InRequest : string
token : string
ConsoleInterface
Interface documentation:
| Operation Name | Input Type | Output Type | Faults |
|---|---|---|---|
| undefined | void | ||
| println | undefined | void | |
| registerForInput | RegisterForInputRequest | void | |
| unsubscribeSessionListener | UnsubscribeSessionListener | void | |
| subscribeSessionListener | SubscribeSessionListener | void | |
| enableTimestamp | EnableTimestampRequest | void |
Operation Description
Operation documentation:
Invocation template:
print@Console( request )( response )
Request type
Type: undefined
undefined : any
Response type
Type: void
void : void
println
Operation documentation:
Invocation template:
println@Console( request )( response )
Request type
Type: undefined
undefined : any
Response type
Type: void
void : void
registerForInput
Operation documentation: it enables the console for input listening parameter enableSessionListener enables console input listening for more than one service session (default=false)
Invocation template:
registerForInput@Console( request )( response )
Request type
Type: RegisterForInputRequest
type RegisterForInputRequest: void {
.enableSessionListener?: bool
}
RegisterForInputRequest : void
enableSessionListener : bool
Response type
Type: void
void : void
unsubscribeSessionListener
Operation documentation: it disables a session to receive inputs from the console, previously registered with subscribeSessionListener operation
Invocation template:
unsubscribeSessionListener@Console( request )( response )
Request type
Type: UnsubscribeSessionListener
type UnsubscribeSessionListener: void {
.token: string
}
UnsubscribeSessionListener : void
token : string
Response type
Type: void
void : void
subscribeSessionListener
Operation documentation: it receives a token string which identifies a service session. it enables the session to receive inputs from the console
Invocation template:
subscribeSessionListener@Console( request )( response )
Request type
Type: SubscribeSessionListener
type SubscribeSessionListener: void {
.token: string
}
SubscribeSessionListener : void
token : string
Response type
Type: void
void : void
enableTimestamp
Operation documentation: It enables timestamp inline printing for each console output operation call: print, println Parameter format allows to specify the timestamp output format. Bad Format will be printed out if format value is not allowed.
Invocation template:
enableTimestamp@Console( request )( response )
Request type
Type: EnableTimestampRequest
type EnableTimestampRequest: bool {
.format?: string
}
EnableTimestampRequest : bool
format : string
Response type
Type: void
void : void
Converter
Inclusion code:
| Service Deployment | |||
|---|---|---|---|
| Port Name | Location | Protocol | Interfaces |
| Converter documentation: | |||
| Converter | - | - | ConverterInterface |
List of Available Interfaces
ConverterInterface
Interface documentation:
| Operation Name | Input Type | Output Type | Faults |
|---|---|---|---|
| stringToRaw | StringToRawRequest | raw | IOException( IOExceptionType ) |
| base64ToRaw | string | raw | IOException( IOExceptionType ) |
| rawToBase64 | raw | string | |
| rawToString | RawToStringRequest | string | IOException( IOExceptionType ) |
Operation Description
stringToRaw
Operation documentation: string <-> raw (byte arrays) conversion methods
Invocation template:
stringToRaw@Converter( request )( response )
Request type
Type: StringToRawRequest
type StringToRawRequest: string {
.charset?: string
}
StringToRawRequest : string
charset : string: set the encoding. Default: system (eg. for Unix-like OS UTF-8)
Response type
Type: raw
raw : raw
Possible faults thrown
Fault IOException with type IOExceptionType
Fault-handling install template:
install ( IOException => /* error-handling code */ )
type IOExceptionType: JavaExceptionType
base64ToRaw
Operation documentation:
Invocation template:
base64ToRaw@Converter( request )( response )
Request type
Type: string
string : string
Response type
Type: raw
raw : raw
Possible faults thrown
Fault IOException with type IOExceptionType
Fault-handling install template:
install ( IOException => /* error-handling code */ )
type IOExceptionType: JavaExceptionType
rawToBase64
Operation documentation:
Invocation template:
rawToBase64@Converter( request )( response )
Request type
Type: raw
raw : raw
Response type
Type: string
string : string
rawToString
Operation documentation: string <-> raw (byte arrays) conversion methods
Invocation template:
rawToString@Converter( request )( response )
Request type
Type: RawToStringRequest
type RawToStringRequest: raw {
.charset?: string
}
RawToStringRequest : raw : The byte array to be converted
charset : string: set the encoding. Default: system (eg. for Unix-like OS UTF-8)
Response type
Type: string
string : string
Possible faults thrown
Fault IOException with type IOExceptionType
Fault-handling install template:
install ( IOException => /* error-handling code */ )
type IOExceptionType: JavaExceptionType
Subtypes
JavaExceptionType
type JavaExceptionType: string { .stackTrace: string }
Database
Inclusion code:
| Service Deployment | |||
|---|---|---|---|
| Port Name | Location | Protocol | Interfaces |
| Database documentation: | |||
| Database | - | - | DatabaseInterface |
List of Available Interfaces
DatabaseInterface
Interface documentation:
| Operation Name | Input Type | Output Type | Faults |
|---|---|---|---|
| checkConnection | void | void | ConnectionError( undefined ) |
| query | QueryRequest | QueryResult | SQLException( undefined ) ConnectionError( undefined ) |
| executeTransaction | DatabaseTransactionRequest | DatabaseTransactionResult | SQLException( undefined ) ConnectionError( undefined ) |
| update | UpdateRequest | int | SQLException( undefined ) ConnectionError( undefined ) |
| close | void | void | |
| connect | ConnectionInfo | void | InvalidDriver( undefined ) ConnectionError( undefined ) DriverClassNotFound( undefined ) |
Operation Description
checkConnection
Operation documentation: Checks the connection with the database. Throws ConnectionError if the connection is not functioning properly.
Invocation template:
checkConnection@Database( request )( response )
Request type
Type: void
void : void
Response type
Type: void
void : void
Possible faults thrown
Fault ConnectionError with type undefined
Fault-handling install template:
install ( ConnectionError => /* error-handling code */ )
query
Operation documentation: Queries the database and returns a result set
Example with SQL parameters:
queryRequest =
"SELECT city, country, data FROM weather " +
"WHERE city=:city AND country=:country";
queryRequest.city = City;
queryRequest.country = Country;
query@Database( queryRequest )( queryResponse );
_template:
Field _template allows for the definition of a specific output template.
Assume, e.g., to have a table with the following columns:
| col1 | col2 | col3 | col4 |
If _template is not used the output will be rows with the following format:
row
|-col1
|-col2
|-col3
|-col4
Now let us suppose we would like to have the following structure for each row:
row
|-mycol1 contains content of col1
|-mycol2 contains content of col2
|-mycol3 contains content of col3
|-mycol4 contains content of col4
In order to achieve this, we can use field _template as it follows:
with( query_request._template ) {
.mycol1 = "col1";
.mycol1.mycol2 = "col2";
.mycol1.mycol2.mycol3 = "col3";
.mycol4 = "col4"
}
_template does not currently support vectors.
Invocation template:
query@Database( request )( response )
Request type
Type: QueryRequest
type QueryRequest: undefined
QueryRequest : string
Response type
Type: QueryResult
type QueryResult: void {
.row*: undefined
}
QueryResult : void
row : void
Possible faults thrown
Fault SQLException with type undefined
Fault-handling install template:
install ( SQLException => /* error-handling code */ )
Fault ConnectionError with type undefined
Fault-handling install template:
install ( ConnectionError => /* error-handling code */ )
executeTransaction
Operation documentation: Executes more than one database command in a single transaction
Invocation template:
executeTransaction@Database( request )( response )
Request type
Type: DatabaseTransactionRequest
type DatabaseTransactionRequest: void {
.statement[1,2147483647]: undefined
}
DatabaseTransactionRequest : void
statement : string
Response type
Type: DatabaseTransactionResult
type DatabaseTransactionResult: void {
.result*: TransactionQueryResult
}
DatabaseTransactionResult : void
result : int
Possible faults thrown
Fault SQLException with type undefined
Fault-handling install template:
install ( SQLException => /* error-handling code */ )
Fault ConnectionError with type undefined
Fault-handling install template:
install ( ConnectionError => /* error-handling code */ )
update
Operation documentation: Updates the database and returns a single status code
Example with SQL parameters:
updateRequest =
"INSERT INTO weather(city, country, data) " +
"VALUES (:city, :country, :data)";
updateRequest.city = City;
updateRequest.country = Country;
updateRequest.data = r;
update@Database( updateRequest )( ret )
Invocation template:
update@Database( request )( response )
Request type
Type: UpdateRequest
type UpdateRequest: undefined
UpdateRequest : string
Response type
Type: int
int : int
Possible faults thrown
Fault SQLException with type undefined
Fault-handling install template:
install ( SQLException => /* error-handling code */ )
Fault ConnectionError with type undefined
Fault-handling install template:
install ( ConnectionError => /* error-handling code */ )
close
Operation documentation: Explicitly closes a database connection Per default the close happens on reconnect or on termination of the Database service, eg. when the enclosing program finishes.
Invocation template:
close@Database( request )( response )
Request type
Type: void
void : void
Response type
Type: void
void : void
connect
Operation documentation: Connects to a database and eventually closes a previous connection
Example with HSQLDB:
with ( connectionInfo ) {
.username = "sa";
.password = "";
.host = "";
.database = "file:weatherdb/weatherdb"; // "." for memory-only
.driver = "hsqldb_embedded"
};
connect@Database( connectionInfo )( void );
Invocation template:
connect@Database( request )( response )
Request type
Type: ConnectionInfo
type ConnectionInfo: void {
.database: string
.password: string
.checkConnection?: int
.driver: string
.port?: int
.toLowerCase?: bool
.host: string
.toUpperCase?: bool
.attributes?: string
.username: string
}
ConnectionInfo : void
database : stringpassword : stringcheckConnection : intdriver : stringport : inttoLowerCase : boolhost : stringtoUpperCase : boolattributes : stringusername : string
Response type
Type: void
void : void
Possible faults thrown
Fault InvalidDriver with type undefined
Fault-handling install template:
install ( InvalidDriver => /* error-handling code */ )
Fault ConnectionError with type undefined
Fault-handling install template:
install ( ConnectionError => /* error-handling code */ )
Fault DriverClassNotFound with type undefined
Fault-handling install template:
install ( DriverClassNotFound => /* error-handling code */ )
Subtypes
TransactionQueryResult
type TransactionQueryResult: int { .row*: undefined }
Exec
Inclusion code:
| Service Deployment | |||
|---|---|---|---|
| Port Name | Location | Protocol | Interfaces |
| Exec documentation: | |||
| Exec | - | - | ExecInterface |
List of Available Interfaces
ExecInterface
Interface documentation:
| Operation Name | Input Type | Output Type | Faults |
|---|---|---|---|
| exec | CommandExecutionRequest | CommandExecutionResult |
Operation Description
exec
Operation documentation:
Invocation template:
exec@Exec( request )( response )
Request type
Type: CommandExecutionRequest
type CommandExecutionRequest: string {
.args*: string
.workingDirectory?: string
.stdOutConsoleEnable?: bool
.waitFor?: int
}
CommandExecutionRequest : string
args : stringworkingDirectory : stringstdOutConsoleEnable : boolwaitFor : int
Response type
Type: CommandExecutionResult
type CommandExecutionResult: any {
.exitCode?: int
.stderr?: string
}
CommandExecutionResult : any
exitCode : intstderr : string
File
Inclusion code:
| Service Deployment | |||
|---|---|---|---|
| Port Name | Location | Protocol | Interfaces |
| File documentation: | |||
| File | - | - | FileInterface |
List of Available Interfaces
FileInterface
Interface documentation:
Operation Description
convertFromBase64ToBinaryValue
Operation documentation: deprecated, please use base64ToRaw@Converter()() from converter.iol
Invocation template:
convertFromBase64ToBinaryValue@File( request )( response )
Request type
Type: string
string : string
Response type
Type: raw
raw : raw
Possible faults thrown
Fault IOException with type IOExceptionType
Fault-handling install template:
install ( IOException => /* error-handling code */ )
type IOExceptionType: JavaExceptionType
getMimeType
Operation documentation: it tests if the specified file or directory exists or not.
Invocation template:
getMimeType@File( request )( response )
Request type
Type: string
string : string
Response type
Type: string
string : string
Possible faults thrown
Fault FileNotFound with type FileNotFoundType
Fault-handling install template:
install ( FileNotFound => /* error-handling code */ )
type FileNotFoundType: WeakJavaExceptionType
convertFromBinaryToBase64Value
Operation documentation: deprecated, please use rawToBase64@Converter()() from converter.iol
Invocation template:
convertFromBinaryToBase64Value@File( request )( response )
Request type
Type: raw
raw : raw
Response type
Type: string
string : string
toAbsolutePath
Operation documentation: Constructs an absolute path to the target file or directory. Can be used to construct an absolute path for new files that does not exist yet. Throws a InvalidPathException fault if input is a relative path is not system recognized path.
Invocation template:
toAbsolutePath@File( request )( response )
Request type
Type: string
string : string
Response type
Type: string
string : string
Possible faults thrown
Fault InvalidPathException with type JavaExceptionType
Fault-handling install template:
install ( InvalidPathException => /* error-handling code */ )
type JavaExceptionType: string {
.stackTrace: string
}
getParentPath
Operation documentation: Constructs the path to the parent directory. Can be used to construct paths that does not exist so long as the path uses the system's filesystem path conventions. Throws a InvalidPathException fault if input path is not a recognized system path or if the parent has no parent.
Invocation template:
getParentPath@File( request )( response )
Request type
Type: string
string : string
Response type
Type: string
string : string
Possible faults thrown
Fault InvalidPathException with type JavaExceptionType
Fault-handling install template:
install ( InvalidPathException => /* error-handling code */ )
type JavaExceptionType: string {
.stackTrace: string
}
list
Operation documentation: The size of any basic type variable.
-
raw: buffer size
-
void: 0
-
boolean: 1
-
integer types: int 4, long 8
-
double: 8
-
string: size in the respective platform encoding, on ASCII and latin1
equal to the string's length, on Unicode (UTF-8 etc.) >= string's length
Invocation template:
list@File( request )( response )
Request type
Type: ListRequest
type ListRequest: void {
.regex?: string
.dirsOnly?: bool
.directory: string
.recursive?: bool
.order?: void {
.byname?: bool
}
.info?: bool
}
ListRequest : void
regex : stringdirsOnly : booldirectory : stringrecursive : boolorder : voidbyname : bool
info : bool
Response type
Type: ListResponse
type ListResponse: void {
.result*: string {
.info?: void {
.size: long
.absolutePath: string
.lastModified: long
.isDirectory: bool
.isHidden: bool
}
}
}
ListResponse : void
result : stringinfo : voidsize : longabsolutePath : stringlastModified : longisDirectory : boolisHidden : bool
Possible faults thrown
Fault IOException with type IOExceptionType
Fault-handling install template:
install ( IOException => /* error-handling code */ )
type IOExceptionType: JavaExceptionType
copyDir
Operation documentation: it copies a source directory into a destination one
Invocation template:
copyDir@File( request )( response )
Request type
Type: CopyDirRequest
type CopyDirRequest: void {
.from: string
.to: string
}
CopyDirRequest : void : from: the source directory to copy to: the target directory to copy into
from : stringto : string
Response type
Type: bool
bool : bool
Possible faults thrown
Fault FileNotFound with type undefined
Fault-handling install template:
install ( FileNotFound => /* error-handling code */ )
Fault IOException with type undefined
Fault-handling install template:
install ( IOException => /* error-handling code */ )
delete
Operation documentation: it copies a source directory into a destination one
Invocation template:
delete@File( request )( response )
Request type
Type: DeleteRequest
type DeleteRequest: string {
.isRegex?: int
}
DeleteRequest : string
isRegex : int
Response type
Type: bool
bool : bool
Possible faults thrown
Fault IOException with type IOExceptionType
Fault-handling install template:
install ( IOException => /* error-handling code */ )
type IOExceptionType: JavaExceptionType
getSize
Operation documentation: The size of any basic type variable.
-
raw: buffer size
-
void: 0
-
boolean: 1
-
integer types: int 4, long 8
-
double: 8
-
string: size in the respective platform encoding, on ASCII and latin1
equal to the string's length, on Unicode (UTF-8 etc.) >= string's length
Invocation template:
getSize@File( request )( response )
Request type
Type: any
any : any
Response type
Type: int
int : int
getFileSeparator
Operation documentation: it tests if the specified file or directory exists or not.
Invocation template:
getFileSeparator@File( request )( response )
Request type
Type: void
void : void
Response type
Type: string
string : string
rename
Operation documentation: The size of any basic type variable.
-
raw: buffer size
-
void: 0
-
boolean: 1
-
integer types: int 4, long 8
-
double: 8
-
string: size in the respective platform encoding, on ASCII and latin1
equal to the string's length, on Unicode (UTF-8 etc.) >= string's length
Invocation template:
rename@File( request )( response )
Request type
Type: RenameRequest
type RenameRequest: void {
.filename: string
.to: string
}
RenameRequest : void
filename : stringto : string
Response type
Type: void
void : void
Possible faults thrown
Fault IOException with type IOExceptionType
Fault-handling install template:
install ( IOException => /* error-handling code */ )
type IOExceptionType: JavaExceptionType
readFile
Operation documentation: Reads some file's content into a Jolie structure
Supported formats (ReadFileRequest.format):
- text (the default)
- base64 (same as binary but afterwards base64-encoded)
- binary
- xml
- xml_store (a type-annotated XML format)
- properties (Java properties file)
- json
Child values: text, base64 and binary only populate the return's base value, the other formats fill in the child values as well.
- xml, xml_store: the XML root node will costitute a return's child value, the rest is filled in recursively
- properties: each property is represented by a child value
- json: each attribute corresponds to a child value, the default values (attribute "$" or singular value) are saved as the base values, nested arrays get mapped with the "_" helper childs (e.g. a[i][j] -> a._[i]._[j]), the rest is filled in recursively
Invocation template:
readFile@File( request )( response )
Request type
Type: ReadFileRequest
type ReadFileRequest: void {
.filename: string
.format?: string {
.skipMixedText?: bool
.charset?: string
}
}
ReadFileRequest : void
filename : stringformat : stringskipMixedText : boolcharset : string
Response type
Type: undefined
undefined : any
Possible faults thrown
Fault FileNotFound with type FileNotFoundType
Fault-handling install template:
install ( FileNotFound => /* error-handling code */ )
type FileNotFoundType: WeakJavaExceptionType
Fault IOException with type IOExceptionType
Fault-handling install template:
install ( IOException => /* error-handling code */ )
type IOExceptionType: JavaExceptionType
exists
Operation documentation: it tests if the specified file or directory exists or not.
Invocation template:
exists@File( request )( response )
Request type
Type: string
string : string
Response type
Type: bool
bool : bool
setMimeTypeFile
Operation documentation: it tests if the specified file or directory exists or not.
Invocation template:
setMimeTypeFile@File( request )( response )
Request type
Type: string
string : string
Response type
Type: void
void : void
Possible faults thrown
Fault IOException with type IOExceptionType
Fault-handling install template:
install ( IOException => /* error-handling code */ )
type IOExceptionType: JavaExceptionType
deleteDir
Operation documentation: it deletes a directory recursively removing all its contents
Invocation template:
deleteDir@File( request )( response )
Request type
Type: string
string : string
Response type
Type: bool
bool : bool
Possible faults thrown
Fault IOException with type IOExceptionType
Fault-handling install template:
install ( IOException => /* error-handling code */ )
type IOExceptionType: JavaExceptionType
getServiceDirectory
Operation documentation: it tests if the specified file or directory exists or not.
Invocation template:
getServiceDirectory@File( request )( response )
Request type
Type: void
void : void
Response type
Type: string
string : string
Possible faults thrown
Fault IOException with type IOExceptionType
Fault-handling install template:
install ( IOException => /* error-handling code */ )
type IOExceptionType: JavaExceptionType
writeFile
Operation documentation: Writes a Jolie structure out to an external file
Supported formats (WriteFileRequest.format):
- text (the default if base value not of type raw)
- binary (the default if base value of type raw)
- xml
- xml_store (a type-annotated XML format)
- json
Child values: text and binary only consider the content's (WriteFileRequest.content) base value, the other formats look at the child values as well.
- xml, xml_store: the XML root node will costitute the content's only child value, the rest gets read out recursively
- json: each child value corresponds to an attribute, the base values are saved as the default values (attribute "$" or singular value), the "_" helper childs disappear (e.g. a._[i]._[j] -> a[i][j]), the rest gets read out recursively
when format is xml and a schema is defined, the resulting xml follows the schema constraints.
Use "@NameSpace" in order to enable root element identification in the schema by specifying the namespace of the root.
Use "@Prefix" for forcing a prefix in an element.
Use "@ForceAttribute" for forcing an attribute in an element even if it is not defined in the corresponding schema
Invocation template:
writeFile@File( request )( response )
Request type
Type: WriteFileRequest
type WriteFileRequest: void {
.filename: string
.format?: string {
.schema*: string
.indent?: bool
.doctype_system?: string
.encoding?: string
}
.content: undefined
.append?: int
}
WriteFileRequest : void
filename : stringformat : stringschema : stringindent : booldoctype_system : stringencoding : string
content : anyappend : int
Response type
Type: void
void : void
Possible faults thrown
Fault FileNotFound with type FileNotFoundType
Fault-handling install template:
install ( FileNotFound => /* error-handling code */ )
type FileNotFoundType: WeakJavaExceptionType
Fault IOException with type IOExceptionType
Fault-handling install template:
install ( IOException => /* error-handling code */ )
type IOExceptionType: JavaExceptionType
mkdir
Operation documentation:
it creates the directory specified in the request root. Returns true if the directory has been created with success, false otherwise
Invocation template:
mkdir@File( request )( response )
Request type
Type: string
string : string
Response type
Type: bool
bool : bool
isDirectory
Operation documentation: it returns if a filename is a directory or not. False if the file does not exist.
Invocation template:
isDirectory@File( request )( response )
Request type
Type: string
string : string
Response type
Type: bool
bool : bool
Possible faults thrown
Fault FileNotFound with type FileNotFoundType
Fault-handling install template:
install ( FileNotFound => /* error-handling code */ )
type FileNotFoundType: WeakJavaExceptionType
Fault IOException with type IOExceptionType
Fault-handling install template:
install ( IOException => /* error-handling code */ )
type IOExceptionType: JavaExceptionType
Subtypes
JavaExceptionType
type JavaExceptionType: string { .stackTrace: string }
WeakJavaExceptionType
type WeakJavaExceptionType: any { .stackTrace?: string }
HTMLUtils
Inclusion code:
| Service Deployment | |||
|---|---|---|---|
| Port Name | Location | Protocol | Interfaces |
| HTMLUtils documentation: | |||
| HTMLUtils | - | - | HTMLUtilsInterface |
List of Available Interfaces
HTMLUtilsInterface
Interface documentation:
| Operation Name | Input Type | Output Type | Faults |
|---|---|---|---|
| escapeHTML | string | string | |
| unescapeHTML | string | string |
Operation Description
escapeHTML
Operation documentation:
Invocation template:
escapeHTML@HTMLUtils( request )( response )
Request type
Type: string
string : string
Response type
Type: string
string : string
unescapeHTML
Operation documentation:
Invocation template:
unescapeHTML@HTMLUtils( request )( response )
Request type
Type: string
string : string
Response type
Type: string
string : string
IniUtils
Inclusion code:
| Service Deployment | |||
|---|---|---|---|
| Port Name | Location | Protocol | Interfaces |
| IniUtils documentation: | |||
| IniUtils | - | - | IniUtilsInterface |
List of Available Interfaces
IniUtilsInterface
Interface documentation:
| Operation Name | Input Type | Output Type | Faults |
|---|---|---|---|
| parseIniFile | parseIniFileRequest | IniData |
Operation Description
parseIniFile
Operation documentation:
Invocation template:
parseIniFile@IniUtils( request )( response )
Request type
Type: parseIniFileRequest
type parseIniFileRequest: string {
.charset?: string
}
parseIniFileRequest : string
charset : string
Response type
Type: IniData
type IniData: undefined
IniData : void
JsonUtils
Inclusion code:
| Service Deployment | |||
|---|---|---|---|
| Port Name | Location | Protocol | Interfaces |
| JsonUtils documentation: | |||
| JsonUtils | - | - | JsonUtilsInterface |
List of Available Interfaces
JsonUtilsInterface
Interface documentation:
| Operation Name | Input Type | Output Type | Faults |
|---|---|---|---|
| getJsonString | GetJsonStringRequest | GetJsonStringResponse | JSONCreationError( undefined ) |
| getJsonValue | GetJsonValueRequest | GetJsonValueResponse | JSONCreationError( undefined ) |
Operation Description
getJsonString
Operation documentation: Returns the value converted into a JSON string
Each child value corresponds to an attribute, the base values are saved as the default values (attribute "$" or singular value), the "_" helper childs disappear (e.g. a._[i]._[j] -> a[i][j]), the rest gets converted recursively
Invocation template:
getJsonString@JsonUtils( request )( response )
Request type
Type: GetJsonStringRequest
type GetJsonStringRequest: undefined
GetJsonStringRequest : any
Response type
Type: GetJsonStringResponse
GetJsonStringResponse : string
Possible faults thrown
Fault JSONCreationError with type undefined
Fault-handling install template:
install ( JSONCreationError => /* error-handling code */ )
getJsonValue
Operation documentation: Returns the JSON string converted into a value
Each attribute corresponds to a child value, the default values (attribute "$" or singular value) are saved as the base values, nested arrays get mapped with the "_" helper childs (e.g. a[i][j] -> a._[i]._[j]), the rest gets converted recursively
Invocation template:
getJsonValue@JsonUtils( request )( response )
Request type
Type: GetJsonValueRequest
type GetJsonValueRequest: any {
.strictEncoding?: bool
.charset?: string
}
GetJsonValueRequest : any
strictEncoding : boolcharset : string
Response type
Type: GetJsonValueResponse
type GetJsonValueResponse: undefined
GetJsonValueResponse : any
Possible faults thrown
Fault JSONCreationError with type undefined
Fault-handling install template:
install ( JSONCreationError => /* error-handling code */ )
Math
Inclusion code:
| Service Deployment | |||
|---|---|---|---|
| Port Name | Location | Protocol | Interfaces |
| Math documentation: | |||
| Math | - | - | MathInterface |
List of Available Interfaces
MathInterface
Interface documentation:
| Operation Name | Input Type | Output Type | Faults |
|---|---|---|---|
| random | void | double | |
| abs | int | int | |
| round | RoundRequestType | double | |
| pi | void | double | |
| pow | PowRequest | double | |
| summation | SummationRequest | int |
Operation Description
random
Operation documentation: Returns a random number d such that 0.0 <= d < 1.0.
Invocation template:
random@Math( request )( response )
Request type
Type: void
void : void
Response type
Type: double
double : double
abs
Operation documentation: Returns the absolute value of the input integer.
Invocation template:
abs@Math( request )( response )
Request type
Type: int
int : int
Response type
Type: int
int : int
round
Operation documentation: Returns the PI constant
Invocation template:
round@Math( request )( response )
Request type
Type: RoundRequestType
type RoundRequestType: double {
.decimals?: int
}
RoundRequestType : double
decimals : int
Response type
Type: double
double : double
pi
Operation documentation: Returns the PI constant
Invocation template:
pi@Math( request )( response )
Request type
Type: void
void : void
Response type
Type: double
double : double
pow
Operation documentation: Returns the result of .base to the power of .exponent (see request data type).
Invocation template:
pow@Math( request )( response )
Request type
Type: PowRequest
type PowRequest: void {
.base: double
.exponent: double
}
PowRequest : void
base : doubleexponent : double
Response type
Type: double
double : double
summation
Operation documentation: Returns the summation of values from .from to .to (see request data type). For example, .from=2 and .to=5 would produce a return value of 2+3+4+5=14.
Invocation template:
summation@Math( request )( response )
Request type
Type: SummationRequest
type SummationRequest: void {
.from: int
.to: int
}
SummationRequest : void
from : intto : int
Response type
Type: int
int : int
MessageDigest
Inclusion code:
| Service Deployment | |||
|---|---|---|---|
| Port Name | Location | Protocol | Interfaces |
| MessageDigest documentation: | |||
| MessageDigest | - | - | MessageDigestInterface |
List of Available Interfaces
MessageDigestInterface
Interface documentation:
| Operation Name | Input Type | Output Type | Faults |
|---|---|---|---|
| md5 | MD5Request | string | UnsupportedOperation( JavaExceptionType ) |
Operation Description
md5
Operation documentation:
Invocation template:
md5@MessageDigest( request )( response )
Request type
Type: MD5Request
type MD5Request: string {
.radix?: int
} | raw {
.radix?: int
}
MD5Request :
: stringradix : int: rawradix : int
Response type
Type: string
string : string
Possible faults thrown
Fault UnsupportedOperation with type JavaExceptionType
Fault-handling install template:
install ( UnsupportedOperation => /* error-handling code */ )
type JavaExceptionType: string {
.stackTrace: string
}
MetaJolie
Inclusion code:
| Service Deployment | |||
|---|---|---|---|
| Port Name | Location | Protocol | Interfaces |
| MetaJolie documentation: | |||
| MetaJolie | - | - | MetaJolieInterface |
List of Available Interfaces
MetaJolieInterface
Interface documentation:
| Operation Name | Input Type | Output Type | Faults |
|---|---|---|---|
| getInputPortMetaData | GetInputPortMetaDataRequest | GetInputPortMetaDataResponse | ParserException( ParserExceptionType ) InputPortMetaDataFault( undefined ) SemanticException( SemanticExceptionType ) |
| getMetaData | GetMetaDataRequest | GetMetaDataResponse | ParserException( ParserExceptionType ) SemanticException( SemanticExceptionType ) |
| messageTypeCast | MessageTypeCastRequest | MessageTypeCastResponse | TypeMismatch( undefined ) |
| checkNativeType | CheckNativeTypeRequest | CheckNativeTypeResponse |
Operation Description
getInputPortMetaData
Operation documentation:
Invocation template:
getInputPortMetaData@MetaJolie( request )( response )
Request type
Type: GetInputPortMetaDataRequest
type GetInputPortMetaDataRequest: void {
.filename: string
.name?: Name
}
GetInputPortMetaDataRequest : void
filename : string: the filename where the service definition isname : void: the absolute name to give to the resource. in this operation only .domain will be used. default .domain = "".
Response type
Type: GetInputPortMetaDataResponse
type GetInputPortMetaDataResponse: void {
.input*: Port
}
GetInputPortMetaDataResponse : void
input : void: the full description of each input port of the service definition
Possible faults thrown
Fault ParserException with type ParserExceptionType
Fault-handling install template:
install ( ParserException => /* error-handling code */ )
type ParserExceptionType: void {
.line: int
.sourceName: string
.message: string
}
Fault InputPortMetaDataFault with type undefined
Fault-handling install template:
install ( InputPortMetaDataFault => /* error-handling code */ )
Fault SemanticException with type SemanticExceptionType
Fault-handling install template:
install ( SemanticException => /* error-handling code */ )
type SemanticExceptionType: void {
.error*: void {
.line: int
.sourceName: string
.message: string
}
}
getMetaData
Operation documentation:
Invocation template:
getMetaData@MetaJolie( request )( response )
Request type
Type: GetMetaDataRequest
type GetMetaDataRequest: void {
.filename: string
.name: Name
}
GetMetaDataRequest : void
filename : string: the filename where the service definition isname : void: the name and the domain name to give to the service
Response type
Type: GetMetaDataResponse
type GetMetaDataResponse: void {
.output*: Port
.input*: Port
.interfaces*: Interface
.types*: Type
.service: Service
.embeddedServices*: void {
.servicepath: string
.type: string
.portId: string
}
}
GetMetaDataResponse : void
output : void: the definitions of all the output portsinput : void: the definitions of all the input portsinterfaces : void: the definitions of all the interfacestypes : void: the definitions of all the typesservice : void: the definition of the serviceembeddedServices : void: the definitions of all the embedded servicesservicepath : string: path where the service can be foundtype : string: type of the embedded serviceportId : string: target output port where the embedded service is bound
Possible faults thrown
Fault ParserException with type ParserExceptionType
Fault-handling install template:
install ( ParserException => /* error-handling code */ )
type ParserExceptionType: void {
.line: int
.sourceName: string
.message: string
}
Fault SemanticException with type SemanticExceptionType
Fault-handling install template:
install ( SemanticException => /* error-handling code */ )
type SemanticExceptionType: void {
.error*: void {
.line: int
.sourceName: string
.message: string
}
}
messageTypeCast
Operation documentation:
Invocation template:
messageTypeCast@MetaJolie( request )( response )
Request type
Type: MessageTypeCastRequest
type MessageTypeCastRequest: void {
.types: void {
.types*: Type
.messageTypeName: Name
}
.message: undefined
}
MessageTypeCastRequest : void
types : void: the types to use for casting the messagetypes : void: list of all the required typesmessageTypeName : void: starting type to user for casting
message : any: the message to be cast
Response type
Type: MessageTypeCastResponse
type MessageTypeCastResponse: void {
.message: undefined
}
MessageTypeCastResponse : void
message : any: casted message
Possible faults thrown
Fault TypeMismatch with type undefined
Fault-handling install template:
install ( TypeMismatch => /* error-handling code */ )
checkNativeType
Operation documentation:
Invocation template:
checkNativeType@MetaJolie( request )( response )
Request type
Type: CheckNativeTypeRequest
type CheckNativeTypeRequest: void {
.type_name: string
}
CheckNativeTypeRequest : void
type_name : string: the type name to check it is native
Response type
Type: CheckNativeTypeResponse
type CheckNativeTypeResponse: void {
.result: bool
}
CheckNativeTypeResponse : void
result : bool
Subtypes
Name
type Name: void { .registry?: string .domain?: string .name: string }
Port
type Port: void { .protocol: string .interfaces*: Interface .name: Name .location: any }
Interface
type Interface: void { .types*: Type .operations*: Operation .name: Name }
Type
type Type: void { .root_type: NativeType .sub_type*: SubType .name: Name }
NativeType
type NativeType: void { .string_type?: bool .void_type?: bool .raw_type?: bool .int_type?: bool .any_type?: bool .link?: void { .domain?: string .name: string } .bool_type?: bool .double_type?: bool .long_type?: bool }
SubType
type SubType: void { .type_inline?: Type .name: string .cardinality: Cardinality .type_link?: Name }
Cardinality
type Cardinality: void { .min: int .max?: int .infinite?: int }
Operation
type Operation: void { .operation_name: string .output?: Name .input: Name .documentation?: any .fault*: Fault }
Fault
type Fault: void { .type_name?: Name .name: Name }
Service
type Service: void { .output*: Name .input*: void { .domain: string .name: string } .name: Name }
MetaParser
Inclusion code:
| Service Deployment | |||
|---|---|---|---|
| Port Name | Location | Protocol | Interfaces |
| Parser documentation: | |||
| Parser | - | - | ParserInterface |
List of Available Interfaces
ParserInterface
Interface documentation:
| Operation Name | Input Type | Output Type | Faults |
|---|---|---|---|
| getSurface | Port | string | |
| getNativeType | NativeType | string | |
| getInterface | Interface | string | |
| getTypeInLine | Type | string | |
| getSurfaceWithoutOutputPort | Port | string | |
| getType | Type | string | |
| getOutputPort | Port | string | |
| getSubType | SubType | string | |
| getInputPort | Port | string | |
| getCardinality | Cardinality | string |
Operation Description
getSurface
Operation documentation:
Invocation template:
getSurface@Parser( request )( response )
Request type
Type: Port
type Port: void {
.protocol: string
.interfaces*: Interface
.name: Name
.location: any
}
Port : void
protocol : stringinterfaces : voidname : voidlocation : any
Response type
Type: string
string : string
getNativeType
Operation documentation:
Invocation template:
getNativeType@Parser( request )( response )
Request type
Type: NativeType
type NativeType: void {
.string_type?: bool
.void_type?: bool
.raw_type?: bool
.int_type?: bool
.any_type?: bool
.link?: void {
.domain?: string
.name: string
}
.bool_type?: bool
.double_type?: bool
.long_type?: bool
}
NativeType : void
string_type : boolvoid_type : boolraw_type : boolint_type : boolany_type : boollink : voiddomain : stringname : string
bool_type : booldouble_type : boollong_type : bool
Response type
Type: string
string : string
getInterface
Operation documentation:
Invocation template:
getInterface@Parser( request )( response )
Request type
Type: Interface
type Interface: void {
.types*: Type
.operations*: Operation
.name: Name
}
Interface : void
types : voidoperations : voidname : void
Response type
Type: string
string : string
getTypeInLine
Operation documentation:
Invocation template:
getTypeInLine@Parser( request )( response )
Request type
Type: Type
type Type: void {
.root_type: NativeType
.sub_type*: SubType
.name: Name
}
Type : void
root_type : voidsub_type : voidname : void
Response type
Type: string
string : string
getSurfaceWithoutOutputPort
Operation documentation:
Invocation template:
getSurfaceWithoutOutputPort@Parser( request )( response )
Request type
Type: Port
type Port: void {
.protocol: string
.interfaces*: Interface
.name: Name
.location: any
}
Port : void
protocol : stringinterfaces : voidname : voidlocation : any
Response type
Type: string
string : string
getType
Operation documentation:
Invocation template:
getType@Parser( request )( response )
Request type
Type: Type
type Type: void {
.root_type: NativeType
.sub_type*: SubType
.name: Name
}
Type : void
root_type : voidsub_type : voidname : void
Response type
Type: string
string : string
getOutputPort
Operation documentation:
Invocation template:
getOutputPort@Parser( request )( response )
Request type
Type: Port
type Port: void {
.protocol: string
.interfaces*: Interface
.name: Name
.location: any
}
Port : void
protocol : stringinterfaces : voidname : voidlocation : any
Response type
Type: string
string : string
getSubType
Operation documentation:
Invocation template:
getSubType@Parser( request )( response )
Request type
Type: SubType
type SubType: void {
.type_inline?: Type
.name: string
.cardinality: Cardinality
.type_link?: Name
}
SubType : void
type_inline : voidname : stringcardinality : voidtype_link : void
Response type
Type: string
string : string
getInputPort
Operation documentation:
Invocation template:
getInputPort@Parser( request )( response )
Request type
Type: Port
type Port: void {
.protocol: string
.interfaces*: Interface
.name: Name
.location: any
}
Port : void
protocol : stringinterfaces : voidname : voidlocation : any
Response type
Type: string
string : string
getCardinality
Operation documentation:
Invocation template:
getCardinality@Parser( request )( response )
Request type
Type: Cardinality
type Cardinality: void {
.min: int
.max?: int
.infinite?: int
}
Cardinality : void
min : intmax : intinfinite : int
Response type
Type: string
string : string
Subtypes
Interface
type Interface: void { .types*: Type .operations*: Operation .name: Name }
Type
type Type: void { .root_type: NativeType .sub_type*: SubType .name: Name }
NativeType
type NativeType: void { .string_type?: bool .void_type?: bool .raw_type?: bool .int_type?: bool .any_type?: bool .link?: void { .domain?: string .name: string } .bool_type?: bool .double_type?: bool .long_type?: bool }
SubType
type SubType: void { .type_inline?: Type .name: string .cardinality: Cardinality .type_link?: Name }
Cardinality
type Cardinality: void { .min: int .max?: int .infinite?: int }
Name
type Name: void { .registry?: string .domain?: string .name: string }
Operation
type Operation: void { .operation_name: string .output?: Name .input: Name .documentation?: any .fault*: Fault }
Fault
type Fault: void { .type_name?: Name .name: Name }
NetworkService
Inclusion code:
| Service Deployment | |||
|---|---|---|---|
| Port Name | Location | Protocol | Interfaces |
| NetworkService documentation: | |||
| NetworkService | - | - | NetworkServiceInterface |
List of Available Interfaces
NetworkServiceInterface
Interface documentation:
| Operation Name | Input Type | Output Type | Faults |
|---|---|---|---|
| getNetworkInterfaceNames | GetNetworkInterfaceNamesRequest | GetNetworkInterfaceNamesResponse | |
| getIPAddresses | GetIPAddressesRequest | GetIPAddressesResponse | InterfaceNotFound( undefined ) |
Operation Description
getNetworkInterfaceNames
Operation documentation:
Invocation template:
getNetworkInterfaceNames@NetworkService( request )( response )
Request type
Type: GetNetworkInterfaceNamesRequest
GetNetworkInterfaceNamesRequest : void
Response type
Type: GetNetworkInterfaceNamesResponse
type GetNetworkInterfaceNamesResponse: void {
.interfaceName*: string {
.displayName: string
}
}
GetNetworkInterfaceNamesResponse : void
interfaceName : stringdisplayName : string
getIPAddresses
Operation documentation:
Invocation template:
getIPAddresses@NetworkService( request )( response )
Request type
Type: GetIPAddressesRequest
type GetIPAddressesRequest: void {
.interfaceName: string
}
GetIPAddressesRequest : void
interfaceName : string
Response type
Type: GetIPAddressesResponse
type GetIPAddressesResponse: void {
.ip4?: string
.ip6?: string
}
GetIPAddressesResponse : void
ip4 : stringip6 : string
Possible faults thrown
Fault InterfaceNotFound with type undefined
Fault-handling install template:
install ( InterfaceNotFound => /* error-handling code */ )
QueueUtils
Inclusion code:
| Service Deployment | |||
|---|---|---|---|
| Port Name | Location | Protocol | Interfaces |
| QueueUtils documentation: | |||
| QueueUtils | - | - | QueueUtilsInterface |
List of Available Interfaces
QueueUtilsInterface
Interface documentation:
| Operation Name | Input Type | Output Type | Faults |
|---|---|---|---|
| size | string | int | |
| poll | string | undefined | |
| new_queue | string | bool | |
| delete_queue | string | bool | |
| push | QueueRequest | bool | |
| peek | string | undefined |
Operation Description
size
Operation documentation: Returns the size of an existing queue, null otherwise
Invocation template:
size@QueueUtils( request )( response )
Request type
Type: string
string : string
Response type
Type: int
int : int
poll
Operation documentation: Removes and returns the head of the queue
Invocation template:
poll@QueueUtils( request )( response )
Request type
Type: string
string : string
Response type
Type: undefined
undefined : any
new_queue
Operation documentation: Creates a new queue with queue_name as key
Invocation template:
new_queue@QueueUtils( request )( response )
Request type
Type: string
string : string
Response type
Type: bool
bool : bool
delete_queue
Operation documentation: Removes an existing queue
Invocation template:
delete_queue@QueueUtils( request )( response )
Request type
Type: string
string : string
Response type
Type: bool
bool : bool
push
Operation documentation: Pushes an element at the end of an existing queue
Invocation template:
push@QueueUtils( request )( response )
Request type
Type: QueueRequest
type QueueRequest: void {
.queue_name: string
.element: undefined
}
QueueRequest : void
queue_name : stringelement : any
Response type
Type: bool
bool : bool
peek
Operation documentation: Retrieves, but does not remove, the head of the queue
Invocation template:
peek@QueueUtils( request )( response )
Request type
Type: string
string : string
Response type
Type: undefined
undefined : any
Reflection
Inclusion code:
| Service Deployment | |||
|---|---|---|---|
| Port Name | Location | Protocol | Interfaces |
| Reflection documentation: | |||
| Reflection | - | - | ReflectionIface |
List of Available Interfaces
ReflectionIface
Interface documentation: WARNING: the API of this service is experimental. Use it at your own risk.
| Operation Name | Input Type | Output Type | Faults |
|---|---|---|---|
| invoke | InvokeRequest | undefined | OperationNotFound( string ) InvocationFault( InvocationFaultType ) |
Operation Description
invoke
Operation documentation: Invokes the specified .operation at .outputPort. If the operation is a OneWay, the invocation returns no value.
Invocation template:
invoke@Reflection( request )( response )
Request type
Type: InvokeRequest
type InvokeRequest: void {
.outputPort: string
.data?: undefined
.resourcePath?: string
.operation: string
}
InvokeRequest : void
outputPort : stringdata : anyresourcePath : stringoperation : string
Response type
Type: undefined
undefined : any
Possible faults thrown
Fault OperationNotFound with type string
Fault-handling install template:
install ( OperationNotFound => /* error-handling code */ )
Fault InvocationFault with type InvocationFaultType
Fault-handling install template:
install ( InvocationFault => /* error-handling code */ )
type InvocationFaultType: void {
.data: string
.name: string
}
Runtime
Inclusion code:
| Service Deployment | |||
|---|---|---|---|
| Port Name | Location | Protocol | Interfaces |
| Runtime documentation: | |||
| Runtime | - | - | RuntimeInterface |
List of Available Interfaces
RuntimeInterface
Interface documentation:
| Operation Name | Input Type | Output Type | Faults |
|---|---|---|---|
| getVersion | void | string | |
| loadLibrary | string | void | IOException( IOExceptionType ) |
| removeOutputPort | string | void | |
| setRedirection | SetRedirectionRequest | void | RuntimeException( RuntimeExceptionType ) |
| getOutputPorts | void | GetOutputPortsResponse | |
| loadEmbeddedService | LoadEmbeddedServiceRequest | any | RuntimeException( RuntimeExceptionType ) |
| getOutputPort | GetOutputPortRequest | GetOutputPortResponse | OutputPortDoesNotExist( undefined ) |
| dumpState | void | string | |
| getLocalLocation | void | any | |
| getRedirection | GetRedirectionRequest | MaybeString | |
| setOutputPort | SetOutputPortRequest | void | |
| halt | HaltRequest | void | |
| callExit | any | void | |
| stats | void | Stats | |
| removeRedirection | GetRedirectionRequest | void | RuntimeException( RuntimeExceptionType ) |
| setMonitor | SetMonitorRequest | void | |
| getProcessId | void | string | |
| getIncludePaths | void | GetIncludePathResponse | |
| getenv | string | MaybeString |
Operation Description
getVersion
Operation documentation: Returns the version of the Jolie interpreter running this service.
Invocation template:
getVersion@Runtime( request )( response )
Request type
Type: void
void : void
Response type
Type: string
string : string
loadLibrary
Operation documentation: Dynamically loads an external (jar) library.
Invocation template:
loadLibrary@Runtime( request )( response )
Request type
Type: string
string : string
Response type
Type: void
void : void
Possible faults thrown
Fault IOException with type IOExceptionType
Fault-handling install template:
install ( IOException => /* error-handling code */ )
type IOExceptionType: JavaExceptionType
removeOutputPort
Operation documentation: Removes the output port with the requested name.
Invocation template:
removeOutputPort@Runtime( request )( response )
Request type
Type: string
string : string
Response type
Type: void
void : void
setRedirection
Operation documentation: Set a redirection at an input port. If the redirection with this name does not exist already, this operation creates it. Otherwise, the redirection is replaced with this one.
Invocation template:
setRedirection@Runtime( request )( response )
Request type
Type: SetRedirectionRequest
type SetRedirectionRequest: void {
.inputPortName: string
.outputPortName: string
.resourceName: string
}
SetRedirectionRequest : void
inputPortName : string: The target input portoutputPortName : string: The target output portresourceName : string: The target resource name
Response type
Type: void
void : void
Possible faults thrown
Fault RuntimeException with type RuntimeExceptionType
Fault-handling install template:
install ( RuntimeException => /* error-handling code */ )
type RuntimeExceptionType: JavaExceptionType
getOutputPorts
Operation documentation: Returns all the output ports used by this service.
Invocation template:
getOutputPorts@Runtime( request )( response )
Request type
Type: void
void : void
Response type
Type: GetOutputPortsResponse
type GetOutputPortsResponse: void {
.port*: void {
.protocol: string
.name: string
.location: string
}
}
GetOutputPortsResponse : void
port : void: The output ports used by this interpreterprotocol : string: The protocol name of the output portname : string: The name of the output portlocation : string: The location of the output port
loadEmbeddedService
Operation documentation: Load an embedded service.
Invocation template:
loadEmbeddedService@Runtime( request )( response )
Request type
Type: LoadEmbeddedServiceRequest
type LoadEmbeddedServiceRequest: void {
.filepath: string
.type: string
}
LoadEmbeddedServiceRequest : void
filepath : string: The path to the service to loadtype : string: The type of the service, e.g., Jolie, Java, or JavaScript
Response type
Type: any
any : any
Possible faults thrown
Fault RuntimeException with type RuntimeExceptionType
Fault-handling install template:
install ( RuntimeException => /* error-handling code */ )
type RuntimeExceptionType: JavaExceptionType
getOutputPort
Operation documentation: Returns the definition of output port definition. @throws OutputPortDoesNotExist if the requested output port does not exist.
Invocation template:
getOutputPort@Runtime( request )( response )
Request type
Type: GetOutputPortRequest
type GetOutputPortRequest: void {
.name: string
}
GetOutputPortRequest : void
name : string: The name of the output port
Response type
Type: GetOutputPortResponse
type GetOutputPortResponse: void {
.protocol: string
.name: string
.location: string
}
GetOutputPortResponse : void
protocol : string: The protocol name of the output portname : string: The name of the output portlocation : string: The location of the output port
Possible faults thrown
Fault OutputPortDoesNotExist with type undefined
Fault-handling install template:
install ( OutputPortDoesNotExist => /* error-handling code */ )
dumpState
Operation documentation: Returns a pretty-printed string representation of the local state of the invoking Jolie process and the global state of this service.
Invocation template:
dumpState@Runtime( request )( response )
Request type
Type: void
void : void
Response type
Type: string
string : string
getLocalLocation
Operation documentation: Get the local in-memory location of this service.
Invocation template:
getLocalLocation@Runtime( request )( response )
Request type
Type: void
void : void
Response type
Type: any
any : any
getRedirection
Operation documentation: Get the output port name that a redirection points to.
Invocation template:
getRedirection@Runtime( request )( response )
Request type
Type: GetRedirectionRequest
type GetRedirectionRequest: void {
.inputPortName: string
.resourceName: string
}
GetRedirectionRequest : void
inputPortName : string: The target input portresourceName : string: The resource name of the redirection to get
Response type
Type: MaybeString
type MaybeString: void | string
MaybeString :
: void: string
setOutputPort
Operation documentation: Set an output port. If an output port with this name does not exist already, this operation creates it. Otherwise, the output port is replaced with this one.
Invocation template:
setOutputPort@Runtime( request )( response )
Request type
Type: SetOutputPortRequest
type SetOutputPortRequest: void {
.protocol?: undefined
.name: string
.location: any
}
SetOutputPortRequest : void
protocol : string: The name of the protocol (e.g., sodep, http)name : string: The name of the output portlocation : any: The location of the output port
Response type
Type: void
void : void
halt
Operation documentation: Halts non-gracefully the execution of this service.
Invocation template:
halt@Runtime( request )( response )
Request type
Type: HaltRequest
type HaltRequest: void {
.status?: int
}
HaltRequest : void
status : int: The status code to return to the execution environment
Response type
Type: void
void : void
callExit
Operation documentation: Stops gracefully the execution of this service. Calling this operation is equivalent to invoking the exit statement.
Invocation template:
callExit@Runtime( request )( response )
Request type
Type: any
any : any
Response type
Type: void
void : void
stats
Operation documentation: Returns information on the runtime state of the VM.
Invocation template:
stats@Runtime( request )( response )
Request type
Type: void
void : void
Response type
Type: Stats
type Stats: void {
.os: void {
.availableProcessors: int
.systemLoadAverage: double
.name: string
.arch: string
.version: string
}
.files: void {
.openCount?: long
.maxCount?: long
}
}
Stats : void : Information on the interpreter execution so far
os : void: OS-related informationavailableProcessors : int: Number of available processorssystemLoadAverage : double: System load averagename : string: Name of the OSarch : string: Architectureversion : string: OS version
files : void: Information on file descriptorsopenCount : long: Number of open filesmaxCount : long: Maximum number of open files allowed for this VM
removeRedirection
Operation documentation: Remove a redirection at an input port
Invocation template:
removeRedirection@Runtime( request )( response )
Request type
Type: GetRedirectionRequest
type GetRedirectionRequest: void {
.inputPortName: string
.resourceName: string
}
GetRedirectionRequest : void
inputPortName : string: The target input portresourceName : string: The resource name of the redirection to get
Response type
Type: void
void : void
Possible faults thrown
Fault RuntimeException with type RuntimeExceptionType
Fault-handling install template:
install ( RuntimeException => /* error-handling code */ )
type RuntimeExceptionType: JavaExceptionType
setMonitor
Operation documentation: Set the monitor for this service.
Invocation template:
setMonitor@Runtime( request )( response )
Request type
Type: SetMonitorRequest
type SetMonitorRequest: void {
.protocol?: undefined
.location: any
}
SetMonitorRequest : void
protocol : string: The protocol configuration for the monitorlocation : any: The location of the monitor
Response type
Type: void
void : void
getProcessId
Operation documentation: Returns the internal identifier of the executing Jolie process.
Invocation template:
getProcessId@Runtime( request )( response )
Request type
Type: void
void : void
Response type
Type: string
string : string
getIncludePaths
Operation documentation: Get the include paths used by this interpreter
Invocation template:
getIncludePaths@Runtime( request )( response )
Request type
Type: void
void : void
Response type
Type: GetIncludePathResponse
type GetIncludePathResponse: void {
.path*: string
}
GetIncludePathResponse : void
path : string: The include paths of the interpreter
getenv
Operation documentation: Returns the value of an environment variable.
Invocation template:
getenv@Runtime( request )( response )
Request type
Type: string
string : string
Response type
Type: MaybeString
type MaybeString: void | string
MaybeString :
: void: string
Subtypes
JavaExceptionType
type JavaExceptionType: string { .stackTrace: string }
Scheduler
Inclusion code:
| Service Deployment | |||
|---|---|---|---|
| Port Name | Location | Protocol | Interfaces |
| Scheduler documentation: | |||
| Scheduler | - | - | SchedulerInterface |
List of Available Interfaces
SchedulerInterface
Interface documentation:
| Operation Name | Input Type | Output Type | Faults |
|---|---|---|---|
| setCronJob | SetCronJobRequest | void | JobAlreadyExists( void ) |
| deleteCronJob | DeleteCronJobRequest | void | |
| setCallbackOperation | SetCallBackOperationRequest | - |
Operation Description
setCronJob
Operation documentation:
Invocation template:
setCronJob@Scheduler( request )( response )
Request type
Type: SetCronJobRequest
type SetCronJobRequest: void {
.jobName: string
.cronSpecs: void {
.dayOfWeek: string
.hour: string
.month: string
.dayOfMonth: string
.year?: string
.second: string
.minute: string
}
.groupName: string
}
SetCronJobRequest : void
jobName : stringcronSpecs : voiddayOfWeek : stringhour : stringmonth : stringdayOfMonth : stringyear : stringsecond : stringminute : string
groupName : string
Response type
Type: void
void : void
Possible faults thrown
Fault JobAlreadyExists with type void
Fault-handling install template:
install ( JobAlreadyExists => /* error-handling code */ )
deleteCronJob
Operation documentation:
Invocation template:
deleteCronJob@Scheduler( request )( response )
Request type
Type: DeleteCronJobRequest
type DeleteCronJobRequest: void {
.jobName: string
.groupName: string
}
DeleteCronJobRequest : void
jobName : stringgroupName : string
Response type
Type: void
void : void
setCallbackOperation
Operation documentation:
Invocation template:
setCallbackOperation@Scheduler( request )
Request type
Type: SetCallBackOperationRequest
type SetCallBackOperationRequest: void {
.operationName: string
}
SetCallBackOperationRequest : void
operationName : string
SecurityUtils
Inclusion code:
| Service Deployment | |||
|---|---|---|---|
| Port Name | Location | Protocol | Interfaces |
| SecurityUtils documentation: | |||
| SecurityUtils | - | - | SecurityUtilsInterface |
List of Available Interfaces
SecurityUtilsInterface
Interface documentation:
| Operation Name | Input Type | Output Type | Faults |
|---|---|---|---|
| secureRandom | SecureRandomRequest | raw | |
| createSecureToken | void | string |
Operation Description
secureRandom
Operation documentation:
Invocation template:
secureRandom@SecurityUtils( request )( response )
Request type
Type: SecureRandomRequest
type SecureRandomRequest: void {
.size: int
}
SecureRandomRequest : void
size : int
Response type
Type: raw
raw : raw
createSecureToken
Operation documentation:
Invocation template:
createSecureToken@SecurityUtils( request )( response )
Request type
Type: void
void : void
Response type
Type: string
string : string
SemaphoreUtils
Inclusion code:
| Service Deployment | |||
|---|---|---|---|
| Port Name | Location | Protocol | Interfaces |
| SemaphoreUtils documentation: | |||
| SemaphoreUtils | - | - | SemaphoreUtilsInterface |
List of Available Interfaces
SemaphoreUtilsInterface
Interface documentation:
| Operation Name | Input Type | Output Type | Faults |
|---|---|---|---|
| release | SemaphoreRequest | bool | |
| acquire | SemaphoreRequest | bool |
Operation Description
release
Operation documentation: Releases permits to a semaphore. If there exists no semaphore with the given ".name", "release" creates a new semaphore with that name and as many permits as indicated in ".permits". The default behaviour when value ".permits" is absent is to release one permit.
Invocation template:
release@SemaphoreUtils( request )( response )
Request type
Type: SemaphoreRequest
type SemaphoreRequest: void {
.permits?: int
.name: string
}
SemaphoreRequest : void
permits : int: the optional number of permits to release/acquirename : string
Response type
Type: bool
bool : bool
acquire
Operation documentation: Acquires permits from a semaphore. If there exists no semaphore with the given ".name", "acquire" creates a new semaphore with 0 permits with that name. The operation returns a response when a new permit is released (see operation "release"). The default behaviour when value ".permits" is absent is to acquire one permit.
Invocation template:
acquire@SemaphoreUtils( request )( response )
Request type
Type: SemaphoreRequest
type SemaphoreRequest: void {
.permits?: int
.name: string
}
SemaphoreRequest : void
permits : int: the optional number of permits to release/acquirename : string
Response type
Type: bool
bool : bool
SMTP
Inclusion code:
| Service Deployment | |||
|---|---|---|---|
| Port Name | Location | Protocol | Interfaces |
| SMTP documentation: | |||
| SMTP | - | - | SMTPInterface |
List of Available Interfaces
SMTPInterface
Interface documentation:
| Operation Name | Input Type | Output Type | Faults |
|---|---|---|---|
| sendMail | SendMailRequest | void | SMTPFault( undefined ) |
Operation Description
sendMail
Operation documentation:
Invocation template:
sendMail@SMTP( request )( response )
Request type
Type: SendMailRequest
type SendMailRequest: void {
.cc*: string
.authenticate?: void {
.password: string
.username: string
}
.bcc*: string
.attachment*: void {
.filename: string
.contentType: string
.content: raw
}
.subject: string
.host: string
.replyTo*: string
.from: string
.to[1,2147483647]: string
.contentType?: string
.content: string
}
SendMailRequest : void
cc : stringauthenticate : voidpassword : stringusername : string
bcc : stringattachment : voidfilename : stringcontentType : stringcontent : raw
subject : stringhost : stringreplyTo : stringfrom : stringto : stringcontentType : stringcontent : string
Response type
Type: void
void : void
Possible faults thrown
Fault SMTPFault with type undefined
Fault-handling install template:
install ( SMTPFault => /* error-handling code */ )
StandardMonitor
Inclusion code:
| Service Deployment | |||
|---|---|---|---|
| Port Name | Location | Protocol | Interfaces |
| MonitorInput | local | - | StandardMonitorInputInterface |
| Monitor documentation: | |||
| Monitor | - | - | MonitorInterfaceStandardMonitorInterface |
List of Available Interfaces
StandardMonitorInputInterface
Interface documentation:
| Operation Name | Input Type | Output Type | Faults |
|---|---|---|---|
| monitorAlert | void | - |
Operation Description
monitorAlert
Operation documentation:
Invocation template:
monitorAlert( request )
Request type
Type: void
void : void
MonitorInterface
Interface documentation:
| Operation Name | Input Type | Output Type | Faults |
|---|---|---|---|
| pushEvent | undefined | - |
Operation Description
pushEvent
Operation documentation:
Invocation template:
pushEvent@Monitor( request )
Request type
Type: undefined
undefined : any
Subtypes
MonitorEvent
type MonitorEvent: void {
.memory: long
.data?: undefined
.type: string
.timestamp: long
}
MonitorEvent : void
StandardMonitorInterface
Interface documentation:
| Operation Name | Input Type | Output Type | Faults |
|---|---|---|---|
| flush | void | FlushResponse | |
| setMonitor | SetStandardMonitorRequest | void |
Operation Description
flush
Operation documentation: Invocation template:
flush@Monitor( request )( response )
Request type
Type: void
void : void
Response type
Type: FlushResponse
type FlushResponse: void {
.events*: MonitorEvent
}
FlushResponse : void
events : void
setMonitor
Operation documentation:
Invocation template:
setMonitor@Monitor( request )( response )
Request type
Type: SetStandardMonitorRequest
type SetStandardMonitorRequest: void {
.queueMax?: int
.triggeredEnabled?: bool
.triggerThreshold?: int
}
SetStandardMonitorRequest : void
queueMax : inttriggeredEnabled : booltriggerThreshold : int
Response type
Type: void
void : void
Subtypes
MonitorEvent
type MonitorEvent: void { .memory: long .data?: undefined .type: string .timestamp: long }
StringUtils
Inclusion file:
include "string_utils.iol" from string_utils import StringUtils
Inclusion code:
| Service Deployment | |||
|---|---|---|---|
| Port Name | Location | Protocol | Interfaces |
| StringUtils documentation: | |||
| StringUtils | - | - | StringUtilsInterface |
List of Available Interfaces
StringUtilsInterface
Interface documentation: An interface for supporting string manipulation operations.
| Operation Name | Input Type | Output Type | Faults |
|---|---|---|---|
| leftPad | PadRequest | string | |
| valueToPrettyString | undefined | string | |
| toLowerCase | string | string | |
| length | string | int | |
| match | MatchRequest | MatchResult | |
| replaceFirst | ReplaceRequest | string | |
| sort | StringItemList | StringItemList | |
| replaceAll | ReplaceRequest | string | |
| substring | SubStringRequest | string | |
| getRandomUUID | void | string | |
| rightPad | PadRequest | string | |
| contains | ContainsRequest | bool | |
| split | SplitRequest | SplitResult | |
| splitByLength | SplitByLengthRequest | SplitResult | |
| trim | string | string | |
| find | MatchRequest | MatchResult | |
| endsWith | EndsWithRequest | bool | |
| toUpperCase | string | string | |
| join | JoinRequest | string | |
| indexOf | IndexOfRequest | IndexOfResponse | |
| startsWith | StartsWithRequest | bool |
Operation Description
leftPad
Operation documentation: Returns true if the string contains .substring
Invocation template:
leftPad@StringUtils( request )( response )
Request type
Type: PadRequest
type PadRequest: string {
.length: int
.char: string
}
PadRequest : string
length : intchar : string
Response type
Type: string
string : string
valueToPrettyString
Operation documentation: take a custom data type / simple type and return it's literal indented representation (string)
Invocation template:
valueToPrettyString@StringUtils( request )( response )
Request type
Type: undefined
undefined : any
Response type
Type: string
string : string
toLowerCase
Operation documentation: Returns true if the string contains .substring
Invocation template:
toLowerCase@StringUtils( request )( response )
Request type
Type: string
string : string
Response type
Type: string
string : string
length
Operation documentation: Returns true if the string contains .substring
Invocation template:
length@StringUtils( request )( response )
Request type
Type: string
string : string
Response type
Type: int
int : int
match
Operation documentation: Returns true if the string contains .substring
Invocation template:
match@StringUtils( request )( response )
Request type
Type: MatchRequest
type MatchRequest: string {
.regex: string
}
MatchRequest : string
regex : string
Response type
Type: MatchResult
type MatchResult: int {
.group*: string
}
MatchResult : int
group : string
replaceFirst
Operation documentation: Returns true if the string contains .substring
Invocation template:
replaceFirst@StringUtils( request )( response )
Request type
Type: ReplaceRequest
type ReplaceRequest: string {
.regex: string
.replacement: string
}
ReplaceRequest : string
regex : stringreplacement : string
Response type
Type: string
string : string
sort
Operation documentation: Returns true if the string contains .substring
Invocation template:
sort@StringUtils( request )( response )
Request type
Type: StringItemList
type StringItemList: void {
.item*: string
}
StringItemList : void
item : string
Response type
Type: StringItemList
type StringItemList: void {
.item*: string
}
StringItemList : void
item : string
replaceAll
Operation documentation: Returns true if the string contains .substring
Invocation template:
replaceAll@StringUtils( request )( response )
Request type
Type: ReplaceRequest
type ReplaceRequest: string {
.regex: string
.replacement: string
}
ReplaceRequest : string
regex : stringreplacement : string
Response type
Type: string
string : string
substring
Operation documentation: Returns true if the string contains .substring
Invocation template:
substring@StringUtils( request )( response )
Request type
Type: SubStringRequest
type SubStringRequest: string {
.end: int
.begin: int
}
SubStringRequest : string
end : intbegin : int
Response type
Type: string
string : string
getRandomUUID
Operation documentation: it returns a random UUID
Invocation template:
getRandomUUID@StringUtils( request )( response )
Request type
Type: void
void : void
Response type
Type: string
string : string
rightPad
Operation documentation: Returns true if the string contains .substring
Invocation template:
rightPad@StringUtils( request )( response )
Request type
Type: PadRequest
type PadRequest: string {
.length: int
.char: string
}
PadRequest : string
length : intchar : string
Response type
Type: string
string : string
contains
Operation documentation: Returns true if the string contains .substring
Invocation template:
contains@StringUtils( request )( response )
Request type
Type: ContainsRequest
type ContainsRequest: string {
.substring: string
}
ContainsRequest : string
substring : string
Response type
Type: bool
bool : bool
split
Operation documentation: Returns true if the string contains .substring
Invocation template:
split@StringUtils( request )( response )
Request type
Type: SplitRequest
type SplitRequest: string {
.regex: string
.limit?: int
}
SplitRequest : string
regex : stringlimit : int
Response type
Type: SplitResult
type SplitResult: void {
.result*: string
}
SplitResult : void
result : string
splitByLength
Operation documentation: Returns true if the string contains .substring
Invocation template:
splitByLength@StringUtils( request )( response )
Request type
Type: SplitByLengthRequest
type SplitByLengthRequest: string {
.length: int
}
SplitByLengthRequest : string
length : int
Response type
Type: SplitResult
type SplitResult: void {
.result*: string
}
SplitResult : void
result : string
trim
Operation documentation: Returns true if the string contains .substring
Invocation template:
trim@StringUtils( request )( response )
Request type
Type: string
string : string
Response type
Type: string
string : string
find
Operation documentation: Returns true if the string contains .substring
Invocation template:
find@StringUtils( request )( response )
Request type
Type: MatchRequest
type MatchRequest: string {
.regex: string
}
MatchRequest : string
regex : string
Response type
Type: MatchResult
type MatchResult: int {
.group*: string
}
MatchResult : int
group : string
endsWith
Operation documentation: checks if a string ends with a given suffix
Invocation template:
endsWith@StringUtils( request )( response )
Request type
Type: EndsWithRequest
type EndsWithRequest: string {
.suffix: string
}
EndsWithRequest : string
suffix : string
Response type
Type: bool
bool : bool
toUpperCase
Operation documentation: Returns true if the string contains .substring
Invocation template:
toUpperCase@StringUtils( request )( response )
Request type
Type: string
string : string
Response type
Type: string
string : string
join
Operation documentation: Returns true if the string contains .substring
Invocation template:
join@StringUtils( request )( response )
Request type
Type: JoinRequest
type JoinRequest: void {
.piece*: string
.delimiter: string
}
JoinRequest : void
piece : stringdelimiter : string
Response type
Type: string
string : string
indexOf
Operation documentation: Returns true if the string contains .substring
Invocation template:
indexOf@StringUtils( request )( response )
Request type
Type: IndexOfRequest
type IndexOfRequest: string {
.word: string
}
IndexOfRequest : string
word : string
Response type
Type: IndexOfResponse
IndexOfResponse : int
startsWith
Operation documentation: checks if the passed string starts with a given prefix
Invocation template:
startsWith@StringUtils( request )( response )
Request type
Type: StartsWithRequest
type StartsWithRequest: string {
.prefix: string
}
StartsWithRequest : string
prefix : string
Response type
Type: bool
bool : bool
SwingUI
Inclusion code:
| Service Deployment | |||
|---|---|---|---|
| Port Name | Location | Protocol | Interfaces |
| SwingUI documentation: | |||
| SwingUI | - | - | UserInterface |
List of Available Interfaces
UserInterface
Interface documentation:
| Operation Name | Input Type | Output Type | Faults |
|---|---|---|---|
| showMessageDialog | string | void | |
| showYesNoQuestionDialog | string | int | |
| showInputDialog | string | string |
Operation Description
showMessageDialog
Operation documentation:
Invocation template:
showMessageDialog@SwingUI( request )( response )
Request type
Type: string
string : string
Response type
Type: void
void : void
showYesNoQuestionDialog
Operation documentation:
Invocation template:
showYesNoQuestionDialog@SwingUI( request )( response )
Request type
Type: string
string : string
Response type
Type: int
int : int
showInputDialog
Operation documentation:
Invocation template:
showInputDialog@SwingUI( request )( response )
Request type
Type: string
string : string
Response type
Type: string
string : string
Time
Inclusion code:
| Service Deployment | |||
|---|---|---|---|
| Port Name | Location | Protocol | Interfaces |
| Time documentation: | |||
| Time | - | - | TimeInterface |
List of Available Interfaces
TimeInterface
Interface documentation:
| Operation Name | Input Type | Output Type | Faults |
|---|---|---|---|
| scheduleTimeout | ScheduleTimeOutRequest | long | InvalidTimeUnit( undefined ) |
| getDateValues | DateValuesRequestType | DateValuesType | InvalidDate( undefined ) |
| getDateTime | GetDateTimeRequest | GetDateTimeResponse | |
| getCurrentTimeMillis | void | long | |
| getDateDiff | DiffDateRequestType | int | |
| getTimeDiff | GetTimeDiffRequest | int | |
| getTimestampFromString | GetTimestampFromStringRequest | long | InvalidTimestamp( undefined ) |
| cancelTimeout | long | bool | |
| setNextTimeoutByTime | undefined | - | |
| getCurrentDateTime | CurrentDateTimeRequestType | string | |
| sleep | undefined | undefined | |
| setNextTimeout | SetNextTimeOutRequest | - | |
| getTimeFromMilliSeconds | int | TimeValuesType | |
| getDateTimeValues | GetTimestampFromStringRequest | DateTimeType | InvalidDate( undefined ) |
| setNextTimeoutByDateTime | undefined | - | |
| getCurrentDateValues | void | DateValuesType | |
| getTimeValues | string | TimeValuesType |
Operation Description
scheduleTimeout
Operation documentation: Schedules a timeout, which can be cancelled using #cancelTimeout from the returned string. Default .timeunit value is MILLISECONDS, .operation default is "timeout".
Invocation template:
scheduleTimeout@Time( request )( response )
Request type
Type: ScheduleTimeOutRequest
type ScheduleTimeOutRequest: int {
.message?: undefined
.operation?: string
.timeunit?: string
}
ScheduleTimeOutRequest : int
message : anyoperation : stringtimeunit : string
Response type
Type: long
long : long
Possible faults thrown
Fault InvalidTimeUnit with type undefined
Fault-handling install template:
install ( InvalidTimeUnit => /* error-handling code */ )
getDateValues
Operation documentation: Converts an input string into a date expressed by means of three elements: day, month and year. The request may specify the date parsing format. See #DateValuesRequestType for details.
Invocation template:
getDateValues@Time( request )( response )
Request type
Type: DateValuesRequestType
type DateValuesRequestType: string {
.format?: string
}
DateValuesRequestType : string
format : string
Response type
Type: DateValuesType
type DateValuesType: void {
.month: int
.year: int
.day: int
}
DateValuesType : void : WARNING: work in progress, the API is unstable.
month : intyear : intday : int
Possible faults thrown
Fault InvalidDate with type undefined
Fault-handling install template:
install ( InvalidDate => /* error-handling code */ )
getDateTime
Operation documentation: It returns a date time in a string format starting from a timestamp
Invocation template:
getDateTime@Time( request )( response )
Request type
Type: GetDateTimeRequest
type GetDateTimeRequest: long {
.format?: string
}
GetDateTimeRequest : long
format : string
Response type
Type: GetDateTimeResponse
type GetDateTimeResponse: string {
.month: int
.hour: int
.year: int
.day: int
.minute: int
.second: int
}
GetDateTimeResponse : string
month : inthour : intyear : intday : intminute : intsecond : int
getCurrentTimeMillis
Operation documentation: Warning: this is temporary and subject to future change as soon as long is supported by Jolie.
Invocation template:
getCurrentTimeMillis@Time( request )( response )
Request type
Type: void
void : void
Response type
Type: long
long : long
getDateDiff
Operation documentation: Returns the current date split in three fields: day, month and year
Invocation template:
getDateDiff@Time( request )( response )
Request type
Type: DiffDateRequestType
type DiffDateRequestType: void {
.format?: string
.date2: string
.date1: string
}
DiffDateRequestType : void
format : stringdate2 : stringdate1 : string
Response type
Type: int
int : int
getTimeDiff
Operation documentation: Warning: this is temporary and subject to future change as soon as long is supported by Jolie.
Invocation template:
getTimeDiff@Time( request )( response )
Request type
Type: GetTimeDiffRequest
type GetTimeDiffRequest: void {
.time1: string
.time2: string
}
GetTimeDiffRequest : void
time1 : stringtime2 : string
Response type
Type: int
int : int
getTimestampFromString
Operation documentation: Warning: this is temporary and subject to future change as soon as long is supported by Jolie.
Invocation template:
getTimestampFromString@Time( request )( response )
Request type
Type: GetTimestampFromStringRequest
type GetTimestampFromStringRequest: string {
.format?: string
.language?: string
}
GetTimestampFromStringRequest : string
format : stringlanguage : string
Response type
Type: long
long : long
Possible faults thrown
Fault InvalidTimestamp with type undefined
Fault-handling install template:
install ( InvalidTimestamp => /* error-handling code */ )
cancelTimeout
Operation documentation: Cancels a timeout from a long-value created from #scheduleTimeout
Invocation template:
cancelTimeout@Time( request )( response )
Request type
Type: long
long : long
Response type
Type: bool
bool : bool
setNextTimeoutByTime
Operation documentation: it sets a timeout whose duration is in milliseconds and it is represented by the root value of the message When the alarm is triggered a message whose content is defined in .message is sent to operation defined in .operation ( default: timeout )
Invocation template:
setNextTimeoutByTime@Time( request )
Request type
Type: undefined
undefined : any
getCurrentDateTime
Operation documentation:
Invocation template:
getCurrentDateTime@Time( request )( response )
Request type
Type: CurrentDateTimeRequestType
type CurrentDateTimeRequestType: void {
.format?: string
}
CurrentDateTimeRequestType : void
format : string
Response type
Type: string
string : string
sleep
Operation documentation:
Invocation template:
sleep@Time( request )( response )
Request type
Type: undefined
undefined : any
Response type
Type: undefined
undefined : any
setNextTimeout
Operation documentation: it sets a timeout whose duration is in milliseconds and it is represented by the root value of the message When the alarm is triggered a message whose content is defined in .message is sent to operation defined in .operation ( default: timeout )
Invocation template:
setNextTimeout@Time( request )
Request type
Type: SetNextTimeOutRequest
type SetNextTimeOutRequest: int {
.message?: undefined
.operation?: string
}
SetNextTimeOutRequest : int
message : anyoperation : string
getTimeFromMilliSeconds
Operation documentation: Warning: this is temporary and subject to future change as soon as long is supported by Jolie.
Invocation template:
getTimeFromMilliSeconds@Time( request )( response )
Request type
Type: int
int : int
Response type
Type: TimeValuesType
type TimeValuesType: void {
.hour: int
.minute: int
.second: int
}
TimeValuesType : void
hour : intminute : intsecond : int
getDateTimeValues
Operation documentation: Warning: this is temporary and subject to future change as soon as long is supported by Jolie.
Invocation template:
getDateTimeValues@Time( request )( response )
Request type
Type: GetTimestampFromStringRequest
type GetTimestampFromStringRequest: string {
.format?: string
.language?: string
}
GetTimestampFromStringRequest : string
format : stringlanguage : string
Response type
Type: DateTimeType
type DateTimeType: void {
.month: int
.hour: int
.year: int
.day: int
.minute: int
.second: int
}
DateTimeType : void
month : inthour : intyear : intday : intminute : intsecond : int
Possible faults thrown
Fault InvalidDate with type undefined
Fault-handling install template:
install ( InvalidDate => /* error-handling code */ )
setNextTimeoutByDateTime
Operation documentation: it sets a timeout whose duration is in milliseconds and it is represented by the root value of the message When the alarm is triggered a message whose content is defined in .message is sent to operation defined in .operation ( default: timeout )
Invocation template:
setNextTimeoutByDateTime@Time( request )
Request type
Type: undefined
undefined : any
getCurrentDateValues
Operation documentation: Returns the current date split in three fields: day, month and year
Invocation template:
getCurrentDateValues@Time( request )( response )
Request type
Type: void
void : void
Response type
Type: DateValuesType
type DateValuesType: void {
.month: int
.year: int
.day: int
}
DateValuesType : void : WARNING: work in progress, the API is unstable.
month : intyear : intday : int
getTimeValues
Operation documentation: Warning: this is temporary and subject to future change as soon as long is supported by Jolie.
Invocation template:
getTimeValues@Time( request )( response )
Request type
Type: string
string : string
Response type
Type: TimeValuesType
type TimeValuesType: void {
.hour: int
.minute: int
.second: int
}
TimeValuesType : void
hour : intminute : intsecond : int
UriTemplates
Inclusion code:
| Service Deployment | |||
|---|---|---|---|
| Port Name | Location | Protocol | Interfaces |
| UriTemplates documentation: | |||
| UriTemplates | - | - | UriTemplatesIface |
List of Available Interfaces
UriTemplatesIface
Interface documentation: WARNING: the API of this service is experimental. Use it at your own risk.
| Operation Name | Input Type | Output Type | Faults |
|---|---|---|---|
| expand | ExpandRequest | string | |
| match | UriMatchRequest | MatchResponse |
Operation Description
expand
Operation documentation:
Invocation template:
expand@UriTemplates( request )( response )
Request type
Type: ExpandRequest
type ExpandRequest: void {
.template: string
.params?: undefined
}
ExpandRequest : void
template : stringparams : any
Response type
Type: string
string : string
match
Operation documentation:
Invocation template:
match@UriTemplates( request )( response )
Request type
Type: UriMatchRequest
type UriMatchRequest: void {
.template: string
.uri: string
}
UriMatchRequest : void
template : stringuri : string
Response type
Type: MatchResponse
type MatchResponse: undefined
MatchResponse : bool
WebServicesUtils
Inclusion code:
| Service Deployment | |||
|---|---|---|---|
| Port Name | Location | Protocol | Interfaces |
| WebServicesUtils documentation: | |||
| WebServicesUtils | - | - | WebServicesUtilsInterface |
List of Available Interfaces
WebServicesUtilsInterface
Interface documentation:
| Operation Name | Input Type | Output Type | Faults |
|---|---|---|---|
| wsdlToJolie | string | string | IOException( IOExceptionType ) |
Operation Description
wsdlToJolie
Operation documentation:
Invocation template:
wsdlToJolie@WebServicesUtils( request )( response )
Request type
Type: string
string : string
Response type
Type: string
string : string
Possible faults thrown
Fault IOException with type IOExceptionType
Fault-handling install template:
install ( IOException => /* error-handling code */ )
type IOExceptionType: JavaExceptionType
Subtypes
JavaExceptionType
type JavaExceptionType: string { .stackTrace: string }
XmlUtils
Inclusion code:
| Service Deployment | |||
|---|---|---|---|
| Port Name | Location | Protocol | Interfaces |
| XmlUtils documentation: | |||
| XmlUtils | - | - | XmlUtilsInterface |
List of Available Interfaces
XmlUtilsInterface
Interface documentation:
| Operation Name | Input Type | Output Type | Faults |
|---|---|---|---|
| xmlToValue | XMLToValueRequest | undefined | IOException( IOExceptionType ) |
| transform | XMLTransformationRequest | string | TransformerException( JavaExceptionType ) |
| valueToXml | ValueToXmlRequest | string | IOException( IOExceptionType ) IllegalArgumentException( string ) |
Operation Description
xmlToValue
Operation documentation: Transforms the base value in XML format (data types string, raw) into a Jolie value
The XML root node will be discarded, the rest gets converted recursively
Invocation template:
xmlToValue@XmlUtils( request )( response )
Request type
Type: XMLToValueRequest
type XMLToValueRequest: any {
.options?: void {
.skipMixedText?: bool
.charset?: string
.includeAttributes?: bool
.schemaLanguage?: string
.includeRoot?: bool
.schemaUrl?: string
}
.isXmlStore?: bool
}
XMLToValueRequest : any
options : voidskipMixedText : boolcharset : stringincludeAttributes : boolschemaLanguage : stringincludeRoot : boolschemaUrl : string
isXmlStore : bool
Response type
Type: undefined
undefined : any
Possible faults thrown
Fault IOException with type IOExceptionType
Fault-handling install template:
install ( IOException => /* error-handling code */ )
type IOExceptionType: JavaExceptionType
transform
Operation documentation:
Invocation template:
transform@XmlUtils( request )( response )
Request type
Type: XMLTransformationRequest
type XMLTransformationRequest: void {
.source: string
.xslt: string
}
XMLTransformationRequest : void
source : stringxslt : string
Response type
Type: string
string : string
Possible faults thrown
Fault TransformerException with type JavaExceptionType
Fault-handling install template:
install ( TransformerException => /* error-handling code */ )
type JavaExceptionType: string {
.stackTrace: string
}
valueToXml
Operation documentation: Transforms the value contained within the root node into an xml string.
The base value of ValueToXmlRequest.root will be discarded, the rest gets converted recursively
Invocation template:
valueToXml@XmlUtils( request )( response )
Request type
Type: ValueToXmlRequest
type ValueToXmlRequest: void {
.omitXmlDeclaration?: bool
.indent?: bool
.plain?: bool
.root: undefined
.rootNodeName?: string
.isXmlStore?: bool
.applySchema?: void {
.schema: string
.doctypeSystem?: string
.encoding?: string
}
}
ValueToXmlRequest : void
omitXmlDeclaration : boolindent : boolplain : boolroot : anyrootNodeName : stringisXmlStore : boolapplySchema : voidschema : stringdoctypeSystem : stringencoding : string
Response type
Type: string
string : string
Possible faults thrown
Fault IOException with type IOExceptionType
Fault-handling install template:
install ( IOException => /* error-handling code */ )
type IOExceptionType: JavaExceptionType
Fault IllegalArgumentException with type string
Fault-handling install template:
install ( IllegalArgumentException => /* error-handling code */ )
Subtypes
JavaExceptionType
type JavaExceptionType: string { .stackTrace: string }
XMPP
Inclusion code:
| Service Deployment | |||
|---|---|---|---|
| Port Name | Location | Protocol | Interfaces |
| XMPP documentation: | |||
| XMPP | - | - | XMPPInterface |
List of Available Interfaces
XMPPInterface
Interface documentation:
| Operation Name | Input Type | Output Type | Faults |
|---|---|---|---|
| sendMessage | SendMessageRequest | void | XMPPException( undefined ) |
| connect | ConnectionRequest | void | XMPPException( undefined ) |
Operation Description
sendMessage
Operation documentation:
Invocation template:
sendMessage@XMPP( request )( response )
Request type
Type: SendMessageRequest
type SendMessageRequest: string {
.to: string
}
SendMessageRequest : string
to : string
Response type
Type: void
void : void
Possible faults thrown
Fault XMPPException with type undefined
Fault-handling install template:
install ( XMPPException => /* error-handling code */ )
connect
Operation documentation:
Invocation template:
connect@XMPP( request )( response )
Request type
Type: ConnectionRequest
type ConnectionRequest: void {
.password: string
.port?: int
.resource?: string
.host?: string
.serviceName: string
.username: string
}
ConnectionRequest : void
password : stringport : intresource : stringhost : stringserviceName : stringusername : string
Response type
Type: void
void : void
Possible faults thrown
Fault XMPPException with type undefined
Fault-handling install template:
install ( XMPPException => /* error-handling code */ )
ZipUtils
Inclusion code:
| Service Deployment | |||
|---|---|---|---|
| Port Name | Location | Protocol | Interfaces |
| ZipUtils documentation: | |||
| ZipUtils | - | - | ZipUtilsInterface |
List of Available Interfaces
ZipUtilsInterface
Interface documentation:
| Operation Name | Input Type | Output Type | Faults |
|---|---|---|---|
| zip | ZipRequest | raw | IOException( IOExceptionType ) |
| IOException | undefined | undefined | |
| unzip | UnzipRequest | UnzipResponse | FileNotFound( undefined ) |
| readEntry | ReadEntryRequest | any | IOException( IOExceptionType ) |
| listEntries | ListEntriesRequest | ListEntriesResponse | IOException( IOExceptionType ) |
Operation Description
zip
Operation documentation:
Invocation template:
zip@ZipUtils( request )( response )
Request type
Type: ZipRequest
type ZipRequest: undefined
ZipRequest : void
Response type
Type: raw
raw : raw
Possible faults thrown
Fault IOException with type IOExceptionType
Fault-handling install template:
install ( IOException => /* error-handling code */ )
type IOExceptionType: JavaExceptionType
IOException
Operation documentation:
Invocation template:
IOException@ZipUtils( request )( response )
Request type
Type: undefined
undefined : any
Response type
Type: undefined
undefined : any
unzip
Operation documentation:
Invocation template:
unzip@ZipUtils( request )( response )
Request type
Type: UnzipRequest
type UnzipRequest: void {
.filename: string
.targetPath: string
}
UnzipRequest : void
filename : stringtargetPath : string
Response type
Type: UnzipResponse
type UnzipResponse: void {
.entry*: string
}
UnzipResponse : void
entry : string
Possible faults thrown
Fault FileNotFound with type undefined
Fault-handling install template:
install ( FileNotFound => /* error-handling code */ )
readEntry
Operation documentation:
Invocation template:
readEntry@ZipUtils( request )( response )
Request type
Type: ReadEntryRequest
type ReadEntryRequest: void {
.entry: string
.filename?: string
.archive?: raw
}
ReadEntryRequest : void
entry : stringfilename : stringarchive : raw
Response type
Type: any
any : any
Possible faults thrown
Fault IOException with type IOExceptionType
Fault-handling install template:
install ( IOException => /* error-handling code */ )
type IOExceptionType: JavaExceptionType
listEntries
Operation documentation:
Invocation template:
listEntries@ZipUtils( request )( response )
Request type
Type: ListEntriesRequest
type ListEntriesRequest: void {
.filename?: string
.archive?: raw
}
ListEntriesRequest : void
filename : stringarchive : raw
Response type
Type: ListEntriesResponse
type ListEntriesResponse: void {
.entry*: string
}
ListEntriesResponse : void
entry : string
Possible faults thrown
Fault IOException with type IOExceptionType
Fault-handling install template:
install ( IOException => /* error-handling code */ )
type IOExceptionType: JavaExceptionType
Subtypes
JavaExceptionType
type JavaExceptionType: string { .stackTrace: string }
Understanding errors
This section is devoted to explain some errors that can be raised by the interpreter which could be difficult to understand due to the service oriented model used by Jolie:
- If execution is not single, the body of main must be either an input choice or a sequence that starts with an input statement (request-response or one-way) :
In Jolie a service may have different execution modalities:
concurrent,sequential, andsingle. If no execution modality is specified,singleis used by default, meaning that the service is going to be executed once (this is suitable for one-shot programs like scripts). If the execution modality is set toconcurrentorsequential, the service will start to listen for requests to be served. In this last case, the behaviour defined within scopemainmust either be aninput choice or a sequence of statements that starts with an input primitive. An input primitive can be a request-response or a one-way input. In all other cases, the engine will raise the errorIf execution is not single, the body of main must be either an input choice or a sequence that starts with an input statement (request-response or one-way). So if you get this error, check yourmaindefinition and verify that it consists of either an input choice or a sequence that starts with an input statement.
Glossary
This document defines the key elements of the service-oriented programming paradigm.
This terminology is used in the Jolie website and documentation.
Operation
A functionality exposed by a service.
Interface
A machine-readable and -checkable declaration of a set of operations, which defines an API. An interface acts as the contract between a service and its clients.
Ports
Ports are endpoints used for sending and receiving messages. There are two kind of ports:
- input ports are used for receiving messages;
- and output ports are used for sending messages.
A port includes at least three elements:
- the location at which the port is deployed, e.g., an IP address;
- the transport protocol used for communications through the port;
- the interface that the port makes accessible.
Surface
The resulting interface offered by an inputPort, intended as the sum of all the available interfaces at the given port.
Connection
We say that an output port is connected to an input port when it is meant that messages sent through the former will reach the latter.
This typically happens when the output port has the same location and protocol as the target input port, but network or container configurations might alter this. As such, knowing the connections in a system requires looking both at the definitions of the involved ports and how they are deployed in the system.
Service (or microservice)
A service is a running software application that supplies APIs in the form of operations available at its input ports. It communicates with other services by message passing.
Service definition
The code that, when executed, implements a service. When clear from the context, we simply use the word service interchangeably.
Conversation
A conversation is a series of related message exchanges between two or more services.
During a conversation between a client and a service, the set of available operations offered by the service to the client might change over time (e.g., after successfully logging in the client might gain access to more operations).
A service is always willing to serve requests for its available API.
Behaviour
The definition of some communication and/or computation logic to be executed at runtime for implementing a service's API.
Process
A running instance of a behaviour, equipped with its own private state and message queues.
Service dependency
When a service A has an output port that needs to be connected to another service B in order for the service A to function, we say that service A depends on service B.

Service network
A group of services and their connections.
Networks are always connected, in the sense that there is always a path from one service to another, possibly through many connections.
Networks might have private locations: locations that are visible only to the services in the network.
The nature of a private location depends on the implementation, e.g., shared-memory channels, local sockets, virtual networks.
Networks can be composed into bigger networks.
Network boundary
Given a service network, we call its boundary the set of:
- the input ports exposed by the services in the network that can be reached from outside of the network;
- the output ports that the services inside of the network require to be connected to services outside of the network.
Cell (or Multi service)
A group of service networks in execution.
Cell boundary
The union of all the network boundaries of the cell.
Cell overlay
A group of cells and the connections among the ports in their cell boundaries.
Reference Index
This reference index is still under construction. If you spot something missing, please consider contributing!
Basic Data Types
bool: booleans;int: integers;long: long integers (withLorlsuffix);double: double-precision float (decimal literals);string: strings;raw: byte arrays;void: the empty type.
Go to section: Handling Simple Data
Tree operators
<<: deep copy. Go to section: Copying an entire tree structure->: alias. Go to section: Structure aliases
Boolean operators
==: is equal to;!=: is not equal to;<: is lower than;<=: is lower than or equal to;>: is higher than;>=: is higher than or equal to;!: negation.
See also conditions and conditional statement.
Behavioural operators
;: sequence. Go to section: Sequence|: parallel. Go to section: Parallel
Statements
^: "freezing" operator. Go to section: Termination and Compensation[..]{..}: input choice. Go to section: Input Choiceaggregates: aggregation statement. Go to section: AggregationcH: handler placeholder. Go to section: Termination and Compensationcomp(): compensation statement. Go to section: Termination and Compensationconstants: constants definition. Go to section: Constantscourier: courier process definition. Go to section: Courierscset: cset definition. Go to section: Sessionscsets: csets assignment. Go to section: Sessionsdefault: fault name alias. Go to section: Scopes and Faultsdefine: procedure definition. Go to section: Defineembedded: embedding statement. Go to section: Embeddingexecution: single | concurrent | sequential: execution modality. Go to section: Processesfor(){}: deterministic loop. Go to section: for and whileforeach(:){}: traversing items. Go to section: foreachforward: forward statement. Go to section: Couriersglobal: global variables. Go to section: Processesif (..) {..} else {..}: conditional statement. Go to section: Conditions and conditional statementimport .. from .. [as ..]:init{}: init scope. Go to section: Processes and SessionsinputPort: input port statement. Go to section: Portsinstanceof: variable type checking. Go to section: Handle Simple Datainterface: interface definition. Go to section: Interfacesinterface extender: interface extension. Go to section: Couriersinterfaces: port interfaces. Go to section: Interfacesinstall(): handler installation. Go to section: Scopes and Faultslocation: port location. Go to section: Locationsmain {}: main scope. Go to section: Processesnew: generation of a fresh token. Go to section: SessionsOneWay: one way operation definition. Go to section: InterfacesoutputPort: output port statement. Go to section: Portsprotocol: port protocol. Go to section: Protocolprovide [] until []: provide until statement. Go to section: Sessionsredirects: redirection statement. Go to section: RedirectionRequestResponse: request response operation definition. Go to section: Interfacesservice: service definition or internal service definition. Go to section: Internal Servicesscope(){}: scope definition. Go to section: Scopes and Faultssynchronized(){}: variables synchronization. Go to section: Processesspawn( .. over .. ) in .. {}: spawn primitive definition. Go to section: Dynamic Parallelthis: termination handler reference. Go to section: Termination and Compensationthrow(){}: fault raising. Go to section: Scopes and Faultsthrows: fault raising declaration. Go to section: Interfacestype: type definition. Go to section: Data Typesundef(): remove a variable. Go to section: Undefwhile(){}: conditional loop. Go to section: for and whilewith: interface extender operator. Go to section: Courierswith(:){}: shortcut to repetitive variable paths. Go to section: with
Tools and related projects
jolie2surface: surface generation tool. Go to section: jolie2surfacejolie2java: java client generation tool. Go to section: Java Client/jolie2javajocker: docker integration container. Go to section: Docker/Jockerjolier: running a jolie service as a REST service. Go to section: Rest Services/jolierjolie2openapi: it generates an openapi 2.0 definition starting from a jolie interface. Go to section: Rest Services/jolie2openapiopenapi2jolie: it generates a jolie client starting from an openapi 2.0 definition. Go to section: Rest Services/openapi2joliejolie2wsdl: it generates a wsdl definition starting from an jolie input port. Go to section: jolie2wsdlwsdl2jolie: it generates a jolie interface starting from a web service wsdl definition. Go to section: wsdl2joliejoliedoc: it automatically generates documentation for a service. Go to section: Documenting APIjolietraceviewer: it runs a trace viewer which allows for navigating the traces generated by argument--trace filefrom jolie command line. Go to section: Debuggingjoliemock: it generates a mock service starting from an input port. Go to section: Mock Service
Contributing to this documentation
This GitBook is linked to the GitHub repository at https://github.com/jolie/docs.
The first step to update or create contents in the Jolie documentation is to fork the documentation repository.
Then, you can either update or create some content in your fork and, once done, you can issue a pull request to include your contribution in the official Jolie documentation.
Please check also the details in the rest of this page, below.
File structure
The location of the files follows the structure reported by the mdBook. For example, the page Compositing Statements is under path /web/language-tools-and-standard-library/basics/composing-statements/README.md/README.md.
Linking pages
It's advised to link pages using absolute links of the kind https://jolielang.gitbook.io/docs/your/page#and_anchor
Updating existing pages
To modify an existing page, it is sufficient to modify the related .md file.
In case you want to include new images in a page, we usually use (or create, in case it is missing) a dedicated sub-folder called img within the specific first-level sub-folder. For instance, if you want to add an image in a page under the documentation/basics sub-folder, you can create the img folder, save the image in it, and link it from the interested document.
We follow a similar structure also for archives (.zip) that contain comprehensive, runnable code examples, which are stored under the dedicated code folder.
Creating new pages
When creating a new page, please follow the guidelines above and make sure to:
- create the page as a new
.mdfile, under one of the existing first-level sub-folders (or create a new one, if necessary);
- update the summary to show the link to the newly created page. This is done by editing the SUMMARY.md file, present in the root of the repository.